


1.Too tight Bicycles have become lighter and lighter, and the fault-tolerant rate of installation is getting lower and lower. Excessive torque will cause slippage of the chainring, twisting of the handlebars, and serious breakage during cycling. For many novices, some torque values seem very low, especially most of the control components. But in fact, these parts don’t need so much torque! The brake lever is a good example. The torque required to install the brake lever is usually only 4 Nm, which looks a bit weak, but it is enough to prevent the brake lever from turning up and down. Moreover, the lower torque can ensure that in the event of uncontrollable events such as crashes, rotation, and absorption of energy occur to avoid damage to accessories. Although you need to readjust after this, it is better than seeing a broken brake. Don’t forget to use a torque wrench, trust the recommended torque value when installing any components! 2. Spend too much/too little on accessories Of course, we can’t tell you how to spend your money, so if you have a large budget, just spend it. However, for those who have to plan carefully, some upgrades will appear to be much more. Those fancy/expensive carbon fiber handlebars may not enhance your riding experience. However, relatively inexpensive components like tires can have a big impact on your handling and average speed. 3. Do not bring spares, tools, etc. Your mountain bike can take you to some amazing places, which means that it is necessary to bring spare supplies and portable tools, at least to ensure that you can come back from deep in the mountains. Such as inner tubes, tire sticks, portable tools, and pumps are undoubtedly essential items! But if you plan to go further, or the riding environment is worse, then we have some suggestions worthy of reference. Such as a pair of brake pads, a pair of magic buckles. 4. Tire pressure is too high Too high air pressure is a mistake that almost everyone has made, especially those stubborn novices. Although too high air pressure will not cause snake bites, it will greatly reduce tire grip and reduce comfort. These two points should be avoided! We recommend starting from around 30psi and increasing or decreasing the tire pressure a little. Generally speaking, you will choose a slightly lower tire pressure to get the best grip and comfort, while excessive reduction may lead to snake bites. I know some truths are unclear, if you don’t believe it, please try and make mistakes yourself! Certain experiences should really make you try. 5. Like spray lubricants such as WD-40 If you want to clean disc brakes, choose a special cleaner like Muc Off. If you have to use a lubricant like WD40, don’t lose the slender plastic tube, it can lubricate the parts you need more accurately.
1. Cyclists are the strongest people. When cycling on the road, they don’t know when they will fall, but they are always ready to get up after falling. 2. Cyclists are the ones who enjoy life the most. They usually ride their beloved bicycles to the West Lake to enjoy the wind of East Lake, as if there is nothing more important than living in the world. 3. Cyclists are the most energetic and passionate people. They can pick up a map and ride their beloved bicycle just because of a simple dream as if there is no place in the world they can’t reach. 4. Cyclists are the most motivated people. They will never be satisfied with the configuration of their own bicycles at home and start to save money and buy new equipment for themselves. 5. Cyclists are the most romantic people. At their wedding ceremony, there are no luxury cars, only two long rows of bicycles swagger through the street, but they give you happiness that no one can compare. 6. The cyclist is the one who loves home most. After your child is born, he will teach your child to ride a bicycle. On weekends, he will take the three of you, mother and son, on a bike ride out for a picnic. 7. Cyclists are the most politically promising. There is a cowboy in the United States. He used to ride a horse and had nothing to do. Later, he switched to riding a bicycle and became the president of the United States. 8. Cyclists are the people with the most sense of humor. You can see the person who wrote this post. 9. Cyclists are the people who are most prepared for danger. They know that they are a disadvantaged group on the road, so they must take protective measures before riding a bicycle and never rush to the road with motor vehicles. 10. Cyclists are the most attentive people. If there is something wrong with their car, they will find it out. Likewise, if their beloved girl is in a bad mood, they will definitely find ways to make her happy. 11. Cyclists are the most passionate people. When they see the same cyclists on the road, they will definitely wave their hands and face them with a smile. 12. Cyclists are the most optimistic people. If they encounter any troubles, as long as they ride to the West Lake to blow the air, all troubles will disappear, and then they will say to themselves: There is no hurdle in this world that cannot be crossed.
1. Bicycle is one of the best tools to overcome heart function problems. More than half of the people in the world die of heart disease. The exercise of leg muscles when riding a bicycle can help lower limb venous blood return, increase the pressure difference between the entrance and exit of the capillary network, promote blood return, and promote blood return. In fact, it also strengthens the microvascular tissue, which is called “collateral circulation.” Strengthening the blood vessels can keep you from the threat of age and stay young forever. 2. Habitual cycling exercise can strengthen your heart. Otherwise, the blood vessels are getting thinner and the heart function is getting weaker and weaker. In old age, you will experience the troubles it brings, and then you will discover how perfect cycling is. Cycling is a sport that requires a lot of oxygen. There was once an elderly person who completed a 460km bicycle trip in 6 days. He said: “Older people must exercise at least 3 times a week to strengthen the heart and restore normal function. You must make the heartbeat fiercely, but not for too long. A good heart allows you to adapt to emergencies, such as driving or resisting. Dilemma.” 3. Cycling can also prevent high blood pressure, which is sometimes more effective than drugs. It can also prevent weight gain, hardening of blood vessels, and strengthen bones. Bicycles eliminate the need for drugs to maintain your health and are harmless. 4. Bicycle is a tool for weight loss According to statistics, a person weighing 75 kilograms, riding 100 kilometers at a speed of 20 kilometers per hour, can reduce their weight by half a kilogram, but they must be consistent every day. 5. Cycling can not only lose weight but also make your figure more symmetrical and charming. People who use exercise to lose weight, or those who exercise while dieting, are in better shape and more attractive than those who only rely on diet to lose weight. I don’t know how to describe “more charming”, but in fact, people with strong muscles and small ankles trained by cycling are always better-looking than people with haggard and bulging veins. Right! Proper exercise can secrete a hormone, which makes you cheerful and happy. From experience, we know that cycling can produce this hormone.
A cyclist who wants to succeed must not only make his cycling posture very aerodynamic but also improve his pedaling efficiency. In addition, pedaling symmetry is also something that cyclists need to pay attention to. In addition to affecting our cycling efficiency, pedaling symmetry may also affect our physical health. Cycling is not a sport with very demanding technical requirements, but this does not mean that cycling technology is not important. Mastering the correct gear ratio, maintaining an efficient pedaling rhythm, and reducing the physical consumption of cycling are the basic skills that all cyclists who want to ride farther and faster must master. If you want to get good results in the time trial, you have to learn how to make your posture more in line with the requirements of aerodynamics and minimize the resistance to forward. Anyway, although the above is very important, there are some details that we can not ignore, that is the stamping itself. As far as the essence of pedaling is concerned, the most perfect pedaling is to draw a circle. Through the combination of locking pedals and locking shoes, the trajectory of your muscles and joints has been determined by the height of the seat cushion, the position of the hip joint, and the position of the foot. As long as your cranks are equal in length on both sides, then Your pedaling dynamics are symmetrical. However, if you look at each stepping from a biomechanical point of view, the truth is not as good as you think. Everyone’s pedaling action on the bicycle is not necessarily completely symmetrical. Simply put, your left leg may use more force than your right leg. This will lead to two results: you may feel tired prematurely during long-distance cycling (in fact, you can ride farther! JAY note), and secondly, different pedaling power output will make your body lose balance, Brings a higher chance of injury. How unbalanced? The difference in strength between the left leg and the right leg can be very large in the pedaling special study. In a set of research data, six rigorously trained male athletes used SRM power meters to simulate a 40-kilometer time trial to test the pedaling strength of their left and right legs. The experimental results show that the power on the left and right sides is not balanced, with an average difference of 13%-17%. In the final stage of the simulated time trial, all the drivers increased their cadence. At this time, the difference between the left and right feet was reduced. However, the dominant foot of each driver still dominates. Unbalanced power can lead to overuse and increase the chance of injury In another study of pedaling asymmetry, scientists conducted a biomechanical study of pedaling on 11 professional cyclists who often train for long and long-distance cycling. The average age of these cyclists is 53 years old, they have a wealth of cycling experience (the annual cycling distance is between 4,500 kilometers and 14,000 kilometers), and they think they have very good cycling skills. In addition, they have no continuity before participating in the research. Or realize that they may have a biomechanical asymmetry of the pedaling. These cyclists carried out an 18-minute ride test on a bicycle equipped with an SRM power meter. At the same time, they used a TACX power meter cycling platform and adjusted it to the best geometry according to the cyclist’s body. In the test, the pedaling force exerted on the left and right cranks of each tester can be recorded corresponding to the power output data. In this way, the pedaling force applied by each tester at each point in the pedaling process can be understood. Significance of improving pedaling symmetry The asymmetry of pedaling, apart from the increased risk of injury, the imbalance between the left and right legs will cause the body to feel fatigued prematurely. The stronger leg will compensate for the weaker leg with greater force. Maintaining power output is a less efficient way. In view of this result, it is of great significance for qualified drivers to test their pedaling biomechanics, improve pedaling efficiency and reduce the chance of injury. How to check the symmetry of leg strength Don’t “feel” symmetrical and just think it’s a balanced force. The feeling is generally inaccurate. You need accurate measurement and look at the data to analyze whether your left and right output power are balanced and smooth. Use accurate, power meters with left and right output tests, such as SRM, for accurate measurement. How to improve the symmetry of the legs If your left and right legs have a very obvious asymmetric pedaling output, then you need to carry out special strength training for the weak side to improve your pedaling symmetry, thereby increasing the pedaling efficiency. Lunge squats and side lunges are both very good methods. Through certain training, the output power difference of the legs is gradually reduced, and the symmetry of the output on both sides can be improved. Of course, it is also a good method to use a power meter on the cycling platform to perform pedaling force balance training on both sides (the power meter is required to test the output torque of the two legs separately). Your pedaling goal is to minimize the difference in output power between the left and right feet. This, like strength training, can effectively improve your pedaling imbalance.
As mountain bikes are often cycling o rugged and uneven roads, requiring athletes to master certain mountain bike cross-country skills in order to deal with them safely. The following are some summaries of some practical mountain bike cross-country skills, quickly collect them. First, When the road is inclined On sloping road sections and steep slopes towards the edge of a cliff, if you use brakes or make large movements of movement control, the tires may lose their grip and slip off the edge of the road. 1. To make a turn, use a side-tilted body to replace a leaning bicycle. The greater the inclination of the road is like the greater the curvature, the force is the same, and then you know that your tires will be sticky like glue and slide out. 2. Avoid accelerating on the sloping down path. Before arriving, keep a certain speed and slide across the road. If you have to apply a little more force to pass, please apply the force gently and smoothly. 3. Put all the weight of the body on the pedal under the slope, the wheel stick can hold the road well. 4. Choose the middle route and avoid squeezing to the top of the slope. Second, When the road is a rocky area 1. Be prepared to change the route at any time and look at the front of the stone before the front wheel, so as to avoid the front wheel being left aside. If it suddenly pops out of the original route, keep your sight on the originally planned route. , Pedal as smoothly as possible so that you can bounce back to the originally planned route at any time. 2. At low speeds, the up and down vibration caused by the road surface and the suspension system will consume a lot of kinetic energy. If you hit a big rock at a speed similar to walking, it will cause you to stop moving, so you must maintain a certain speed, Stabilize the upper body. 3. If the front wheel is blocked, try to keep pedaling. Usually, this will allow the bicycle to move back a little bit, which will give you the opportunity to choose the path beside you to continue riding and don’t look back. 4. Increase the pedaling position by one gear so that when obstacles are encountered, the rear wheels can be prevented from slipping. 5. Choose a good route early and choose the least bad one. When hitting a rock, try to keep the wheel perpendicular to it. 6. If you want to pass a rocky area on a downhill section, avoid using the brakes as much as possible. The best way is to pass the entire area by sliding. 7. If the brakes must be used, the front and rear brakes must be used at the same time, and when the rock is small and the control is relatively stable, when encountering a large rock or running out of the planned route, the brake must be released. Third. Get into a rift 1. Deliberately ride in small and parallel groove ruts to practice, and get used to the balance of the bike. 2. Keep the front wheel in a rolling state, look at the front intently, relax your body, and allow the wheel to move sideways when it suddenly enters the grooved rut. 3. Before running over a large groove rut, try to stretch out one foot. If the curve of the groove is on your right, stretch out your right foot, and vice versa. Keep your posture, lean slightly backward, and use more rear brakes than usual. If you overuse the front brakes, you will not be able to control chaotic grooves. 4. If you lose your balance, don’t forget to tap with your extended foot. Just make sure that one foot is kept on the pedal and you will pass the bumpy road safely and unharmed. Fourth. Sand riding 1. Follow the trajectory of other mountain bike riders and let the tires ride into the straight rut path that has been crushed to cross the sand. When keeping the tires in the rut, pedal as smoothly as possible, and gently hold the handlebars so that the entire control follows the rut trajectory. 2. Use body movements to avoid oversteer of the handlebar. Excessive steering will cause the front wheels to get stuck in the sand. 3. Keep your hips gently on the seat cushion, keep your body’s center of gravity between the two tires, look directly at the end of the sand, use the low gear to move forward, but use the middle front tooth disc, which can have a longer time The powerful stampede. 4. Every time you turn the pedal, keep straight down. Between the strong pedaling pulse, make good use of the dead point of pedaling to bounce your body up to help the tires go up and reduce the unevenness on the sand. Fifth. Climbing a steep slope 1. When approaching a slope, use a small front chainring and a rear gear that is two levels higher than the gear you want to complete the slope. When the kinetic energy is exhausted, downshift earlier. 2. Maintain a sitting position. When you reach the steepest road, move your hips forward to sit at the forefront of the cushion, and tilt your upper body forward so that the front wheels can grasp the ground and have proper control (the body should not be too forward, which will cause the rear wheel to slip), and do not stand up. 3. If the rear wheel slips a little, don’t stop, simply tilt the upper body slightly away from the slope to ballast the rear wheel and continue pedaling. 4. When reaching the apex, most climbers will lean forward due to their bodies. When they cross the top edge, the rear wheels will slip. They should lean back slightly to keep the rear wheels biting the ground.
Numb hands may ruin your cycling career. Because of the numbness, the bicycle will lack control during the cycling process, causing unexpected danger. A common type of hand numbness is cyclist palsy, which is what we usually call grip numbness. It is caused by compression of the ulnar nerve or the median nerve of the hand. Knowing the reason, let’s set out to solve the grip palsy. 1. Where is the handheld on the handlebar The ulnar nerve enters the palm from the wrist and is located near the little finger and ring finger. When held in the upper position, it will be placed on the ulnar nerve. If enough pressure is applied to the nerve, it will make your ring finger and little finger numb. The median nerve that enters the hand passes through the wrist from the ulnar nerve and the root of the thumb. With too much pressure you will feel numbness in your index and middle fingers, which may be accompanied by numbness in the ulna. 2. Resolve numbness of the grip Make sure your hands are natural when touching the handlebars. Any movement of over-extension of the wrist will directly compress the hand nerves and cause numbness. Pay attention to properly relaxing your hands on the handlebars, and keep your nerves as open as possible. Change the position of your hands on the handlebars during cycling. On a road bike with a handlebar, if you feel your hands are numb, changing the position will reduce the pressure on the base of your palm. Because of the position of the handlebar, it may be a little difficult to do this on a flat handlebar. If you have been cycling a flat-handle bike, you will often have symptoms of hand numbness. It is recommended that you add a pair of vices. Remember the correct grip position. It is not correct to hold it perpendicular to the ground. You should face the direction of the bicycle and relax your wrists naturally. Wearing gloves can also help relieve the symptoms of hand paralysis, or you can wrap the strap a few more times. It is best to use gloves with gel pads. Try putting on gloves first to make sure it is the right size. Too loose gloves will cause blisters, while too tight gloves will aggravate the symptoms of numbness, some oversized pads will also focus on the palm of the hand, causing numbness Moving the seat down and back can also reduce the pressure on the hand. (Imagine the position of the seat of a lady’s bicycle. It is theoretically feasible.) If you really want to do this, be aware that changes in the height of the seat will change the cycling posture, which will lead to changes in other parts of the body. Therefore, if you want to use this method to relieve hand numbness, you must proceed step by step. If the above solutions do not work, you should find a professional technician to do bike fitting to adjust your position. In addition, you may want to find a professional neurologist to help you see what is causing your paralysis. They can help you stay away from the numbness. 3.nervous system Understand that the nervous system will cause numbness in the handgrip, so you can prescribe the right medicine and adjust your posture in a targeted manner. These simple corrections are very effective and simple. If the problem cannot be cured, it is recommended to do a comprehensive professional inspection, so that you can truly control your cycling and stay away from paralysis. Reminder: Try to put the weight on the periphery of the palm instead of the center of the palm.
The Cycling mountain bike has always been a game for the brave. It is common to see cyclists shouting “Don't counsel, just do it!” to encourage novices to take risks. The result is “Crash-Fracture-Sell the bicycle-Retreat” Are the ideas that have been passed down in the Cycling mountain bike circle right? Today we will break them one by one! Rumor 1: Self-study is the best-learn through practice The cycling mountain bike is a sport that requires skill, just like tennis, golf, and skiing. Specifically, many technical actions of mountain bikes have right and wrong methods. Most people rely on their own groping to practice skills. They think that the so-called riding skills are what they like and feel good. These people think that only rookies need guidance. The problem is that many experienced drivers are wrong because what they taught themselves from the beginning is wrong. In fact, the more mature the development of Cycling mountain bikes, the more attention is paid to the cultivation of basic riding skills. Rookie cyclists can greatly improve their riding skills by receiving instruction and teaching, and mountain bike coaching has become a viable profession. . Can you imagine self-taught tennis, swimming, or golf? You may be a genius, or you may be lucky, but it is very possible you did it wrong in the first place, and if so, you will spend three times the time to correct it. Therefore, whether it is through group lessons, one-on-one guidance, or through friends, or even instructional videos and books, the results will be very different. One obvious aspect is that if the cyclist knows how to properly control the bicycle, he can avoid some unavoidable crashes, skin bruises, and fractures. The difficulties of Cycling mountain bikes include steep lanes, unfriendly rocks, out-of-control ruts, annoying tree roots, and the biggest enemy corners. If you use the wrong technique or lose concentration, any of these factors may slap the cyclist on the ground and rub. The cycling mountain bike is not a dangerous sport in itself. Wrong riding skills and risky behaviors that blindly challenge beyond one’s own level are the most dangerous. Don’t think about “going to ride” and it’s OK. Gradual procedures and mastering the correct riding skills are king. Rumor 2: This is not a problem with the Mountain bike, but a problem with the cyclist. Only those who are very proficient in cycling would say this. It may also be people who hate high-tech and don’t want to spend money on upgrading equipment, cycling their seriously outdated mountain bikes, and persuading themselves not to change equipment (except for retro-feeling players). The updated iteration speed of mountain bikes is much faster than that of road bikes and commuter bikes. The top mountain bikes ten years ago will also appear out of date today, and even difficult to complete today’s difficult races. But for most mountain bikers, mountain bikes play a very critical role in cycling fun, performance, and safety. Let the same cyclist ride on a $300 bicycle and a $1200 bicycle, the cycling experience is definitely different. On a $1,200 mountain bike, the cyclist will be faster, safer, and ride happier. Of course, when the price and performance reach the optimal point, the income will diminish. But before that, every dollar spent would be a big gain. But after that, no amount of money may only improve performance by 10%. The development of many things follows this law of diminishing marginal returns. Compared with a mountain bike of USD 500, a mountain bike of 5,000 dollars has a huge performance improvement; however, when comparing mountain bikes of $5,000 and $6,000, ordinary people will probably not experience much difference in cycling. By the same token, if you buy a 15-year-old full-suspension bike and a brand new full-suspension bike worth $3,000 at the same price, the same cyclist will have a better ride on the new full-suspension bike Line experience. A cycling mountain bike is a dynamic and evolving knowledge. In the past ten years, bicycle design has made great progress. In addition, many different types of mountain bikes have now evolved into different cycling methods, and different cycling types have very different feelings. Does the cyclist also matter? Of course, we believe that the cyclist is still the main part of the overall performance. But we must not ignore the important role of the bicycle itself in this sport, and its ability to make the cyclist feel comfortable, safe, and constantly improving. Rumor 3: Only downhill players need to wear knee pads and protective gear Most people don’t wear knee pads because they are bulky and feel that the crash is far away from them. But the problem is that only God knows when and where to fall during an unknown, dangerous ride. When the terrain and friction are constantly changing, and ground debris and obstacles interfere with the control, the crash is uninvited. Accidental crashes are not a problem of chance but a problem of frequency. It always happens. Never use your body to make an impossible gamble. Another unknown factor is that most crashes occur on simple and familiar routes, usually due to the cyclist’s inattention. As the so-called “ship overturned in the gutter”, routes that are too familiar often make cyclists feel self-righteous and lose concentration. Any rut or curve may cause a crash, and sometimes it may be a serious crash because the cyclist is completely unprepared and will be pressed hard on the ground and rubbed, rubbed, rubbed… The good news is that technology has kept up with the pace of Cycling mountain bikes, and now there are many types of knee pads and protective gear. The most exciting thing is that Lindau and XC cyclists can use lighter protective gear. In riding especially when climbing hills, knee pads are the best choice. In the event of a crash, the protective gear can protect your knees intact. It’s a beautiful day without injury, right? Rumor 4: Those who use the lifting seat tube are novices who can’t use the downward tilting technique Similarly, this misconception is also preached by old stubborn people who think they have perfected their riding skills 20 years ago. This is another example of refusing to learn new things after getting used to old technical ideas and riding habits. They often say, “I never lower the Seatpost post during a ride. What use do I want this iron rod for?” Lowering the seat bag during steep descents is only a small part of the advantages of the lifting seat tube. In addition, the lifting seat tube can effectively prevent the cyclist’s center of gravity from tilting forward, but the role of the lifting seat tube is much more than that. Because the lifting seat tube also plays an important role in turning. Lowering the height of the seat tube allows the cyclist to move the center of gravity freely. This is a very important riding technique. Instantly lower the center of gravity to get an extra grip to quickly corner. The body is like an energy ball, at the critical moment to achieve the integration of people and bicycles: when going down a steep slope, the center of gravity is moved backward and pressed on the rear wheels to prevent the handle from falling off, and when climbing a steep slope, the center of gravity is tilted forward to prevent heads. When you turn on a gravel road without traction, stand up, and ride, then you will find that a lower seat will reduce bumps and increase traction. These techniques are possible because of the lifting seat tube. When the seat bag can be raised and lowered freely, cycling will be easier, safer, and more effective. If you are not after a performance or aggressive riding style, you can also consider the safety brought by the lower lift seat tube. This is safer, allows people to learn and progress better, and accept more challenging terrain. Rumor 5. After graduation from the Rookie stage, you need to upgrade to lock pedal Cycling with a locking pedal is easy for those master cyclists, but it is a huge burden for beginners and intermediate cyclists. Novices should first use flat pedals to learn pedaling. When they have enough experience and confidence, they can switch to locked pedaling. But is it really so? Is it necessary to be a master to be locked? On the contrary, if cyclists want to participate in high-level XC or endurance races, they can choose to lock pedals. In cross-country races and long endurance races, mountain bikes using lock pedals are much faster, because the combination of lock pedals and lock shoes is lighter and harder, and the feet are always kept in the best pedaling position, unlike Flat pedaling wastes time looking for the best pedaling position. Sprinting with locked pedals is also an advantage because the cyclist can increase pedaling efficiency and focus on using more leg muscles to sprint to keep a safe pedaling without losing the foot. However, there are many problems with the locked pedals, including the possibility of injury during the process of learning to use the locked pedals; the separation of people and bicycle when it is too late to unlock at a dangerous moment; and having to wear the locked pedals to climb mountains or enter the restaurant is very uncomfortable. Regardless of the competitive environment, ordinary people, especially mountain biker cyclists who are committed to mountain bike technical action practice, can choose flat pedals or lock pedals according to their needs. It makes sense to choose the appropriate equipment when appropriate. The good news is that now cyclists are free to choose whether they are learning to ride or master. Rumor 6. You should learn how to cycle a hardtail mountain bike correctly Hardtail mountain bikes are great for beginners, not only because there are many cheap models to choose from, but they also have a good “price/weight ratio”, but the scope of application of hardtail mountain bikes on fierce racetracks is really good. Limited, over-range use will make your cycling painful or even crash. However, it is nonsense to preach that all beginners should use a hardtail to learn the correct cycling technique. This is equivalent to saying that a person should learn to drive on the track with a truck in order to learn correct cycling skills. At least one thing is true: the cyclist will find the correct lane trajectory in the face of a huge impact. But it also has many mistakes, and the same reasoning applies to learning how to use a hard fork, rim brake, or single-speed mountain bike. This suggestion is terrible. Using inappropriate equipment to learn cycling skills will only slow down the learning speed and increase cycling risk factors. cyclists cannot quickly cycle on challenging terrain, making mistakes can cause crashes and even injuries. The ideal model is a full-suspension mountain bike with 120mm front and rear suspension travel. Equipped with a lifting seat tube will make the learning process more efficient. Of course, full-suspension mountain bikes are not cheap and not everyone can afford them. Choose a hardtail mountain bike you can afford to equip with a widened cross-country tire (2.8 or even wider) and a lift seat tube. This method is very good. Rumor 7. this is all market hype and nonsense Many great mountain bike innovations, suspension, disc brakes, seat tube, 1x transmission, and tubeless tire system have been considered by many to be marketing hype, including the evolution of the 26, 27.5, and 29 wheel diameters are also “conspiracy theories” “We commented on the depot’s means of collecting money. These have really improved the cyclist’s experience and ability in the actual riding process. But I also understand the criticisms about the incompatibility brought by the ever-changing hub specifications and BB standards. So, what rumors have you heard about Cycling mountain bikes? What detours have you taken? May wish to leave a message to share your experience!
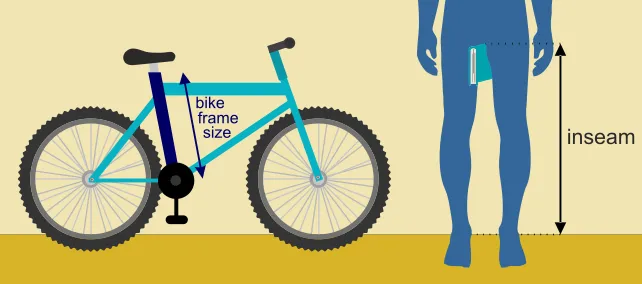
Learn how to take your own measurements - use a measuring tape and a level to accurately measure the various components of your bike. When it comes to mountain biking, finding the right frame size for your body is essential. To ensure you get a bike that fits perfectly and offers you the best riding experience possible, it's important to take accurate measurements of your body and compare them with a mountain bike frame sizing chart. This article will provide step by step instructions on how to measure a mountain bike frame. First, you'll need to measure your height and inseam length. To measure your height, stand straight with your back against a wall and use a measuring tape or ruler to measure from the top of your head down to the floor. For the inseam measurement, stand up straight and have someone help you measure from your crotch to the floor. Make sure to record both measurements in inches. Next, you'll need to measure your mountain bike frame size. To do this, you'll use a measuring tape and a level, as well as the height and inseam measurements you recorded earlier. Start by measuring the top tube length of the frame, which is the distance between the seat tube and head tube. Then measure the seat tube length, which runs from the bottom bracket to the top of the seat tube. Finally, measure the standover height, which is the measurement from where your crotch rests on top of the frame when standing over it with feet apart. Once you have all of your measurements, you can compare them to a mountain bike frame sizing chart. This will help you determine what size frame is best for your body type and riding style. It's important to note that every brand has their own sizing charts so make sure to consult the appropriate chart for your specific bike. Taking these measurements can seem intimidating at first, but with practice and a few helpful tips it can become second nature. This article has provided an overview of how to measure a mountain bike frame and how to compare your measurements to the appropriate sizing chart. With accurate measurements, you'll be well on your way to finding the perfect fit for your next mountain biking adventure.Good luck!

99% of cyclists have experienced a puncture halfway through. Especially in the long-distance bicycle cycling, the tire puncture problem is encountered in a place where is the middle of nowhere It is conceivable to feel depressed. Long-distance cycling experience, let me sum up some experience. It’s best not to ride alone, you must bring a spare tire when you start, and you must master some tire repair skills and bring tire repair tools. There is no spare tire, no repair tools, no companions, and there is a tire blowout problem in a wilderness. At that time, I can only pray to meet passer to save you. At the same time, I also summed up some experience in preventing tire blowouts during cycling. First, you can cut the unnecessary inner tube broken belly pad between the inner and outer tires, cut off the discarded inner tube air nozzle, and then cut it from the inner ring along with the tire. Note that it is not shear the tire! The principle is that use the old tires pack new tires to increase the thickness of our tires, which can increase the strength of the tires! After cutting it, wrap the old tire on the new tire and put it in again, wrapping all the parts in contact with the ground. Second, clean the tires in time, and check whether iron nails, glass slag, and other debris are stuck on the tires. Because if this debris remains on the tire, it will cause continuous tire bursts. Third, you can avoid the glass slag on the road. If you can’t avoid it, press it over, don’t pinch the brake. Fourth, the tires must be fully inflated, but not too full. If you have an air cylinder with a barometer, please hit it close to the air pressure number marked on the tire. If there is no barometer, feel it with your fingers. Generally speaking, road bikes have to be hit until the tires cannot be pinched completely with fingers. The mountain bike can be squeezed until it is hit, but it is very, very hard. The benefits of high tire pressure are obvious. The tires are hard, many sharp stones, broken glass and the like will be bounced away after being hit, and cannot be inserted. Greatly reduces the chance of being pierced.


