


Choosing the best quality bike wheels is crucial for enhancing your ride experience.
1. Know Your Riding Style
First, identify your primary riding style. Are you into road biking, mountain biking, or gravel riding? Road bike wheels prioritize speed and aerodynamics, while mountain bike wheels are built for durability and handling rough terrain.
2. Material Matters
Wheels come in various materials, with aluminum and carbon fiber being the most common. Aluminum wheels are sturdy and affordable, ideal for beginners. Carbon fiber wheels offer superior performance and weight savings but come at a higher price.
3. Wheel Size
Ensure you choose the correct wheel size compatible with your bike. Common sizes include 26", 27.5" (650B), and 29" for mountain bikes, and 700c for road bikes.
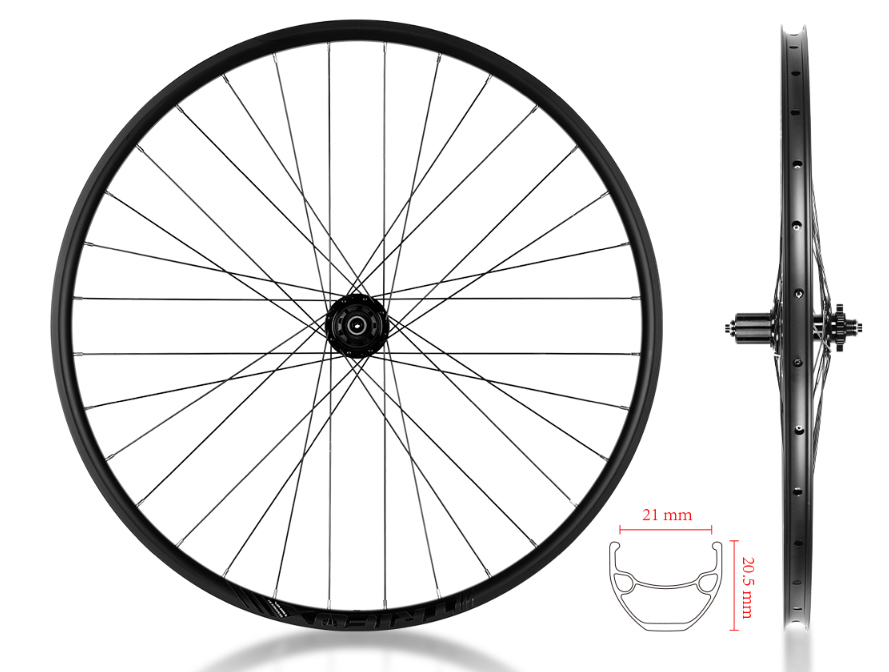
4. Rim Width
Wider rims provide better stability and can accommodate wider tires, enhancing traction and comfort, especially for off-road riding.
5. Spoke Count
More spokes generally mean stronger wheels. For rugged terrain, opt for wheels with 32-36 spokes. For road cycling, fewer spokes (20-24) can reduce weight and improve aerodynamics.
6. Hub Quality
Invest in quality hubs for smooth rotation and longevity. Look for sealed bearings to protect against dirt and moisture.
7. Budget Considerations
Set a budget before shopping. While high-end wheels offer exceptional performance, there are excellent mid-range options that provide good value for money.

By considering these factors, you can select the best quality bike wheels tailored to your specific needs, ensuring a smoother, more enjoyable ride.


Maintaining your bike tires is essential for a smooth and safe ride. Whether you're a seasoned cyclist or a weekend warrior, knowing how to change and maintain your bike tires can save you time, money, and frustration.
Changing Your Bicycle Tire
Step 1: Remove the Wheel
1. Release the Brakes: Open the brake lever to free the wheel.
2. Loosen the Axle Nuts or Quick Release: Use a wrench or release lever to detach the wheel from the frame.
Step 2: Remove the Old Tire
1. Deflate the Tire: Let out any remaining air.
2. Use Tire Levers: Insert tire levers under the bead of the tire and pry it off the rim.
Step 3: Install the New Tire
1. Check for Debris: Inspect the rim and tire for any debris or sharp objects.
2. Insert the Tube: Slightly inflate the new tube and place it inside the tire.
3. Mount the Tire:Start at one side and work the tire onto the rim using your hands or tire levers.
Step 4: Inflate the Tire
1. Check the Pressure: Inflate the tire to the recommended pressure indicated on the sidewall.
2. Reattach the Wheel: Secure the wheel back onto the frame and close the brake lever.
Maintaining Your Bicycle Tire
Regular Inspection
1. Check for Wear and Tear: Regularly inspect your tires for signs of wear, such as cracks, cuts, or bald spots.
2. Inspect Tread Depth: Ensure the tread depth is adequate for good traction.
Proper Inflation
1. Monitor Tire Pressure: Check tire pressure before each ride. Under-inflated tires can cause poor handling and increased wear.
2. Use a Quality Pump: Invest in a reliable pump with a built-in pressure gauge for accurate readings.
Cleaning and Storage
1. Keep Tires Clean: Wipe down your tires after rides to remove dirt and debris.
2. Proper Storage: Store your bike in a cool, dry place away from direct sunlight to prevent tire degradation.
Rotating Your Tires
To ensure even wear, consider rotating your tires every few months, especially if you notice uneven tread wear. Swap the front and rear tires, as the rear tire typically wears out faster due to the additional weight and force.
Dealing with Flats
1. Patch Kits: Carry a patch kit and a mini pump on your rides to fix flats on the go.
2. Spare Tubes: Always have a spare tube in case of a major puncture.
Advanced Maintenance Tips
1. Use Tire Sealant: For tubeless tires, use sealant to prevent flats.
2. Align Your Wheels: Make sure your wheels are properly aligned to avoid uneven tire wear.
3. Check Spokes and Rim: Regularly inspect spokes and rims for damage that could affect tire performance.
By following these steps, you'll ensure your bike tires provide a smooth and reliable ride. Regular maintenance not only extends the life of your tires but also enhances your overall cycling experience. Happy riding!

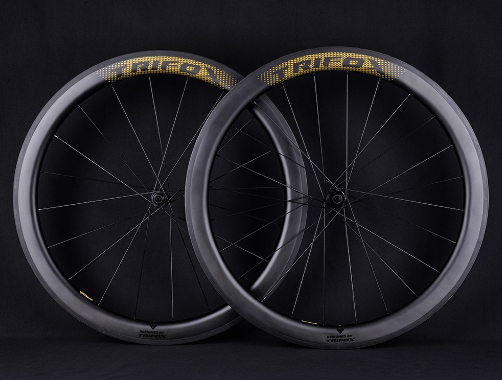
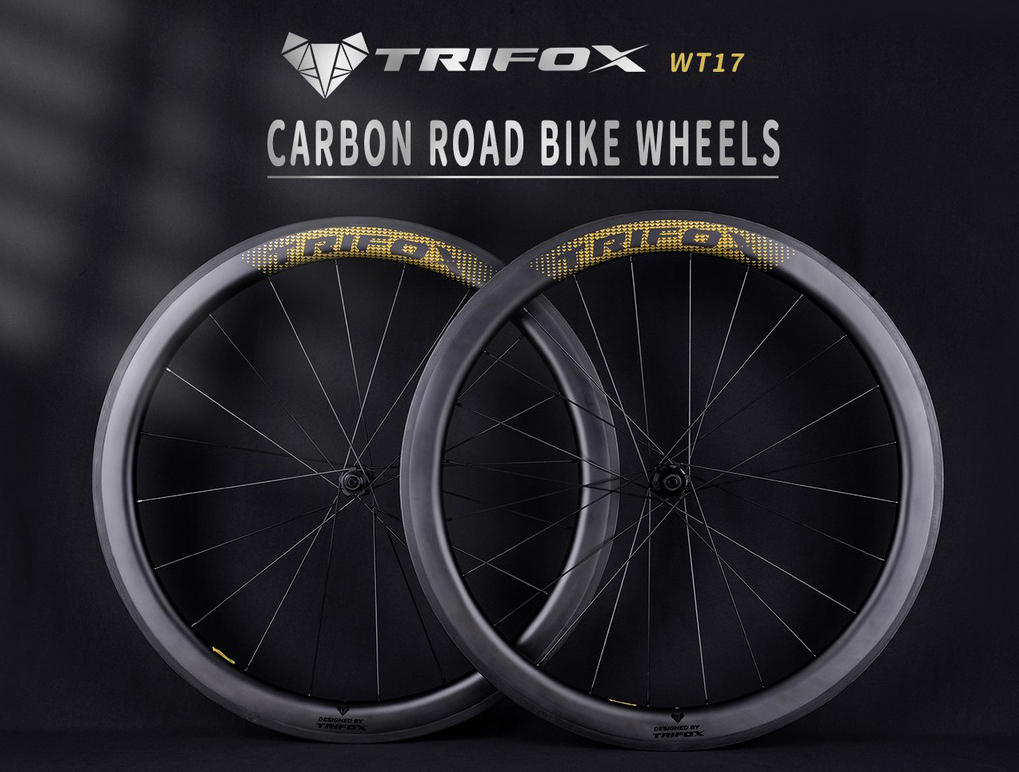
Choosing the right carbon wheels for your road bike is a decision that can significantly enhance your cycling experience. Carbon wheels offer a blend of performance, weight savings, and durability that can make them an excellent upgrade for many riders.
Choosing the Right Carbon Wheels
When selecting carbon wheels, consider the following factors to ensure you choose the right set for your needs:
1. Riding Style
Your riding style plays a crucial role in determining the best carbon wheels for you:
Climbing: If you frequently tackle steep climbs, opt for lightweight carbon wheels designed for quick acceleration and easy climbing.Time Trials and Triathlons: For these disciplines, deep-section aerodynamic wheels can reduce drag and enhance speed;General Road Riding: A versatile set of carbon wheels with moderate depth can provide a balance between weight savings and aerodynamic benefits.
2. Wheel Depth
Carbon wheels come in varying depths:
Shallow (25-35mm): Ideal for climbing and general use, offering good performance in crosswinds;Mid-depth (40-50mm): Provide a balance of aerodynamics and weight, suitable for most riding conditions;Deep (60mm+): Best for flat, fast rides and time trials where aerodynamics is key
3. Brake Type
Consider whether your bike uses rim brakes or disc brakes:
Rim Brakes: Ensure the carbon wheels are compatible with rim brake systems. Look for wheels with a high-quality braking surface for consistent performance;Disc Brakes: If your bike has disc brakes, select carbon wheels designed specifically for disc brake use, which often feature reinforced hubs and spokes.
4. Brand and Reviews
Researching reputable brands and reading customer reviews can provide insight into the quality and performance of different carbon wheels. TrifoxBike, for instance, offers a range of high-quality carbon wheels backed by positive customer feedback and robust support.
Installing Carbon Wheels
Once you’ve chosen the perfect set of carbon wheels, proper installation is key to ensuring safety and optimal performance. Follow these steps to install your new carbon wheels:
Tools You’ll Need
Hex wrench set、Torque wrench、Tire levers、Pump、Carbon assembly paste (if necessary)
Installation Process
Step 1: Remove Old Wheels
Secure Your Bike: Use a bike stand or flip your bike upside down on a stable surface;Release Brakes: Open the brake quick release lever to create space for wheel removal;Remove Wheels: Use the appropriate hex wrench to loosen the axle nuts or quick-release skewer. Carefully remove the old wheels from the frame.
Step 2: Prepare New Wheels
Inspect New Wheels: Check the new carbon wheels for any visible damage or defects;Install Tubes and Tires: Mount the tires onto the new wheels using tire levers. Inflate the tires to the recommended pressure.
Step 3: Install Carbon Wheels
Position Wheels: Place the new wheels into the dropouts on the frame. Ensure they are centered and aligned correctly;Tighten Axle Nuts/Skewers: Secure the wheels using the appropriate hex wrench or by tightening the quick-release skewer. Use a torque wrench to apply the manufacturer-recommended torque settings to avoid over-tightening;Adjust Brakes: Re-engage the brake quick release lever and adjust the brake pads to align with the braking surface of the new wheels.
Step 4: Final Checks
Test Alignment: Spin the wheels to check for any wobbling or misalignment. Adjust as necessary;Test Ride: Take the bike for a short test ride, paying attention to braking performance and any unusual noises.
Conclusion
Choosing and installing carbon wheels can elevate your cycling performance and enjoyment. By considering your riding style, wheel depth, brake type, and budget, you can find the perfect set of carbon wheels to meet your needs. Proper installation ensures safety and maximizes the benefits of your new wheels. Ready to upgrade? Check out the Trifox carbon fiber wheels for a range of high-quality options suited to every rider.
Disc wheels are popular among cyclists for their aerodynamic advantages and improved braking performance. Whether you're a seasoned rider or a cycling enthusiast looking to upgrade, understanding how to install and maintain a disc wheel is essential for optimal performance and longevity.
Why Choose a Disc Wheel?
Before diving into the technical details, it’s worth highlighting why disc wheels are a favored choice:
Aerodynamics: The solid design reduces air drag, making them ideal for time trials and triathlons;Stability: Disc wheels offer greater stability in crosswinds;Braking Performance: When paired with disc brakes, they provide consistent braking in various weather conditions.
Tools and Materials Needed
Disc Wheel: Ensure it's compatible with your bike;Allen Wrench Set: For tightening bolts;Torque Wrench: For precise tightening;Grease: To prevent seizing and ensure smooth operation;Bike Stand: Optional but helpful for stability during installation;Rags and Cleaning Supplies: For maintenance.
Step-by-Step Installation Guide
Step 1: Prepare Your Work Area
Find a clean, flat surface to work on and gather all necessary tools and materials. A bike stand can make the process easier by keeping your bike stable.
Step 2: Remove the Old Wheel
Release the Brakes: If you have rim brakes, release them to free the wheel. For disc brakes, this step isn’t necessary;Loosen the Axle: Use an Allen wrench to loosen the axle bolts or quick-release skewer;Remove the Wheel: Carefully pull the wheel out of the dropouts.
Step 3: Install the Disc Rotor (if not pre-installed)
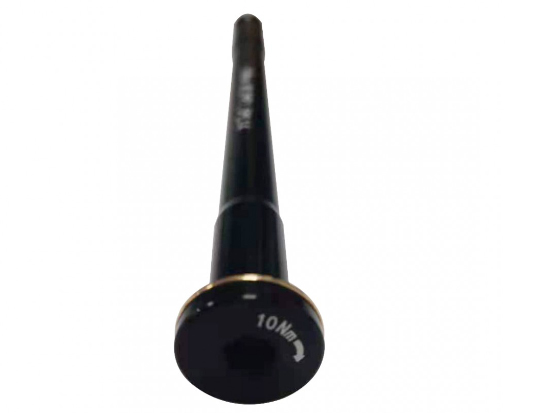
Attach the Rotor: Align the rotor holes with the wheel hub;Insert Bolts: Thread the bolts through the rotor holes and into the hub;Tighten Bolts: Use a torque wrench to tighten the bolts to the manufacturer’s specifications, typically around 6 Nm (Newton meters).
Step 4: Install the Disc Wheel
Align the Axle: Position the disc wheel so that the axle aligns with the dropouts;Insert the Wheel: Gently slide the wheel into the dropouts, ensuring the rotor fits between the brake pads without rubbing;Secure the Axle: Tighten the axle bolts or quick-release skewer using an Allen wrench or your hands. Use a torque wrench for precise tightening if specified by the manufacturer.
Step 5: Adjust the Brakes
Check Alignment: Spin the wheel to ensure the rotor doesn’t rub against the brake pads. If it does, adjust the caliper alignment;Align Caliper: Loosen the caliper mounting bolts, squeeze the brake lever, and retighten the bolts to center the caliper over the rotor.
Maintenance Tips for Disc Wheels
Regular Cleaning
Wipe Down the Wheel: Use a damp cloth to clean the wheel surface and remove dirt and grime;Clean the Rotor: Use isopropyl alcohol and a clean rag to wipe down the rotor, ensuring no contaminants affect braking performance.
Inspect for Damage
Check for Cracks: Regularly inspect the disc wheel for any signs of cracks or structural damage;Examine the Rotor: Look for warping or excessive wear on the rotor. Replace it if necessary.
Lubrication
Lubricate the Axle: Apply a small amount of grease to the axle to prevent seizing and ensure smooth operation;Avoid Rotor Contamination: Be careful not to get any lubricant on the rotor or brake pads, as this can severely impact braking performance.
Brake Pad Replacement
Monitor Pad Wear: Check the brake pads regularly and replace them when they become too thin;Bed-In New Pads: Follow the manufacturer's instructions to bed-in new brake pads, ensuring optimal braking performance.

Conclusion
Installing and maintaining a disc wheel on your bike can significantly enhance your riding experience, offering improved aerodynamics and braking performance. By following this guide, you can ensure a smooth installation and keep your disc wheel in top condition. Regular maintenance will not only extend the life of your wheel but also contribute to safer and more enjoyable rides. Happy cycling!
Choosing the best high-end aluminum wheels for your bike is a critical decision that can significantly impact your ride's performance, comfort, and durability. High-end aluminum wheels offer a balance of strength, weight savings, and cost-effectiveness, making them a popular choice among cyclists. Here’s how to select the perfect set for your needs.
1. Understand Your Riding Style
Before diving into specifics, consider your primary riding style:
Mountain Biking: If you frequently tackle rough terrains and trails, you'll need robust wheels that can withstand heavy impacts and provide excellent traction;Road Cycling: For road cycling, lightweight wheels with low rolling resistance are essential for speed and efficiency;Commuting: Durability and reliability are key for daily commuting, as you’ll need wheels that can handle varied conditions and frequent use.
2. Evaluate Wheel Specifications
When looking at high-end aluminum wheels, pay attention to the following specifications:
Rim Width and Depth: Wider rims offer better stability and can accommodate a range of tire sizes, while deeper rims improve aerodynamics;Spoke Count: More spokes generally mean stronger wheels, which is crucial for mountain biking or heavier riders;Hub Quality: High-quality hubs, like those found in Trifox mountain bike wheels, ensure smooth rotation and long-term reliability.
3. Check Material and Construction
High-end aluminum wheels are typically made from advanced alloys that offer a great balance of weight and strength. Look for wheels with features such as reinforced spoke holes and welded seams for added durability and performance.
4. Seek Expert Reviews and Recommendations
Consulting expert reviews and recommendations can provide valuable insights into the performance and reliability of specific wheel models. Many cycling forums and review sites offer detailed assessments from experienced riders.
5. Consider Price and Warranty
High-end aluminum wheels can be a significant investment, so consider your budget carefully. Look for brands that offer a good warranty, as this can protect you against manufacturing defects and give you peace of mind.
6. Test Ride if Possible
If you have the opportunity, test ride a bike with the wheels you're considering. This firsthand experience can help you feel the difference in performance and ensure the wheels meet your expectations.

Conclusion
Selecting the best high-end aluminum wheels for your bike involves understanding your riding style, evaluating key specifications, checking material and construction quality, seeking expert opinions, considering price and warranty, and ideally, test riding.
For top-notch options, explore the Trifox mountain bike wheels, known for their durability and performance. With the right wheels, you can enhance your cycling experience and enjoy smoother, more efficient rides.
Selecting the right tire width for your climbing bike can make a significant difference in your performance, comfort, and overall riding experience. Whether you're tackling steep ascents or long, winding hill rides, choosing the optimal tire width is crucial. Here’s a guide to help you make an informed decision.
1. Understand Tire Width Basics
Tire width affects various aspects of your ride, including rolling resistance, traction, and comfort. Narrower tires generally offer lower rolling resistance, making them faster on smooth surfaces. Wider tires provide better traction and comfort, especially on rough terrain. The key is to strike a balance that suits your climbing needs.
2. Consider Your Terrain
The type of terrain you typically ride on plays a significant role in determining the optimal tire width.
Smooth Pavement: If most of your climbs are on well-paved roads, narrower tires (23-25mm) might be ideal. They reduce rolling resistance, making it easier to sustain higher speeds;Mixed Surfaces: For climbs that include both pavement and rougher sections, slightly wider tires (25-28mm) can offer a good balance. They provide enough grip and comfort without sacrificing too much speed;Gravel or Rough Terrain: If your climbs often take you off-road, opt for even wider tires (28-32mm). These tires will provide the necessary traction and cushioning to handle uneven surfaces effectively.
3. Assess Your Riding Style
Your personal riding style also influences the choice of tire width.
Speed-Oriented Climbers: If you prioritize speed and efficiency, narrower tires may be more suitable. They help you maintain a brisk pace, especially on smooth climbs;Comfort-Focused Riders: If you value a more comfortable and stable ride, particularly on longer climbs, wider tires are better. They absorb more road vibrations and provide a smoother ride.
4. Factor in Bike Compatibility
Ensure that your bike frame and rims can accommodate your chosen tire width. Check the manufacturer's specifications for the maximum tire width your bike can handle. Using tires that are too wide for your frame can lead to clearance issues and potentially damage your bike.
5. Experiment and Adjust
Ultimately, finding the optimal tire width might require some experimentation. Start with a width recommended for your typical terrain and riding style. Pay attention to how your bike handles and feels during climbs. Don’t hesitate to make adjustments if necessary.

Conclusion
Choosing the optimal tire width for your climbing bike is a balance between rolling resistance, traction, comfort, and compatibility. By considering the terrain, your riding style, and bike specifications, you can find the perfect tire width to enhance your climbing performance and enjoyment. Happy climbing!

Choosing the right trail mountain bike is crucial for maximizing your outdoor adventures. With the vast array of options available, it can be challenging to determine what features and components are essential for your specific needs.
Understanding the Types of Mountain Bikes
Before diving into specifics, it's important to understand the different types of mountain bikes available:
Full Suspension Mountain Bikes
Full suspension bikes feature both front and rear shock absorbers, offering a smoother ride over rough terrain. They provide better control and comfort, especially on downhill trails or rugged paths with numerous obstacles.
Hardtail Mountain Bikes
Hardtail bikes have a front suspension fork but no rear suspension, making them lighter and more efficient on smooth trails and climbs. They are often preferred for cross-country riding due to their simplicity and lower maintenance requirements.
Customizable Options
Some manufacturers, like Trifox, offer customizable mountain bike options. This allows you to tailor your bike to your exact specifications, choosing each component to suit your style and riding preferences.
Key Components to Consider
When selecting a 29-inch trail mountain bike, pay close attention to the following components:
Bike Frames
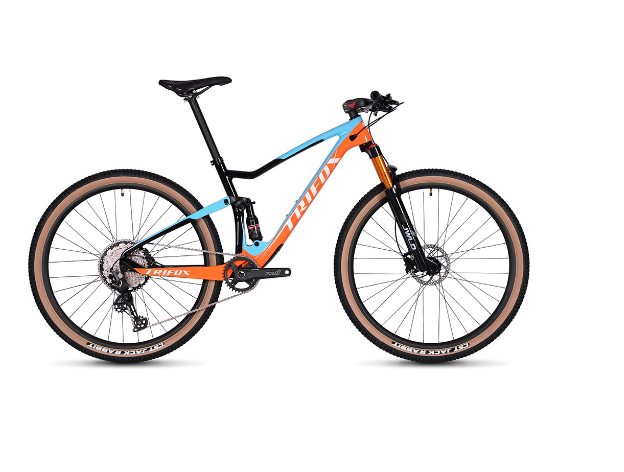
The frame is the backbone of your bike, determining its overall strength, weight, and ride quality. Carbon fiber frames, such as those available from Trifox, are popular for their lightweight yet durable construction. Models like the Pioneer and M2 provide excellent performance and reliability.
Wheels and Tires
Wheels and tires significantly impact your ride's comfort and handling. Look for 29-inch wheels with tubeless-ready tires for improved traction and reduced risk of punctures. The larger wheel size helps roll over obstacles more easily, providing a smoother ride.
Suspension Forks
A high-quality suspension fork is essential for absorbing shocks and bumps on the trail. Adjustable forks allow you to fine-tune the suspension based on the terrain you're riding, ensuring optimal performance.
Handlebars and Stems
Handlebars and stems affect your bike's handling and comfort. Wider handlebars provide better control, while adjustable stems allow you to customize your riding position for maximum comfort.
Seatposts and Saddles
A comfortable saddle and adjustable seatpost are crucial for long rides. Dropper seatposts are a popular choice for trail riding, enabling quick height adjustments on the fly.
Drivetrain and Brakes
Choose a drivetrain that offers a wide range of gears to handle various terrains. Reliable hydraulic disc brakes are a must for consistent stopping power in all conditions.
Essential Accessories
To enhance your biking experience, consider these accessories:
Computer Mounts and Bottle Cages
A computer mount allows you to track your ride data, while bottle cages ensure you stay hydrated on long journeys.
Seatpost Clamps and Handlebar Grips
Secure your seatpost with a reliable clamp and improve your grip with comfortable handlebar grips or tape.
Bike Pedals
Choose pedals that match your riding style. Clipless pedals offer better power transfer, while platform pedals provide more freedom of movement.
Bundles and Deals
Many brands, including Trifox, offer bundle deals that combine essential components at a discounted price. Bundles like Frameset & Wheelset or Frameset & Handlebar can provide significant savings while ensuring compatibility and performance.
Shop with Confidence
When purchasing your new mountain bike, consider the following benefits offered by reputable retailers like Trifox:
Conclusion
Choosing the perfect 29-inch trail mountain bike involves understanding your needs, selecting the right components, and considering additional accessories to enhance your riding experience. By carefully evaluating your options and taking advantage of bundles and deals, you can find a bike that meets your requirements and provides endless hours of adventure on the trails.
For a wide range of high-quality mountain bikes and components, visit Trifox and explore their extensive collection today.

Building a custom mountain bike (MTB) is an exciting venture for any cycling enthusiast. It allows you the freedom to select components that match your specific riding style, preferences, and terrain needs. One critical, yet often overlooked, aspect of this process is determining the correct spoke length for your MTB wheels. The right spoke length is vital for wheel strength, performance, and reliability.
Understanding the Importance of Correct Spoke Length
Spokes are the thin metal rods connecting the wheel's hub to the rim. Their tension keeps the wheel true (straight and round), affecting the bike's handling, responsiveness, and ability to withstand impacts. Too long or too short spokes can lead to weak wheels, prone to deformation or failure — a risk no rider should take, especially on challenging mountain trails.
Step 1: Gather Your Components and Specifications
Before you begin calculations, ensure you have all the necessary information about your wheel components. You'll need:
ERD (Effective Rim Diameter): This is the diameter of the rim where the spokes make contact, not the outer diameter. Manufacturers often list this measurement, but it can also be measured directly if you have the rim.
Hub Dimensions: Specifically, you'll need to know the flange diameter (the circle diameter that the spoke holes make), center-to-left flange distance, and center-to-right flange distance.
Number of Spokes and Lacing Pattern: Decide how many spokes your wheel will have (commonly 32 or 36 for MTB wheels) and your lacing pattern (e.g., 3-cross, 4-cross).
Step 2: Understand the Basic Spoke Length Formula
The spoke length can be calculated using a mathematical formula that considers the rim's ERD, hub dimensions, number of spokes, and lacing pattern. While the formula might seem daunting at first, there are many online calculators available to simplify the process. Essentially, the calculation accounts for the geometric relationship between these components to determine the correct spoke length.
Step 3: Use an Online Calculator
For most builders, using an online spoke length calculator is the easiest and most accurate method. Websites like ProWheelBuilder.com or the DT Swiss Spoke Calculator allow you to input your components’ specifications, and the calculator does the work for you. These tools consider the intricacies of different lacing patterns and provide the spoke length down to the millimeter.
Step 4: Consider Spoke Stretch and Tension
While calculators offer precise measurements, real-world factors such as spoke stretch under tension can affect the final wheel build. Experienced wheel builders might subtract a small length (usually around 1mm) from the calculated figure to account for this stretch. This step requires some experience and knowledge about the specific spokes being used.
Step 5: Ordering Spokes and Building the Wheel
Once you have your spoke length determined, you're ready to order your spokes. It's advisable to order a couple extra in case of mistakes or miscalculations during the build. Then, proceed with the wheel lacing, starting by threading spokes through the hub and into the rim in your chosen lacing pattern, followed by tensioning and truing the wheel.
Additional Tips for Success
Double-Check Measurements: Always verify your measurements and calculations before ordering spokes. An error here can result in a poorly built wheel.
Consider Professional Help: If this is your first time building a wheel or if you're unsure about any step, consider seeking help from a professional wheel builder. They can offer valuable insights and ensure your custom wheels are built correctly.
Custom Tools: Some builders recommend using a spoke tension meter during the build process to ensure even tension across all spokes, which is crucial for wheel durability and performance.
Conclusion
Calculating the correct MTB wheel spoke length for a custom build might seem complicated, but it's a fundamental skill that can significantly impact your bike's performance and durability. By carefully selecting your components, accurately measuring, and utilizing online calculators, you can ensure that your custom MTB wheels are precisely tailored to your riding needs. Remember, patience and attention to detail are key in this process, and when in doubt, don’t hesitate to consult with a professional. This not only guarantees the success of your project but also enhances your overall riding experience on the trails.
Upgrading your ride with aluminum racing bike wheels is a surefire way to enhance your performance, whether you're tearing up the mountain trails or cruising on the road. The choice of wheels can significantly affect your bike's handling, speed, and overall ride quality. Aluminum has long been favored for its balance of strength, weight, and cost, making it an attractive option for many cyclists seeking performance improvements without breaking the bank.
The Importance of Wheel Upgrades
Wheels are among the most crucial components when it comes to bike upgrades. They influence your ride's efficiency, acceleration, and ability to tackle various terrains. Lightweight and durable wheels can reduce the effort needed to pedal, allowing you to go faster and further with less fatigue. This is where aluminum racing bike wheels shine, offering a perfect compromise between the responsiveness of carbon fiber and the affordability of heavier metals.
Why Choose Aluminum Racing Bike Wheels?
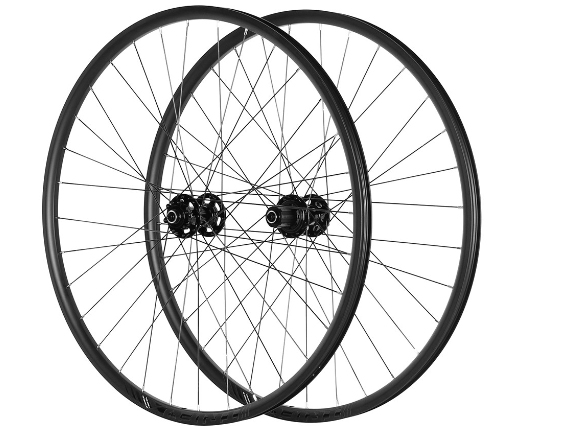
Aluminum wheels, including those available from TrifoxBike, provide several advantages. They are known for their durability and performance, especially suitable for mountain biking enthusiasts. For instance, the Alloy Mountain Bike Wheels WM823 BOOST and the Alloy Mountain Bike Wheelset WM823 from TrifoxBike are designed to withstand the rigors of off-road riding while maintaining a lightweight construction. This ensures optimal speed and agility on the trails.
Benefits of Upgrading to TrifoxBike Aluminum Wheels
High-Quality Goods: TrifoxBike prides itself on offering top-quality aluminum wheels that enhance your riding experience. Whether you're an amateur or a seasoned pro, upgrading to a set of high-performance wheels can make a noticeable difference in your ride.
Secure Payment: Security is paramount, especially when shopping online. TrifoxBike provides multiple safe payment methods, ensuring your transactions are secure.
Choosing the Right Aluminum Wheels for Your Ride
When selecting aluminum racing bike wheels, consider the following factors:
Terrain: Are you primarily riding on roads or trails? The WM823 BOOST is ideal for rugged off-road conditions, while other models might suit mixed or road-only riding better.
Riding Goals: Are you looking to improve speed, enjoy more comfortable long-distance rides, or perhaps both? Different wheelsets cater to various performance aspects.
Compatibility: Ensure the wheels you choose are compatible with your bike in terms of size and the type of brakes you use.
Budget: Determine how much you're willing to invest in an upgrade. Remember, a good set of wheels is an investment in your riding enjoyment and performance.
How to Upgrade
Upgrading to new wheels is relatively straightforward but requires some technical knowledge. If you're comfortable doing it yourself, you'll need to:
Remove your current wheels, carefully detaching the brake system and, if present, the gears.
Install the new wheels, ensuring they are securely fastened and that the brake systems are correctly reattached.
Adjust the brakes and gears as necessary to accommodate the new wheels.
If you're not confident in performing these steps, it's best to have your new wheels installed by a professional at a local bike shop. This ensures everything is set up correctly and safely.

Conclusion
Aluminum racing bike wheels offer a fantastic balance of performance, durability, and cost. Upgrading to a set from a reputable supplier like TrifoxBike can transform your cycling experience, providing faster speeds, better handling, and more enjoyable rides.
With options like the WM823 BOOST and Alloy Mountain Bike Wheelset WM823, along with benefits like quality assurance, support, and secure payment options, TrifoxBike makes it easy to elevate your ride. Whether you're a competitive racer or a weekend warrior, investing in a quality set of aluminum wheels is a decision you won't regret.
For more information on upgrading your ride with aluminum racing bike wheels, check out TrifoxBike's offerings and take the first step towards a superior cycling experience.


