


When it comes to mountain biking, the quality of your bike hub can make all the difference. The Trifox Bike Hub M827, with its 6 paw design and 72 clicks, ensures a smooth and responsive ride. Here’s a step-by-step guide on how to install and maintain this high-quality hub for optimal performance. Installation 1. Gather Your Tools: You’ll need a few basic tools such as a wrench set, grease, and a bike stand to secure your bike during installation. 2. Remove the Old Hub: If you’re replacing an existing hub, start by removing the wheel from your bike. Use your wrench to loosen the nuts or quick-release skewer. Carefully remove the old hub. 3. Prepare the New Hub: The Trifox M827 comes equipped with front and rear hubs. Make sure you have both ready along with the provided quick-release skewers. 4. Install the Front Hub: Insert the front hub into the wheel, ensuring it fits snugly. Tighten the bolts or skewer to secure it in place. 5. Install the Rear Hub: Repeat the process with the rear hub. Align it properly to ensure smooth rotation. Make sure the hub is compatible with your drivetrain, whether it’s Shimano or SRAM. 6. Reattach the Wheel: Once both hubs are in place, reattach the wheels to your bike. Tighten all bolts and check for any play or wobble. Maintenance 1. Regular Cleaning: Dirt and debris can affect the hub’s performance. Use a soft brush and mild detergent to clean the hub regularly. 2. Lubrication: To keep the 6 paw mechanism and bearings functioning smoothly, apply high-quality bike grease. This reduces friction and prevents wear. 3. Inspection: Periodically inspect the hub for any signs of wear or damage. Pay attention to the bearings and paw mechanism. 4. Adjustment: Over time, the hub may need slight adjustments. Use the provided tools to fine-tune the tightness, ensuring optimal performance. Benefits Using a high-quality hub like the Trifox M827 enhances your mountain biking experience. The 6 paw design offers quick engagement and the 72 clicks ensure precise control. Its compatibility with both Shimano and SRAM systems adds versatility. Moreover, the durable AL6061 + 7075 material guarantees longevity, allowing you to tackle rough terrains with confidence. By installing and maintaining the Trifox Bike Hub M827, you’ll enjoy smoother rides, improved responsiveness, and a reliable performance that stands the test of time. Embrace the adventure with a hub that’s built for the thrill.
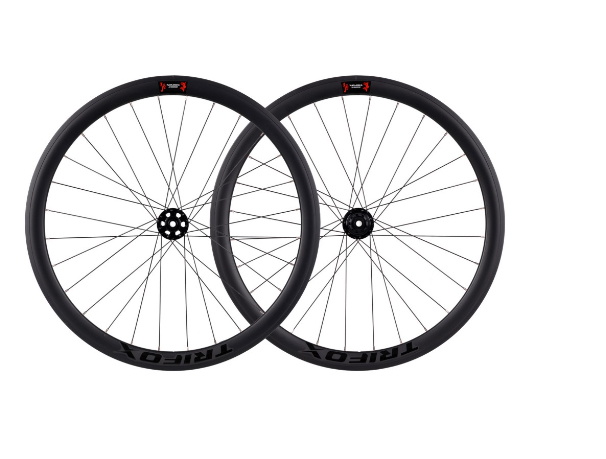
Enhancing your cycling performance can be as simple as upgrading to the right set of wheels. The Trifox 700C Alloy Disc Brake Wheelset AWT7 is a game-changer, designed to deliver speed, stability, and ultimate performance. These revolutionary road wheels are perfect for climbing, daily training, and all-road adventures, thanks to their ultralight alloy construction and 40mm rim depth. Here’s how you can optimize your cycling performance with these exceptional wheels. First, take advantage of the lightweight design. The AWT7 wheels are lighter than typical wheels, reducing the effort required for climbs and allowing for quicker acceleration. This makes them ideal for both competitive racing and daily rides. Next, focus on stability. The 40mm rim profile offers a perfect balance, providing the speed of deeper rims with the stability of shallower ones. This stability is further enhanced by the 14mm inner width, which ensures smoother rolling with less drag. Incorporate these wheels into your routine by starting with your daily training sessions. The Ultralight hubs, featuring TRIFOX’s self-developed aluminum hubs, ensure smooth and reliable rolling, helping you maintain a consistent pace without unnecessary resistance. Finally, don’t overlook the importance of maintenance. Regularly check the centerlock disc hubs and thru-axles to ensure they are secure. Keep the tires inflated to the recommended pressure (90-135 psi) to maximize performance and reduce wear. For those interested in experiencing the benefits firsthand, you can purchase the Trifox 700C Alloy Disc Brake Wheelset AWT7 at Trifoxbike. Upgrade today and revolutionize your cycling performance.
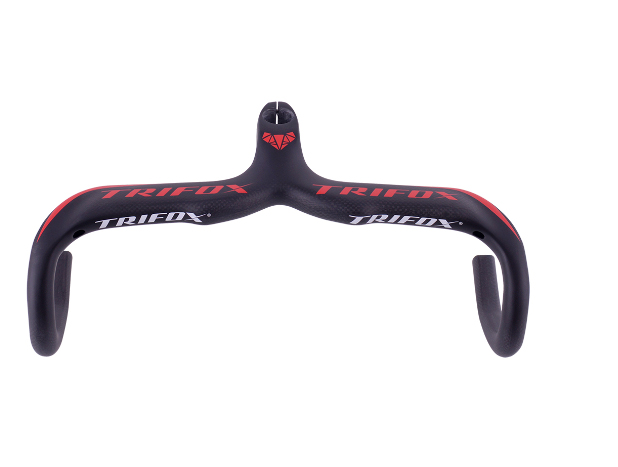
Properly installing and utilizing an integrated drop bar can significantly improve your bike’s performance and comfort. Here’s a step-by-step guide to help you get the most out of this upgrade: Choose Quality: Start with a premium product like the Trifox Integrated Carbon Drop Handlebar with Stem DHB500. This integrated design combines the handlebar and stem, offering better aerodynamics and stability. Compatibility Check: Ensure the new drop bar is compatible with your bike's fork steerer tube diameter and stem length. Remove Old Handlebars: Safely remove the existing handlebars by loosening the stem bolts and detaching brake levers, shifters, and accessories. Install the Integrated Bar: Position the integrated drop bar on the steerer tube, ensuring it’s properly aligned with the front wheel. Tighten the stem bolts evenly to achieve secure fastening. Attach Controls: Reinstall brake levers and shifters, adjusting their positions for easy reach and comfort. Securely fasten all components. Cable Management: Neatly route and secure the cables using integrated channels or zip ties. This keeps the cockpit tidy and prevents interference during rides. Handlebar Tape: Wrap the handlebars with tape to enhance grip and comfort. This also helps in absorbing road vibrations. Test Ride: Take a test ride to ensure everything feels comfortable and secure. Make any necessary adjustments to the position of the controls or the angle of the handlebars. By following these steps, you can successfully install and utilize an integrated drop bar like the Trifox Integrated Carbon Drop Handlebar with Stem DHB500. This upgrade not only enhances the aesthetics of your bike but also improves your riding efficiency and comfort.
Upgrading your bike with a 3K weave handlebar is an excellent way to enhance performance, comfort, and aesthetics. Here’s how to make the most of this upgrade: Choose Quality: Start with a high-quality option like the Trifox Carbon Integrated Handlebar RHB200. The 3K weave carbon fiber ensures superior strength and lightweight properties, reducing overall bike weight for better handling. Compatibility: Ensure the new handlebar fits your bike’s stem and fork. Check the clamp diameter to match your current setup, commonly 31.8mm or 35mm. Remove Old Handlebars: Safely remove the old handlebars by loosening the stem bolts. Carefully detach the brake levers, shifters, and any accessories. Install the New Handlebar: Position the new 3K weave handlebar on the stem, ensuring it is centered and properly aligned with the front wheel. Tighten the stem bolts evenly to avoid any imbalance. Attach Controls: Reinstall the brake levers and shifters, adjusting their positions for comfortable reach. Securely fasten all components. Cable Management: Neatly reroute and secure the cables using zip ties or integrated channels if available. This ensures a clean look and prevents interference while riding. Grip and Tape: Install new grips or wrap the handlebars with tape for added comfort and better grip. This also helps in absorbing vibrations during rides. Test and Adjust: Take a test ride to ensure everything is securely in place and feels comfortable. Make any necessary adjustments to the positioning of controls or angle of the handlebars. By following these steps, you can successfully upgrade your bike with a 3K weave handlebar like the Trifox Carbon Integrated Handlebar RHB200, enhancing both performance and aesthetics.

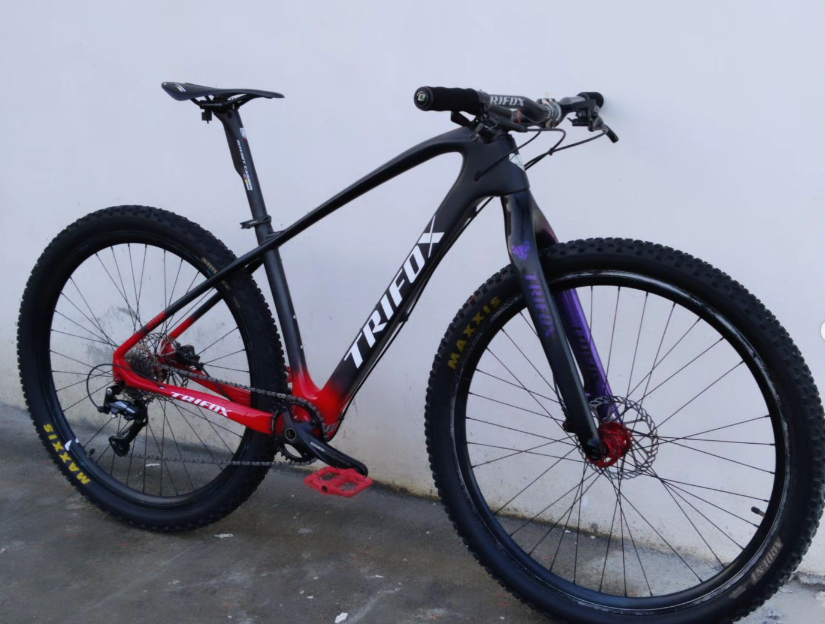
Optimizing your ride with a hardtail mountain bike can significantly enhance your trail experience, making it smoother and more efficient. Here’s how to get the most out of your ride: Choose the Right Bike: Start with a high-quality bike like the Trifox M2 Hardtail Mountain Bike. Its lightweight carbon frame ensures durability and agility on various terrains. Proper Fit: Ensuring your bike fits you well is crucial for comfort and performance. Adjust the saddle height so your legs have a slight bend at the bottom of the pedal stroke. The handlebars should allow you to maintain a slight bend in your elbows. Tire Pressure: Optimize tire pressure based on the terrain. Lower pressure improves traction on rough trails, while higher pressure reduces rolling resistance on smooth paths. Always check the manufacturer’s recommended pressure range. Suspension Setup: Fine-tune the front suspension to match your riding style and trail conditions. Proper suspension settings can absorb shocks better, providing a smoother ride. Gear Selection: Use appropriate gearing to maintain a steady cadence. Lower gears help with uphill climbs, while higher gears are better for flat or downhill sections. Maintain Your Bike: Regular maintenance is key. Clean the drivetrain, check the brake pads, and ensure all bolts are tightened. Lubricate the chain for smooth shifting. Upgrade Components: Invest in quality components like lightweight wheels, reliable brakes, and comfortable grips to enhance your bike’s performance. Riding Technique: Improve your riding skills. Keep your weight centered, look ahead to anticipate obstacles, and practice cornering techniques for better control. By following these tips and starting with a top-tier bike like the Trifox M2 Hardtail Mountain Bike, you can optimize your ride and enjoy superior performance on the trails.
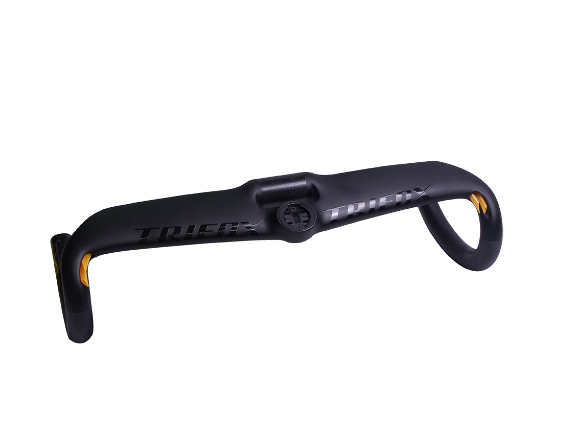
Selecting and installing the perfect bicycle drop bar can transform your riding experience, enhancing comfort, aerodynamics, and control. Here’s how to make the best choice: Material: Opt for lightweight and durable materials like carbon fiber. The Trifox Aerofoil Section Carbon Drop Handlebar TC20AF is an excellent example, offering both strength and minimal weight. Shape and Reach: Drop bars vary in shape (traditional, compact, ergo) and reach (distance from the bar to the brakes). Compact bars are great for smaller hands and provide easier access to controls. Ergo shapes offer enhanced comfort by fitting the natural curve of your hands. Width: Match the width of the drop bar to your shoulder width for optimal control. Wider bars improve stability, while narrower bars reduce wind resistance, benefiting aerodynamic performance. Drop: The drop (vertical distance between the top and bottom of the handlebars) affects your riding posture. A deeper drop suits more aggressive, aerodynamic positions, while a shallower drop is better for relaxed rides. Installation: Installing drop bars can be straightforward. First, remove the old handlebars and clean the stem. Position the new bars and ensure alignment with the front wheel. Tighten the clamp bolts evenly. Attach the brake levers and shifters, ensuring comfortable reach. Finally, wrap the bars with handlebar tape for a secure grip. Test Ride: After installation, take a test ride to adjust the positioning as needed. Ensure that the brake levers and shifters are within easy reach and that the overall setup feels comfortable. By carefully selecting and properly installing the right drop bar, like the Trifox Aerofoil Section Carbon Drop Handlebar TC20AF, you can significantly enhance your cycling performance and comfort.
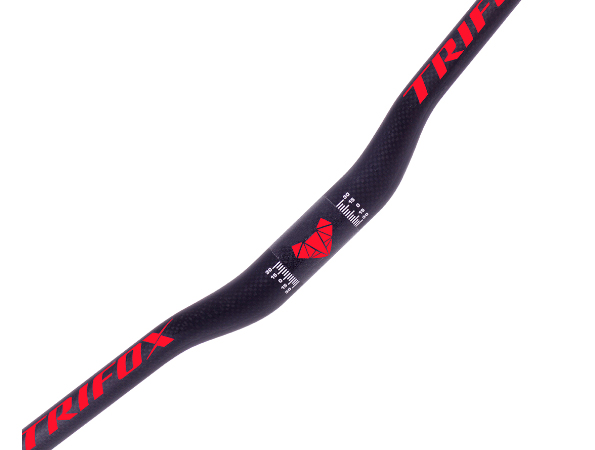
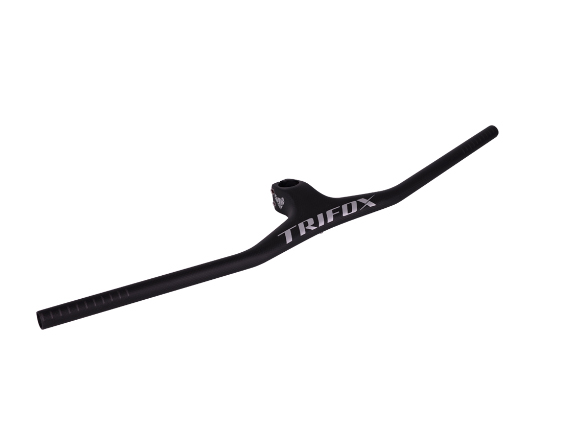
Choosing the best lightweight MTB handlebar for your mountain bike can significantly enhance your comfort, control, and overall riding experience. Here are some key considerations to guide you: Material: The material of your handlebar plays a vital role in its performance. Carbon fiber handlebars, like the Trifox Carbon Riser Handlebar RHB300, are a top choice due to their superior strength-to-weight ratio. They also excel in absorbing trail vibrations, providing a smoother and more comfortable ride compared to aluminum counterparts. Width: The width of the handlebar affects control and stability. Wider bars offer better leverage, making them ideal for rough terrains and technical trails. To determine the optimal width, consider your shoulder width and riding style. Cross-country riders might opt for narrower bars for agility, while enduro or downhill riders benefit from wider bars for enhanced control. Rise and Sweep: The rise refers to the height difference from the center to the ends of the bar. Higher rise handlebars provide an upright riding position, which is beneficial for downhill and technical riding. Lower rise handlebars are preferred for cross-country biking. The sweep, or backward angle of the handlebar, impacts wrist comfort. More sweep can reduce wrist strain during long rides. Clamp Diameter: Ensure that the handlebar's clamp diameter matches your stem size. Common sizes are 31.8mm and 35mm, with larger diameters offering increased stiffness and strength. Weight: Since you're focusing on lightweight options, prioritize handlebars that minimize weight without compromising strength and durability. Carbon fiber is often the best material for achieving this balance. Brand and Reviews: Lastly, consider reputable brands and read user reviews. A product like the Trifox Carbon Riser Handlebar RHB300 comes highly recommended for its quality and performance. By considering these factors, you can find the perfect lightweight MTB handlebar that enhances your riding style and improves performance. For a reliable option, check out the Trifox Carbon Riser Handlebar RHB300.
Boost rigid carbon forks offer a blend of strength, lightweight performance, and precise handling, making them ideal for demanding trail rides. Here’s how to maximize the benefits of your boost rigid carbon fork, like the Trifox TMK100. 1. Proper Installation Start with the correct installation. Ensure the fork is compatible with your frame and wheel setup. The Trifox TMK100, designed for 29er wheels and disc brakes, features a tapered steerer tube for improved stiffness and control. Carefully follow the manufacturer’s instructions to secure it properly and achieve optimal alignment. 2. Wheel Compatibility Ensure your wheels are boost compatible (110mm front hub spacing). This wider stance enhances stability and provides better handling on technical trails. Pairing your fork with the right wheels is crucial for maximizing performance. 3. Tire Selection Match your fork with suitable tires. Wider tires (up to 2.5 inches) offer better traction and comfort, complementing the fork's rigid nature. Adjust tire pressure to find a balance between grip and rolling resistance based on trail conditions. 4. Regular Cleaning Keep your fork clean. Mud and debris can accumulate, affecting performance over time. After rides, gently rinse off dirt and dry thoroughly. Avoid high-pressure water, which can damage the fork’s finish. 5. Periodic Inspection Regularly inspect your fork for any signs of wear or damage. Check for cracks, especially around the steerer tube and axle mount areas. Early detection of issues allows for prompt repairs, preventing further damage. 6. Maintenance Though rigid forks require less maintenance than suspension forks, occasional lubrication of the headset and cleaning of the fork legs ensures smooth operation. Follow the manufacturer’s guidelines for any specific maintenance procedures. 7. Ride Adjustment Adjust your riding style to leverage the fork's rigidity. Approach technical sections with confidence, knowing that your rigid fork offers precise handling and direct feedback from the trail. By following these tips, you can get the most out of your boost rigid carbon fork like the Trifox TMK100, ensuring a reliable and exhilarating ride on any terrain.
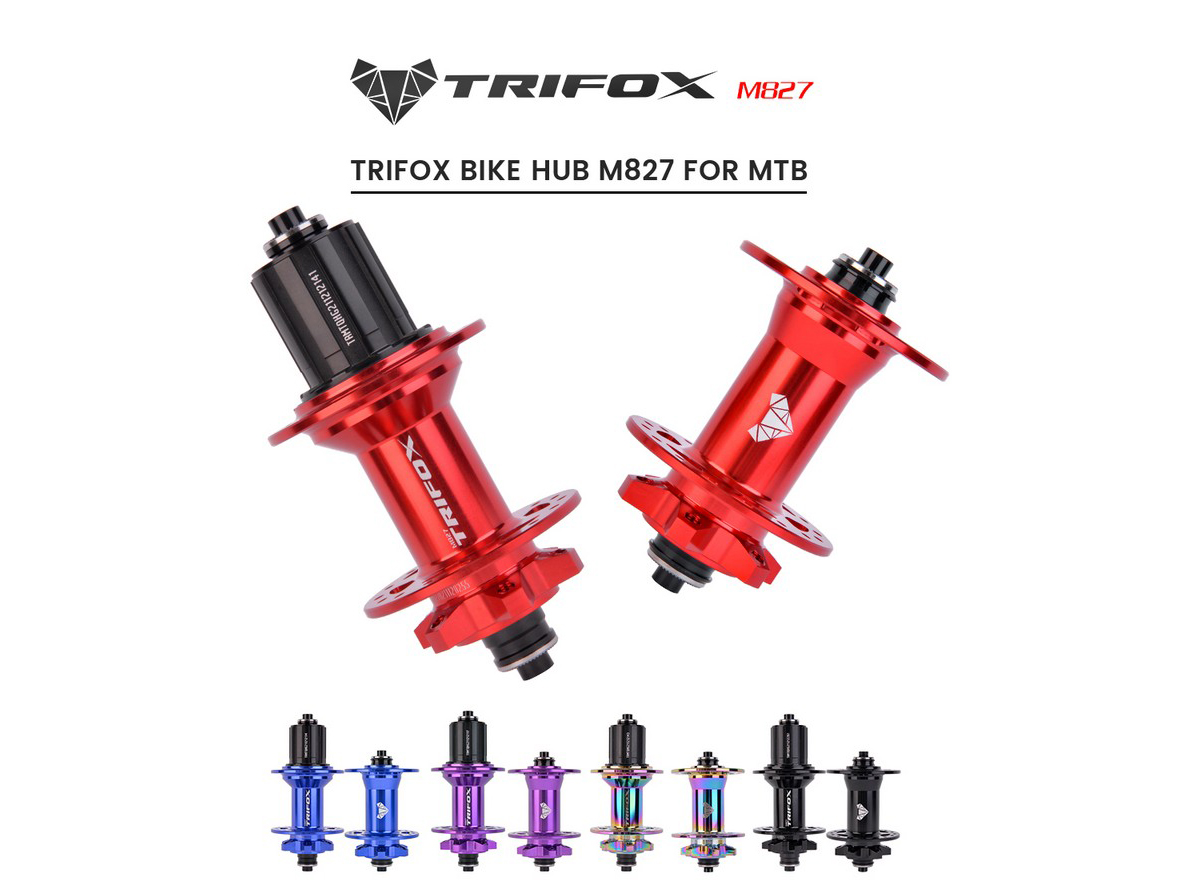
Installing and maintaining a 32H MTB hub is essential for ensuring smooth rides and extending your bike's lifespan. Here’s a step-by-step guide to help you get it right. 1. Installation First, choose a high-quality hub like the Trifox M827 MTB Hub for reliability and performance. Begin by threading the axle through the hub shell, followed by securing the bearings in place. Attach the hub to your wheel rim using a spoke wrench, tightening each spoke evenly in a cross-three pattern to maintain wheel integrity. 2. Lubrication Proper lubrication is crucial for smooth operation. Apply a thin layer of grease to the bearings and axle before installation. This reduces friction and prevents premature wear. 3. Alignment and Tensioning Ensure the hub is centered and spokes are uniformly tensioned. Uneven tension can lead to wheel wobble and compromised performance. Use a truing stand to check for accuracy and make necessary adjustments. 4. Maintenance Regular maintenance keeps your 32H MTB hub running smoothly. Clean the hub and surrounding components after every ride, especially in muddy or wet conditions. Periodically disassemble the hub to inspect and lubricate the bearings, replacing them if they show signs of wear. 5. Inspection Check the hub for damage or loose parts regularly. Pay attention to any grinding noises or resistance while spinning the wheel, as these can indicate issues within the hub. By following these steps, you can install and maintain a 32H MTB hub like the Trifox M827 effectively, ensuring a reliable and smooth ride on any terrain.


