


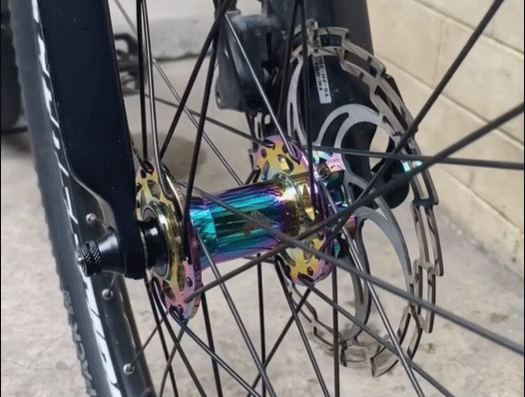
When it comes to mountain biking, choosing the right hub is critical to the performance of your bike. The hub flange spacing is something that might be overlooked, but it's an essential factor when selecting the right hub for your mountain bike.
To begin, what is hub flange spacing? The hub flange spacing refers to the distance between the two flanges on a hub. The distance between the flanges affects the tension of the spokes and the lateral stiffness of the wheel. The wider the hub flange spacing, the more the spoke tension will be reduced, making the wheel less stiff. In contrast, if the hub flange spacing is narrower, the spoke tension will be higher, making the wheel stiffer. Hub flange spacing affects wheel strength, and the right spacing will ensure the longevity and durability of your wheels.
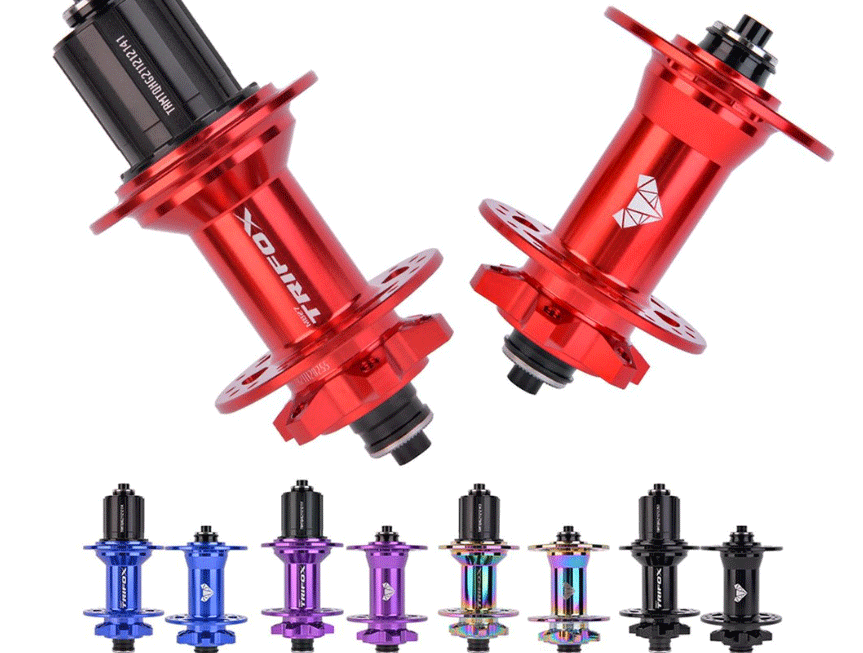
The Trifox Bike Hub M827 for MTB offers an ideal hub flange spacing. It features a 110mm front hub flange spacing and a 148mm rear hub flange spacing. The wider hub flange spacing provides greater lateral stiffness of the wheel, resulting in better control and stability during your mountain biking activities. This ensures that your bike can handle demanding terrain, steep inclines, and challenging conditions.
The Trifox Bike Hub M827 With a lightweight design and durability, this hub is perfect for mountain biking. The alloy construction ensures that the hub can handle the impact of rough terrain, providing a secure and stable foundation for your wheelset. You can rest assured that the hub will be able to handle the demands of your mountain biking adventures.
Another essential factor when selecting the right hub for your MTB is the hub's engagement system. The Trifox Bike Hub M827 features a high-engagement system with 72 points of engagement, providing a rapid and responsive engagement experience. This means you can take on steep climbs with ease, as the hub connects directly to the drivetrain, ensuring maximum power and control.

In summary, the hub flange spacing is an important consideration when selecting the right hub for your mountain biking activities. The Trifox Bike Hub M827 for MTB offers an ideal hub flange spacing, high-engagement system, durability, and lightweight design. These features ensure that you have the best experience and performance during your mountain biking adventures. Choose the Trifox Bike Hub M827 for MTB if you're looking for a robust, high-performing, and reliable mountain

If you are into biking, then you must know the importance of a cassette hub. A cassette hub is the central part of a bicycle wheel, providing a smooth ride while also transferring power from the rider's pedals to the wheels. It is an important component for a cyclist to have a comfortable riding experience. But, do you know everything there is to know about a cassette hub?
In this blog post, we will go in-depth about cassette hubs and understand how it plays a vital role in cycling.
1. What is a Cassette Hub?
Before we dive deep into cassette hubs, let us first understand what it is. A cassette hub is a central component of any bicycle wheel that attaches to the axle and holds the cassette, which houses the different gears. It contains an internal body, which lets you change the gears with the shifter while you are cycling. The cassette hub itself contains ball bearings, impacting the bike's speed, comfort, and maneuverability.
2. Components and Types of Cassette Hub
Cassette hubs come in various types, and they differ in the number of gears, the number of spokes, and the size of the axle. The most common cassette hub types are 8-speed, 9-speed, 10-speed, and 11-speed hubs. The number of gears in cassette hub also determines the degree of versatility in the bike. In addition to the number of gears, the cassette hub's components include the body, free hub, pawls, driver mechanism, seal, and bearings. All of these components play an essential role in ensuring a smooth and comfortable ride.
3. Benefits of a Cassette Hub
Cassette hubs have numerous benefits, making them a popular choice among pro cyclists and biking enthusiasts worldwide. Some of the primary benefits are that the cassette hub can be easily removed for maintenance, it provides a smooth and efficient ride, and it can accommodate different gear ratios to suit various riding needs. Maintenance is also easier since you can quickly change the cassette to replace the damaged or worn-out parts. The cassette hub also improves bike performance, and the power transfer from the pedal to the wheel is effective and quicker.
4. How to Maintain Cassette Hub
Cassette hub requires maintenance to keep them from wearing out too fast, compromising your bike's performance. Here's a maintenance tip you can use to extend the lifespan of your cassette hub. Firstly, clean the cassette hub regularly to prevent dirt and mud from clogging the bearings. Secondly, lubricate your cassette hub often to reduce friction. Lastly, check the cassette for wear regularly, replace the parts if necessary.
Conclusion:
In conclusion, a cassette hub is a vital component of your bike wheel that can significantly impact your cycling experience. Understanding how it works and how best to maintain it is crucial for improving the performance of your bike and extending the lifespan of the cassette hub itself. With the tips we have discussed here, you are now better equipped to make the most of your biking experience with a cassette hub.

Fixed gear bikes are becoming more popular among cycling enthusiasts. This type of bike does not have a freewheel mechanism, which means that the pedals are connected to the rear wheel at all times. One unique component of fixed gear bikes is the fixed gear hub.
In this blog, we’ll take a closer look at this vital component and why it makes fixed gear bikes such a joy to ride.
1. Anatomy of a Fixed Gear Hub
A fixed gear hub is made up of several parts, including the hub shell, the lockring, and the track or threaded cog. The hub shell houses all the other components and is attached to the wheel axle. The lockring is threaded onto the hub and prevents the cog from coming loose. The cog is then attached directly to the hub, making the pedals and rear wheel work together as one.
2. Unique Riding Experience
Riding a fixed gear bike with a fixed gear hub is a unique experience because of the continuous contact between the pedals and the rear wheel. This means that when the pedals turn, the wheels turn too. This can make it easier to accelerate and maneuver your bike, and you’ll feel a greater connection to your bike when you’re riding.
3. Simple Maintenance
Another benefit of having a fixed gear hub is that it is relatively easy to maintain. There are fewer moving parts than on other types of bike hubs, and there are no cables or gears to worry about. A properly maintained fixed gear hub will provide you with years of reliable performance.
4. Versatility
Fixed gear hubs are also versatile, allowing you to switch between different gear ratios by simply changing out the cog. This makes it easy to adjust your gear ratio based on your fitness level or the terrain you’re riding on. You can even have multiple cogs and swap them out according to your needs.
5. Aesthetic Appeal
Finally, fixed gear hubs add a sleek, clean look to your bike. The lack of cables and gears gives the bike a minimalist appearance. Plus, you can customize your bike by choosing different colors and finishes for your hub.
Conclusion:
The fixed gear hub is an essential component of fixed gear bikes. It adds a unique riding experience, requires simple maintenance, and provides versatility when it comes to gear ratio. It also gives your bike a sleek and minimalist look, making it a popular choice among cycling enthusiasts. Whether you’re fiercely competitive or simply love riding bikes, the fixed gear hub can provide you with an unforgettable experience.
Riding a bike is one of the best ways to stay fit and healthy. However, sometimes, while riding your bike, you might notice a strange noise coming from the hub of your bike. This noise can be annoying and distracting but also may indicate a problem that needs to be addressed.
In this post, we provide you with tips on how to fix bike hub noise, so you can get back to enjoying your ride in peace.
1. Clean and Lubricate the Hub
The first thing to try is to clean and lubricate the hub. Dirt, dust, and moisture can accumulate inside the hub, resulting in friction and noise. You can clean your bike hub with a soft rag and mild detergent. Once the hub is clean and dry, add some lubricant to the bearings. This will help to reduce friction and noise within the hub.
2. Adjust the Hub Bearings
If cleaning and lubrication do not solve the problem, you may need to adjust the hub bearings. To do this, remove the wheel from the bike and take apart the hub. Carefully remove the bearings and check for signs of wear or damage. Replace any worn or damaged bearings with new ones, then reassemble the hub and adjust the bearing tension.
3. Tighten Loose Spokes
Another possible cause of bike hub noise is loose spokes. If your spokes are loose, they can cause vibration and noise, especially when you are going downhill or riding on rough terrain. To tighten loose spokes, use a spoke wrench to tighten each spoke evenly until they are all snug. Be careful not to overtighten them, as this can cause the wheel to warp.
4. Replace Worn Parts
If none of the above solutions work, it is possible that one or more parts of your bike hub are worn and need to be replaced. This can include the bearings, the axle, or the cassette body. Worn parts can cause noise, vibration, and even failure of the hub, so it is important to replace them as soon as possible.
5. Seek Professional Assistance
If you are not confident in your ability to fix bike hub noise, or if the noise persists despite your best efforts, it is best to seek professional assistance. A bike mechanic will be able to diagnose and fix the problem quickly and efficiently, giving you peace of mind and a quiet ride.

Conclusion:
Bike hub noise can be frustrating, but it is usually a solvable problem. By following the tips provided in this post, you can diagnose and fix the source of the noise and get back to enjoying your ride in silence. Remember to clean and lubricate the hub, adjust the bearings, tighten loose spokes, replace worn parts, and seek professional assistance if needed. With these solutions, you can keep your bike in top condition and enjoy all the benefits of a healthy, active lifestyle.
If you are an avid cyclist, you understand how important it is to have a reliable and efficient bicycle. One of the essential parts of a bike is the hub which connects the wheel to the frame and allows for smooth rotation. While traditional quick-release hubs have been the norm for decades, more and more cyclists are switching to the bolt-on hub.
In this post, we'll explore what a bolt-on bike hub is, its benefits and drawbacks, and how it can change your cycling experience for the better.
What is a Bolt-on Bike Hub?
A bolt-on bike hub is a type of hub that is secured to the frame with bolts instead of quick-release levers. Typically, bolt-on hubs have a stronger connection to the frame, making them more secure and less likely to come loose in high-stress situations such as sprinting or on rough terrain. Additionally, bolt-on hubs can help reduce the risk of theft as they require a tool to remove, unlike quick-release hubs, which can be taken off with bare hands.
Benefits of a Bolt-on Bike Hub
One of the main benefits of a bolt-on hub is its improved stability. Quick-release hubs can sometimes come loose, causing the wheel to wobble, which can be dangerous during a ride. Bolt-on hubs, on the other hand, provide a secure connection, ensuring the wheel is always stable and reducing the risk of accidents. Additionally, bolt-on hubs are more efficient as they provide more direct power transfer from the pedaling motion to the wheel.
Drawbacks of a Bolt-on Bike Hub
While the benefits of a bolt-on bike hub make it an attractive option for any cyclist, there are a few drawbacks to consider. Firstly, bolt-on hubs can be more challenging to remove, which can be an issue when fixing a flat tire or performing maintenance. Secondly, bolt-on hubs are typically more expensive than quick-release hubs due to their increased stability and security features. Lastly, because bolt-on hubs require a specialized tool to remove, they can be less convenient when traveling with your bike.
How a Bolt-on Bike Hub Can Change Your Cycling Experience
A bolt-on bike hub can transform your cycling experience by improving the stability and power transfer of your bike. You'll feel a significant difference in your riding performance when you switch to a bolt-on hub, particularly when sprinting or climbing. It will also provide you with more confidence that your bike is secure, reducing the risk of accidents. Lastly, you'll have added peace of mind that your bike is less likely to be stolen due to the increased security features.

Conclusion:
In conclusion, a bolt-on bike hub is an excellent investment for any cyclist looking to enhance their riding experience. While it may require a more significant initial cost and can be less convenient at times, the added stability, power transfer, and security features make it well worth it. If you're considering upgrading your bike's hub, a bolt-on hub is the way to go.
Bicycle hub bearings are one of the most important components of a bike's wheel that keep you rolling smoothly on the road. Keeping them well-maintained can significantly improve your bike’s performance, longevity, and safety.
If you're a beginner in cycling, this guide will take you through the simple steps to servicing bicycle hub bearings.
1. Preparing your Bike
Before servicing your bike’s hub bearings, make sure you have all the right tools. You'll need a cone wrench set, a 10mm wrench, a pair of pliers, a rag, and some grease. Begin by removing the wheel and dropping the skewer. Then, take off the dust caps or the end caps covering the bearings.
2. Inspect the Bearings
Once the hub is removed, carefully inspect the bearings for wear and dirt. If the bearings look dusty and dirty, it's necessary to clean and repack them. To clean the bearings, use a rag and a solvent like WD-40. Don't forget to check the cones for wear.
3. Repacking the Bearings
The most critical part of servicing hub bearings is repacking them using grease. Apply a small amount of grease to your palms and rub the grease into the bearings until they're well-lubricated. Ensure that all the bearings are in place before screwing the cones back on.
4. Adjusting the Bearings
The next step is to adjust the bearings for proper tension. You want to have just enough resistance to keep the wheel from wobbling back and forth. You can do this by tightening or loosening the cones that hold the bearings in place, and then re-tightening the locknuts. Use the same tension on both sides of the wheel hub.
5. Finishing Touches
Finally, put the wheel back onto the bike and test it out. Spin the wheel to confirm that it spins smoothly. Lastly, take your bike for a short ride around to ensure it's functionally safer and can travel in good condition.

Conclusion:
In conclusion, servicing bicycle hub bearings may seem intimidating, but as you can see, it's not that difficult. Following these steps of cleaning, repacking, adjusting, and testing surprisingly gives your bike a longer service life. Not only does it save you money by not needing to replace your wheel or bearing, it also boosts riding efficiency. Getting to know the ins and outs of your bike and keeping it well-maintained means better performance, comfort, and a safer and more enjoyable ride.
If you're a cycling enthusiast, you’ve probably come across the terms freehub and freewheel, but how much do you know about them? Both freehub and freewheel are components of a bike’s drivetrain that enable the rear wheel to spin forward while allowing the pedals to remain stationary. While they serve the same purpose, they have significant differences that affect performance and compatibility.
1. Definition and function
A freewheel consists of a cluster of gears and cogs that thread onto the hub of the rear wheel, and the ratcheting mechanism that allows the wheel to spin forward without pedaling. It is a simple design that’s easy to maintain and service. In contrast, a freehub is a more complicated design that features a ratcheting mechanism that’s integrated into the hub of the rear wheel, which connects to the cassette. Instead of threading onto the hub like a freewheel, the cassette attaches to the splines on the freehub body. The freehub design not only provides better power transfer and durability but also offers more options for gear ratios.
2. Compatibility
One of the significant differences between freehub and freewheel is compatibility. Freewheels are commonly found on older bikes, while freehubs are a common feature on modern bikes. If you have an old bike and you want to upgrade to a freehub design, you may have to replace the wheel hub, and possibly the rear derailleur, shifters, and chain, to make sure all the components match. On the other hand, since freehub bodies are generally interchangeable, you can typically change the cassette to switch to a different gear ratio without having to replace the rear wheel.
3. Wear and Tear
Due to their simpler design, freewheels are generally more prone to wear and tear than freehubs. Over time, the ratcheting mechanism in freewheels tends to wear down, which can lead to skipping, uneven engagement, and even failure. Freehub bodies typically don’t suffer from the same wear and tear issues because they are located inside the hub shell where contaminants can’t easily access them. However, if a bearing fails or the pawls break, it’s more challenging to service or replace the freehub body.
4. Performance and Maintenance
In terms of performance, freehub systems offer better power transfer than freewheels because they have more engagement points where the rear hub and the cassette interact. They also provide more precise shifting and offer more gear ratio options. However, they are more complicated and harder to service compared to freewheels. Freewheels, on the other hand, are simpler and easier to maintain, but they don’t offer the same level of performance as freehubs.

Conclusion:
So, which is the better option for your bike, a freehub or a freewheel? Ultimately, it depends on your bike, budget, riding style, and preferences. If you have an older bike and want to stick with a simple and cost-effective design, a freewheel may be the way to go. On the other hand, if you want better performance, more gear ratios, and are willing to invest in a modern high-end bike, then a freehub is the better option. Remember, whichever option you choose, make sure to maintain and service your drivetrain components regularly to ensure smooth and efficient performance.

Bike wheels are one of the most important components of a bicycle, and the hub plays a crucial role in connecting the wheel to the frame. Choosing the right bike hub can make a huge difference in the performance of your bike, but this is a complex task that requires some technical know-how.
In this guide, we'll walk you through everything you need to know about bike hub compatibility and how it relates to your wheel and bike frame.
The first thing to understand is that bike hubs come in different designs and sizes, matching different bike frame specs and wheel types.
The most common types of bike hubs are quick-release (QR) hubs, thru-axle hubs, and bolt-on hubs. QR hubs are the most common type, found in road bikes, and have a skewer mechanism for quick release and attachment of the wheel. Thru-axle hubs are more common in mountain and gravel bikes and use a fixed axle that goes through the frame and wheel. Bolt-on hubs are less common, found in BMX-style bikes, and have a bolt-on mechanism instead of skewers or thru-axles.
Another important aspect to consider when choosing a bike hub is the spacing between the hub flanges. This measurement determines how wide the wheel can be, and thus how wide the frame must be to accommodate the wheel. Typically, road bike hubs have a narrower spacing of about 100mm or 130mm, while mountain bike hubs are wider, usually around 142mm or 148mm. Therefore, make sure you choose a hub that matches your frame spacing.
One of the most confusing aspects of bike hub compatibility is the axle diameter. The axle diameter is the thickness of the axle, and it can vary according to the type of hub and bike frame. The most common axle diameters are 9mm, 12mm, and 15mm, with some hubs offering 20mm or 24mm options. Again, make sure you choose a hub with the right axle diameter for your bike frame.
The last factor to consider is the compatibility of the hub with the wheel type. Wheels can be categorized according to their rim diameter (the outer diameter of the tire), and there are three main sizes: 26”, 27.5”, and 29”. Generally, hubs have a specific size that matches one of these wheel sizes, and it is important to choose a hub that matches the wheel size you have or plan to get.
Conclusion:
As you can see, choosing the right bike hub requires some careful consideration of several technical factors. However, taking the time to understand these factors will ensure that you get a hub that matches your bike frame, wheel, and riding style, and that will provide optimal performance and durability.
Whether you're a road rider or a mountain biker, make sure you consult the specs of your bike and wheels before choosing a hub, and don't hesitate to ask for expert advice if needed. Happy riding!

When it comes to cycling, one of the most important components is the hub. The hub is the part of the bike that the cassette attaches to and where the rear axle is mounted. However, over time, the hub's components can wear out or be damaged, and you may need to replace them. One of the parts that might need to be replaced is the freehub body. The freehub body is responsible for the bicycle's chain and cassette rotation. Here's a step-by-step guide on how to replace a freehub body on a hub.
Step 1: Remove the Quick Release
To begin, you should remove the quick release that holds the wheel in place. This will give you more room to work on the wheel. You can remove the quick-release by flipping it over and unscrewing the bolt that connects it to the non-drive side of the hub. Then, you can pull the quick release out.
Step 2: Remove the Cassette
After removing the quick-release, you should remove the cassette from the hub using a cassette removal tool. The cassette is connected to the freehub using a lockring that needs to be removed with the help of a lockring tool. Once the lockring is removed, you can slide the cassette off the freehub.
Step 3: Remove the Freehub Body
Next, you should remove the freehub body. Depending on the type of hub you have, this may require different tools. Typically, a 10mm Allen key or a 15mm box spanner is used to remove the freehub body. Insert the 10mm Allen key or 15mm box spanner into the center of the hub and turn it counterclockwise to remove the freehub.
Step 4: Install the New Freehub Body
After removing the old freehub, you can install the new one. Place the new freehub body onto the hub and secure it with the same tool you used to remove the old one. Make sure that you tighten it enough to hold it in place.
Step 5: Reassemble the Cassette and Quick-Release
Once the new freehub body is installed, you can reassemble the cassette and lockring onto it. Afterward, you can slide the quick-release back into place and screw the bolt back into the hub's non-drive side. Make sure the wheel is secure and test the rotation before heading out for a ride.

Conclusion:
Replacing a freehub body on a hub may seem like a daunting task for some, but it's definitely doable with the right tools and knowledge. By following the steps outlined above, you should be able to perform this task with ease. Always remember to take care of your bicycle's components and perform routine maintenance to ensure that your rides are as smooth as possible. Happy cycling!


