


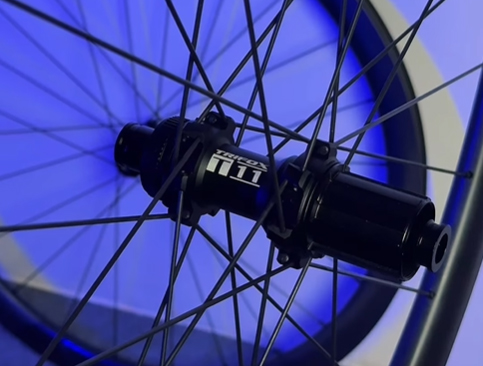
Your disc brake wheelset's hub is the critical link between your drivetrain and your stopping power. Choose wrong, and you'll face compatibility headaches or costly fixes. Here's how to match your hub to your drivetrain flawlessly, using the Trifox T11 Centerlock Road Hub as an example.
1. Axle Standard First:
- What it is: How the hub attaches to your frame (fork/rear triangle). Common standards:
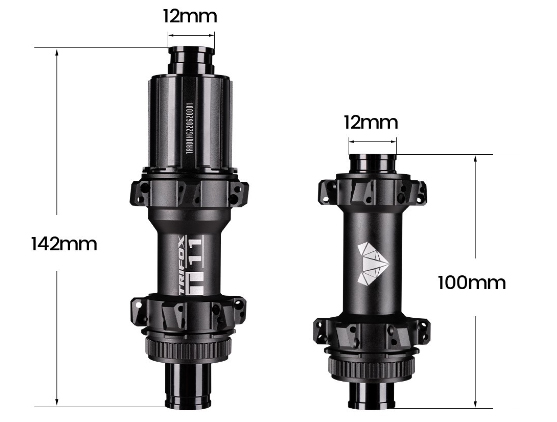
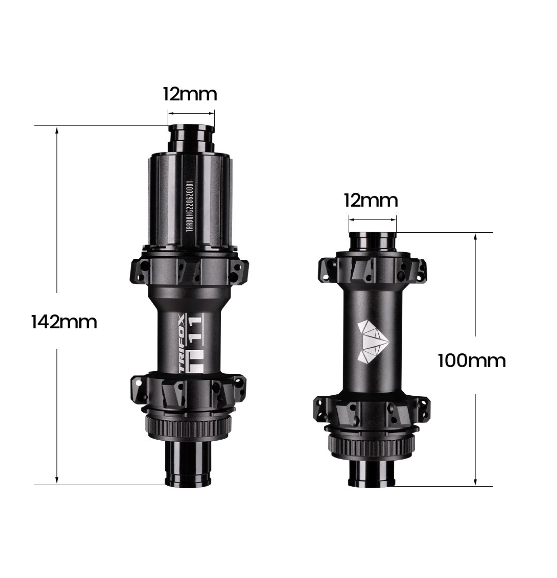
Road: Quick Release (QR), 12x100mm (front), 12x142mm (rear) thru-axle.
Gravel: Often 12x100mm front, 12x142mm rear, but sometimes Boost (110/148mm) for wider tires.
- Why it matters: Your frame dictates this. The Trifox T11 Hub typically offers 12x100mm front and 12x142mm rear thru-axle options – the current road standard. Check your frame specs!
2. Brake Interface:
- Centerlock (CL): Uses a lockring to secure the rotor (like a cassette). Requires specific CL rotors. Lighter, simpler installation.
- 6-Bolt (ISO): Uses 6 bolts to attach the rotor. Compatible with almost all rotors.
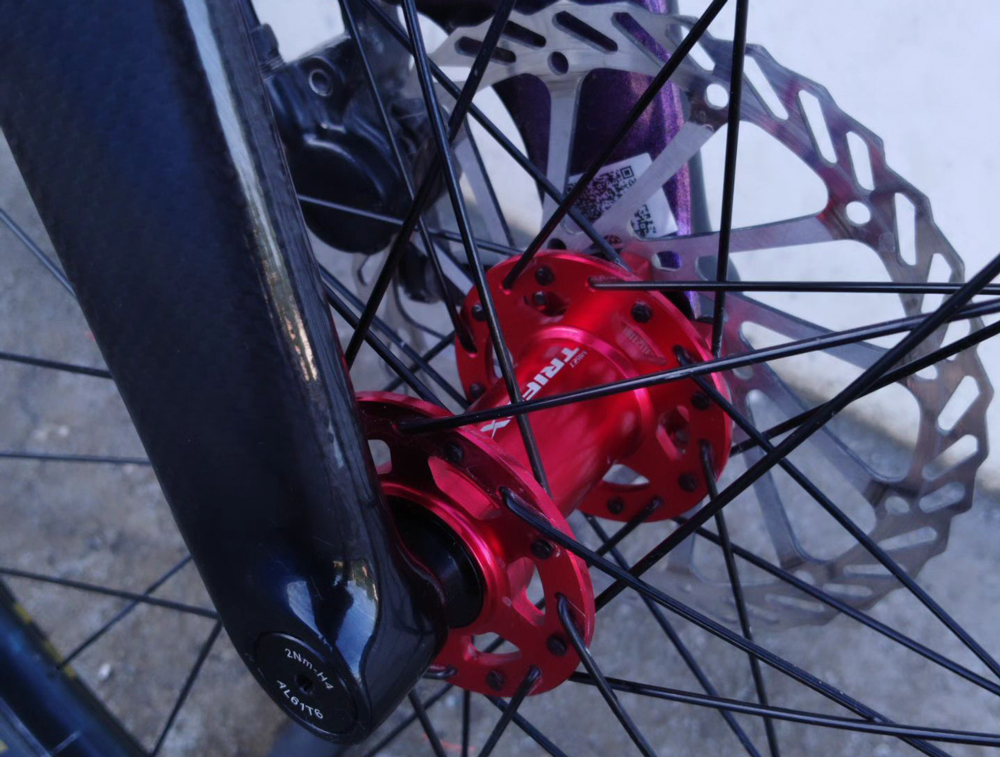
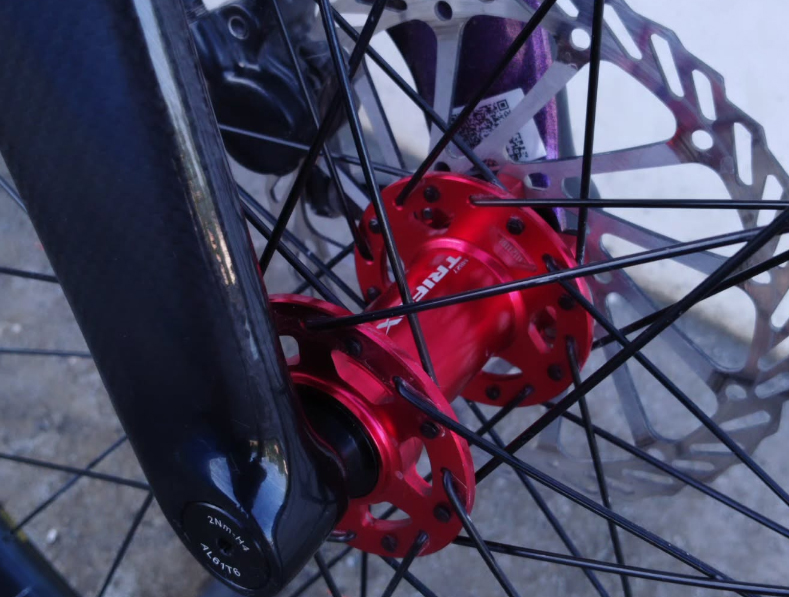
- The Trifox T11 is Centerlock, meaning you need CL rotors (Shimano, SRAM, TRP, etc., offer them). Choose CL for its clean look and ease.
3. Drivetrain Compatibility: The FREEHUB BODY:This is crucial! The freehub body determines which cassette fits.
- Shimano/SRAM Road 8/9/10/11-speed: Uses the HG (Hyperglide) freehub body. This is the most common. The Trifox T11 uses a standard HG freehub, compatible with Shimano Tiagra, 105, Ultegra, Dura-Ace (11s & below), SRAM Apex, Rival, Force (11s & below).
- Shimano 12-speed Road (Dura-Ace R9200, Ultegra R8100): Requires the new Micro Spline freehub body. Not compatible with HG.
- SRAM XDR: Used for SRAM's 12-speed road cassettes (especially the 10-28t, 10-30t). Requires an XDR freehub body.
- Campagnolo: Requires a specific Campagnolo freehub body. Not compatible with HG.
Why the Trifox T11 HG Hub is a Smart Choice:
For riders using Shimano 11-speed or below (like Tiagra 4700, 105 R7000, Ultegra R8000) or SRAM 11-speed road groups, the HG freehub is perfect. It's the universal standard for this tier, ensuring easy cassette compatibility and future wheel upgrades. Combined with its durable Centerlock interface and standard road thru-axles, it's a reliable, high-value foundation for a performance road wheelset.
The Takeaway:
Don't overlook the hub! Match these three elements:
1. Axle Standard (Match your frame: e.g., 12x100/142mm)
2. Brake Interface (Choose CL or 6-Bolt; T11 uses CL)
3. Freehub Body (Match your cassette: T11 uses HG for Shimano/SRAM 11s & below)
Choosing correctly ensures smooth shifting, secure braking, and a hassle-free ride. The Trifox T11 exemplifies a well-specified, versatile hub for mainstream road drivetrains. Double-check your specs before you buy!

Bike hubs are the unsung heroes of your wheelset, influencing performance, durability, and ride quality. Whether you’re upgrading or building a bike, understanding the three primary hub types ensures you pick the right one for your needs.
1. Freewheel Hubs
Common on older or budget bikes, freewheel hubs feature a threaded mechanism where the gear cluster (freewheel) screws directly onto the hub. Pros: Simple design, affordable. Cons: Less durable under heavy load; replacing gears requires removing the entire freewheel. Ideal for casual riders or vintage builds but less common in modern cycling.
2. Freehub (Cassette Hubs)
The modern standard for most road, gravel, and mountain bikes. Freehubs have a splined body where the cassette slides on, with bearings housed within the hub. Pros: Stronger, easier maintenance, and compatible with a wide range of cassettes. Cons: Slightly pricier. This design dominates high-performance bikes due to its reliability and ease of upgrades.
3. Fixed Gear Hubs
Used in track bikes or “fixies,” these hubs lack a freewheel mechanism, meaning the pedals move whenever the bike is in motion. Pros: Direct power transfer, lightweight, and low maintenance. Cons: No coasting—requires constant pedaling. Popular among urban riders and velodrome racers seeking simplicity and control.
Choosing Your Hub
Your riding style dictates the best fit:
- Freewheel: Budget-friendly, low-maintenance commuting.
- Freehub: Versatile performance for most disciplines.
- Fixed Gear: Minimalist urban or track use.
Upgrade your ride with precision-engineered hubs from Trifox Bike, offering durability and smooth engagement across all types. Whether chasing speed or mastering city streets, the right hub transforms your bike's potential.
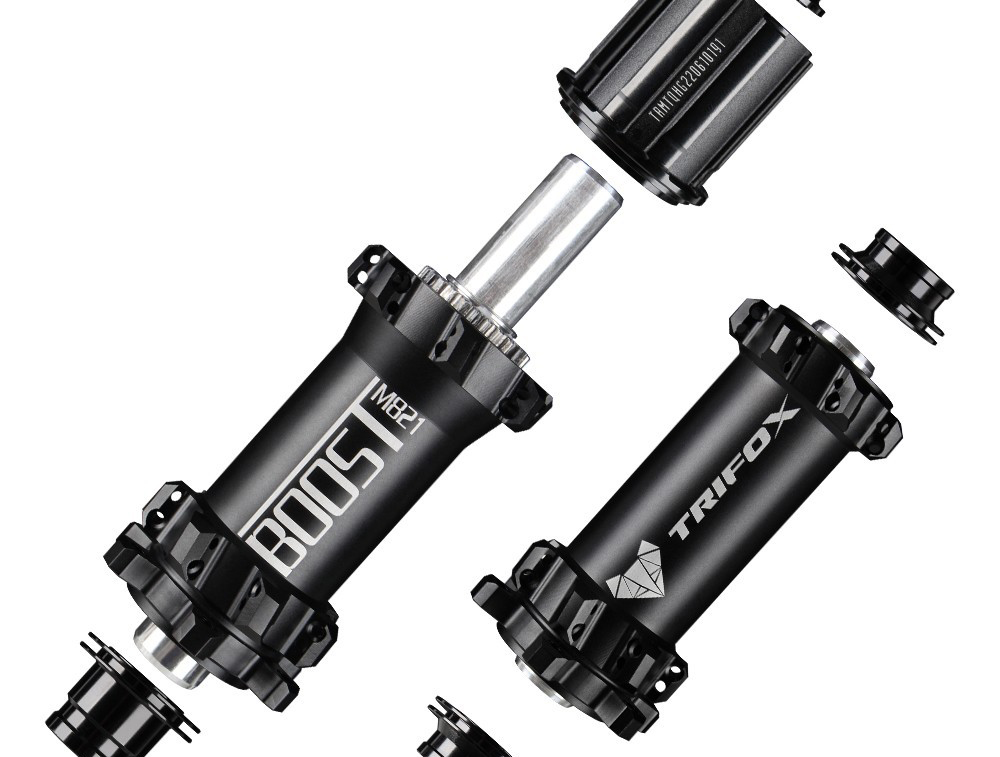
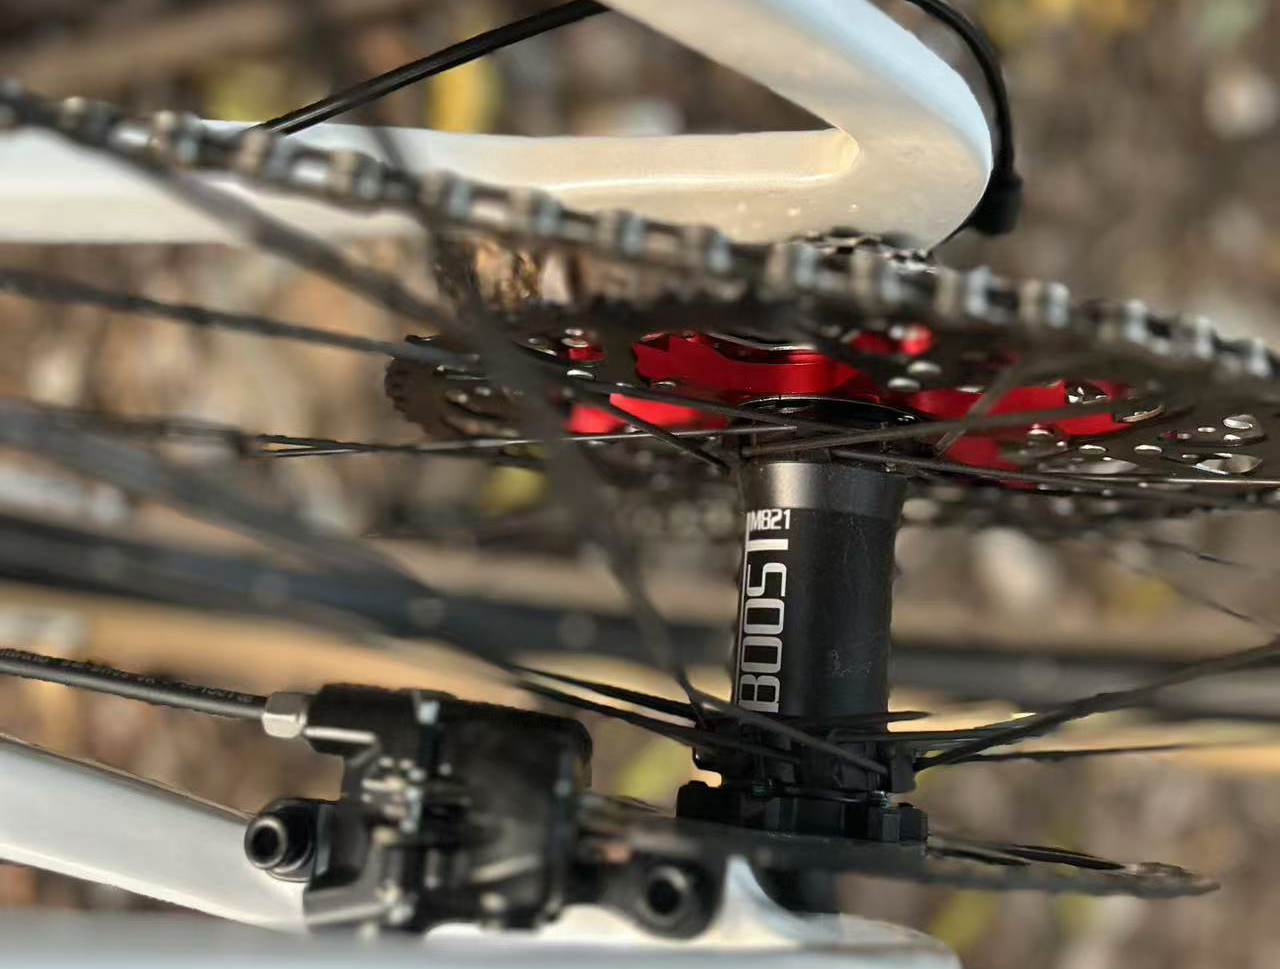
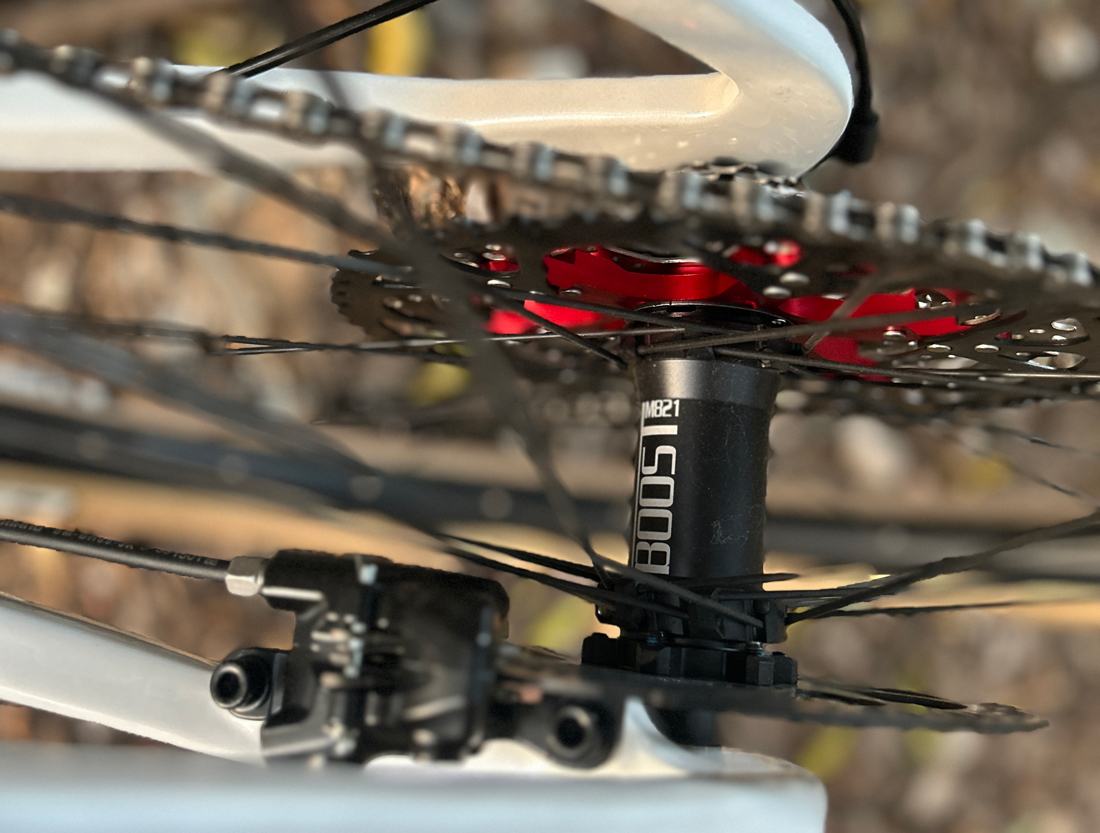
If you're eyeing a wheelset or frame upgrade, you’ve likely heard about “Boost” hubs. But is this wider hub standard (110x15mm front, 148x12mm rear) worth the investment?
What is Hub Boost?
Boost spacing increases hub width, allowing for stiffer wheels and better tire clearance. Developed for mountain biking, it enhances control on technical terrain by improving spoke bracing angles and reducing flex.
Benefits of Boost Hubs
Stiffer Wheels: Better power transfer and handling, especially during aggressive cornering or descents.
Wider Tires: Accommodates modern, plus-sized tires (2.6”+), improving traction and comfort.
Future-Proofing: Most new MTB frames and forks prioritize Boost compatibility.
When Do You Need It?
Aggressive Trail/Enduro Riding: If you’re tackling rocky descents or high-speed singletrack, Boost’s stiffness is a game-changer.
Upgrading Your Frame/Fork: Newer models often require Boost hubs. Check compatibility before purchasing.
Running Wide Tires: Boost spacing prevents chainstay rub on larger tires.
Considerations
Cost: Upgrading may require new hubs, wheels, or even a frame. The Trifox M821 offers a durable, lightweight option at a competitive price.
Compatibility: Non-Boost frames won’t fit Boost hubs without adapters (which add weight and complexity).
Riding Style: Casual riders on smooth trails may not notice a difference.
If you're into technical riding or planning a frame upgrade, Boost hubs are worth it. The stiffness and tire clearance benefits shine on rough terrain. For others, it’s a “nice-to-have” but not essential.
Ready to boost your ride? Explore the Trifox M821 Boost Hub—engineered for durability and performance without breaking the bank.

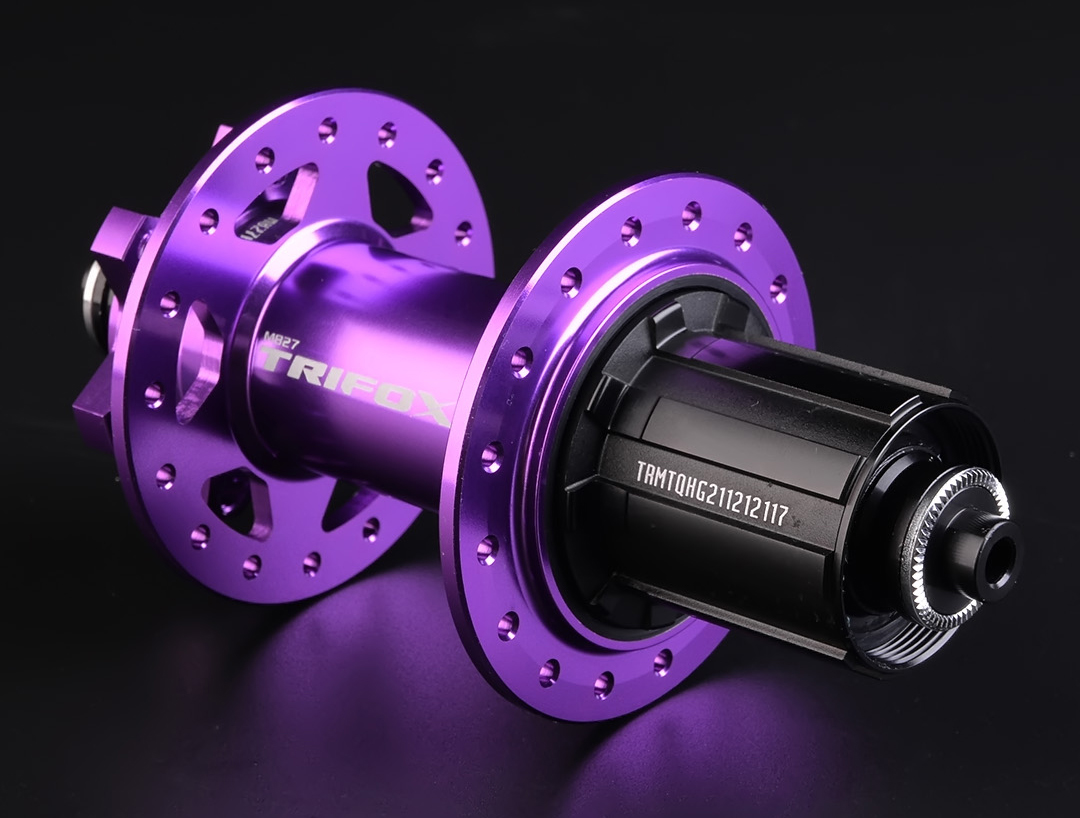
A smooth-rolling hub is critical for peak mountain bike performance. A faulty hub can lead to poor efficiency, safety risks, or even wheel failure. Here’s how to diagnose a bad MTB hub and when to consider a replacement like the Trifox M827.
Signs of a Failing Hub
1. Unusual Noises: Grinding, clicking, or rumbling sounds while pedaling or coasting often indicate damaged bearings or debris inside the hub.
2. Wheel Play: Grasp the wheel and wiggle it side-to-side. If there’s noticeable movement, the hub bearings may be loose or worn.
3. Rough Spinning: Remove the wheel and spin the axle. A healthy hub rotates smoothly. Resistance or gritty sensations suggest dirt ingress, dried grease, or bearing wear.
4. Visible Damage: Check for cracks, dents, or corrosion on the hub shell. Seals that are cracked or missing can allow contaminants to wreck bearings.
How to Diagnose
Step 1: Lift the bike and spin the wheel. Listen for noise and observe wobble.
Step 2: Check for lateral play by shaking the wheel.
Step 3: Remove the axle (if possible) to inspect bearings and races for pitting or rust.
Solutions
-Service the Hub: Clean, regrease, and adjust bearings. Replace individual parts if only certain components are damaged.
-Replace the Hub: If the hub shell is cracked or bearings are beyond repair, upgrade to a reliable model like the Trifox M827.
Why the Trifox M827?
This MTB hub is built for durability and precision:
- Sealed Bearings: Resists mud and water ingress.
- Smooth Engagement: 3-pawl design offers instant power transfer.
- Lightweight: CNC-machined alloy body reduces rotational weight.
- Boost Compatibility: Fits modern 148x12mm frames for trail-ready stiffness.
Ignoring hub issues risks ride quality and safety. Regular maintenance extends lifespan, but when replacements are due, the Trifox M827 delivers performance without breaking the bank. Don’t let a bad hub derail your ride—proactive checks keep your wheels rolling strong.
The Basics of a Bike Hub
A hub is the core part of a bicycle wheel, located at the center where the spokes connect. It houses the axle, bearings, and other mechanisms that allow the wheel to rotate freely. Hubs come in various types, including front hubs, rear hubs, and those designed for specific disciplines like road biking, mountain biking, or commuting.
Key Components of a Hub
1. Axle: The axle is the rod that runs through the hub, connecting it to the bike's frame or fork. It can be quick-release, thru-axle, or bolt-on, depending on the bike’s design.
2. Bearings: Bearings reduce friction between the hub and axle, enabling smooth rotation. They can be either loose ball bearings or sealed cartridge bearings.
3. Hub Shell: The outer shell is the part of the hub where the spokes attach. It’s typically made from lightweight materials like aluminum or carbon fiber.
4. Freehub or Freewheel: Found on the rear hub, this mechanism allows the wheel to spin independently of the pedals when coasting. Modern bikes usually feature a freehub, which integrates with the cassette.
Types of Hubs
- Front Hub: Simpler in design, the front hub connects to the fork and focuses on smooth rotation.
- Rear Hub: More complex, the rear hub includes the freehub or freewheel and is responsible for transferring power from the pedals to the wheel.
- Disc Brake Hub: Designed for bikes with disc brakes, these hubs have mounts for brake rotors.
- Internal Gear Hub: Found on some commuter bikes, these hubs contain gears inside the hub shell, offering a low-maintenance alternative to derailleurs.
Why Hubs Matter
A well-functioning hub is essential for a smooth, efficient ride. High-quality hubs reduce friction, improve power transfer, and enhance durability. They also play a role in wheel stiffness and overall bike performance. Whether you’re climbing hills, sprinting on flat roads, or navigating rough trails, a reliable hub ensures your wheels spin effortlessly.
Maintenance Tips
To keep your hubs in top condition, regularly check for play or grinding noises, which may indicate worn-out bearings. Clean and lubricate the hubs periodically, and consider professional servicing if you’re unsure about maintenance.

The hub is a small but vital part of your bike, ensuring smooth rotation and efficient power transfer. Understanding its role and keeping it well-maintained can significantly enhance your riding experience. Whether you’re a casual rider or a seasoned cyclist, a reliable hub is key to keeping your wheels—and your adventures—rolling smoothly.
When it comes to cycling, the performance of your bike isn’t just determined by your frame or gears. The wheels play a pivotal role, and within the wheels, the wheel hubs and associated parts are often the unsung heroes of your ride. Wheel hubs are crucial to your bike’s overall performance, affecting everything from speed to handling, efficiency, and comfort.
1. Efficient Power Transfer with Quality Hubs
Wheel hubs are at the heart of your bike’s wheel system, and they play a significant role in how power is transferred from your pedals to the ground. When you pedal, the energy you generate is transmitted through the drivetrain and into the wheel hubs. A high-quality hub can efficiently transfer this energy with minimal loss, making your efforts more effective. This efficiency is essential for long rides, competitive cycling, and hilly terrain where every bit of energy counts.
For example, hubs with a higher engagement rate—meaning the number of points where the pawls inside the hub engage—provide a quicker response to your pedaling. This is particularly advantageous when you’re climbing hills or sprinting, as it allows you to accelerate faster and transfer more of your power to the road without losing momentum.
2. Smoothness and Low Friction for Better Performance
Another key factor in how hubs affect cycling performance is their smoothness and level of friction. High-quality hubs are designed to reduce friction to a minimum, ensuring that your wheels spin freely with less effort. Hubs with high-quality bearings—often ceramic or sealed ball bearings—are more efficient at reducing friction compared to low-quality bearings. This means less energy is wasted during your ride, making it easier to maintain speed, especially during long-distance rides or on flat sections of road.
Smooth-running hubs are also less prone to wear and tear, which can result in improved longevity and lower maintenance costs over time. Hubs that are built with durability in mind can handle the rigors of various terrains without compromising performance.
3. Weight Considerations for Better Handling
Wheel hubs also impact the overall weight of your bike. Lighter hubs can contribute to a faster and more responsive ride, particularly for riders who participate in competitive cycling or racing. A lightweight hub allows your bike to accelerate more quickly, especially when transitioning between gears or during a sprint. On the other hand, heavier hubs can slow you down, particularly when climbing hills or navigating tight corners.
However, it's important to balance weight with durability and strength. For instance, carbon hubs may be lighter but could be less durable on rougher terrains compared to more robust aluminum hubs. Choosing the right hub for your needs and riding conditions is essential to ensure that you don't sacrifice performance for weight savings alone.
4. Improved Braking Performance with the Right Hubs
The interaction between your hubs and brake components can significantly impact your overall braking performance. For cyclists who use rim brakes, the quality of the wheel hubs can affect how evenly and effectively your braking surfaces work. Poor-quality hubs can lead to uneven braking, while high-quality hubs ensure that the wheels are aligned correctly for smooth and consistent braking power.
For disc brake-equipped bikes, the hub's compatibility with the rotor and the ability to withstand heat buildup is equally important. A quality hub helps maintain the structural integrity of the disc brake system, reducing the risk of warping or overheating, which can compromise braking efficiency and safety.
5. Durability for Longevity
When it comes to cycling, durability is key—especially if you ride regularly or tackle rough terrain. The right hubs, built with high-quality materials and precision engineering, offer improved longevity. Hubs made from durable materials like aluminum or steel tend to be more resilient to impacts, moisture, and dirt. This is particularly crucial for off-road cyclists or mountain bikers who face harsh conditions that can wear out components faster.
Additionally, hubs with sealed bearings or internal grease systems are better at keeping out dirt and water, ensuring the hubs maintain their smoothness and performance over time. This means less maintenance and fewer repairs, allowing you to focus more on your ride and less on frequent bike tune-ups.
6. Customization for Specific Cycling Needs
One of the most attractive features of modern wheel hubs is the variety of options available for different types of cycling. Whether you're a road cyclist, mountain biker, or triathlete, there are hubs specifically designed to meet the needs of your riding style. Road cyclists may opt for lightweight hubs with quick engagement for improved acceleration, while mountain bikers might prioritize durability and the ability to handle rough terrain.
Hubs also come in different axle types and configurations, allowing you to customize your bike to fit your riding style. For instance, through-axle hubs offer increased stability and strength, particularly for off-road cycling, while quick-release hubs provide convenience for road cyclists who need to make frequent tire changes.

Wheel hubs and their associated parts are crucial to your bike’s overall performance. From improving power transfer and reducing friction to enhancing comfort and longevity, the right hubs can make a noticeable difference in your cycling experience.
Investing in quality wheel hubs ensures that your bike runs more efficiently, lasts longer, and delivers a smoother ride—whether you're on the road, trail, or competing in races. By understanding how wheel hubs influence your performance, you can make better choices when upgrading your bike, ensuring a more enjoyable and efficient ride every time.

When it comes to enhancing your biking experience, every component of your bicycle plays a crucial role, and one of the unsung heroes of bike performance is the hub. Positioned at the center of your wheels, hubs are pivotal in determining how smooth, fast, and stable your ride will be.
The Role of Bicycle Hubs
Hubs serve as the attachment point for your bike's wheels to the frame, facilitating the wheel's rotation around the axle. The design and quality of a hub can significantly influence your bike's performance, affecting speed, stability, and comfort. A well-designed hub ensures minimal friction, allowing for efficient transfer of energy from your legs to the wheels, propelling you forward with ease.
Materials and Durability
One of the key aspects of a hub's design is the material used in its construction. Trifox Bike offers hubs made from durable aluminum, known for its lightweight and resilient properties. This ensures that the hubs can withstand the rigors of regular use while contributing to a lighter overall bike weight, which is advantageous for speed and maneuverability.
Types of Hubs
At Trifox, you can find a variety of hub designs tailored to different biking needs. For instance, the M821 Boost and M827 are standout models that cater to diverse requirements. The M821 Boost hub, with its wider stance, provides increased stability and is ideal for mountain biking where rugged terrain demands extra support. On the other hand, the M827 is designed for road bikes, focusing on delivering speed and smoothness on paved surfaces.
Impact on Speed and Stability
The design of a hub can directly impact your bike's speed. Hubs like the M827, designed for road use, are optimized for reduced friction and efficient energy transfer, allowing cyclists to maintain higher speeds with less effort. Conversely, hubs made for off-road use, like the M821 Boost, prioritize stability to handle uneven terrains effectively.
Stability is equally critical, especially when navigating tricky paths or making sharp turns. A hub with a wider design, such as the Boost, offers enhanced lateral stability, reducing the risk of wobbling or losing control, thus providing a safer ride.
Comfort and Compatibility
Comfort during rides is often a byproduct of the right hub design. A smooth, frictionless ride reduces the strain on the cyclist, allowing for longer and more enjoyable rides. Trifox Bike's hubs are compatible with most standard bicycles, making them an easy upgrade for cyclists looking to enhance their ride without having to invest in a new bike.
Choosing the Right Hub
Selecting the appropriate hub is crucial for tailoring the biking experience to your specific needs. Whether you're an avid mountain biker requiring maximum stability or a road cyclist seeking speed, the right hub can transform your ride. Trifox Bike offers a range of options, ensuring that every cyclist can find a hub that fits their style and enhances their biking experience.
In summary, while often overlooked, the hub is a critical component that can dramatically affect your ride. By understanding the various designs and materials, such as those offered by Trifox Bike, cyclists can make informed choices to improve their bike's performance and enjoy their rides to the fullest.
Choosing the right road hub for your bicycle is crucial for achieving optimal performance and enhancing your riding experience. A well-selected and maintained hub can significantly impact your bike's efficiency, speed, and reliability. Here’s a comprehensive guide on how to select and maintain the perfect road hub.
1. Understanding Road Hubs
A road hub is the central part of a bicycle wheel that connects the wheel to the bike frame and allows it to rotate freely. It consists of several components, including bearings, axle, and hub shell. When selecting a road hub, you’ll want to consider factors like material, weight, and type of bearings.
2. Selecting the Right Road Hub
Material
Road hubs are typically made from aluminum or carbon fiber. Carbon fiber hubs, like those offered by Trifox, are lightweight yet strong, providing excellent stiffness and reduced weight.
Bearings
Hubs can come with either sealed cartridge bearings or loose ball bearings. Sealed bearings are low maintenance and offer better protection against dirt and moisture, making them ideal for road cycling.
Compatibility
Ensure the hub is compatible with your bike’s wheel size and cassette type. The Trifox hubs are designed to fit various wheel sizes and are compatible with multiple drivetrain systems, ensuring a versatile fit for most road bikes.
Weight
For competitive cycling, every gram counts. Choose a lightweight hub to reduce the overall weight of your bike, improving acceleration and climbing efficiency.
3. Maintaining Your Road Hub
Regular Cleaning
Keep your hub clean by wiping it down after rides, especially in muddy or wet conditions. Use a soft cloth and mild detergent to remove dirt and grime.
Lubrication
Regularly lubricate the bearings to keep them running smoothly. Avoid over-lubrication as it can attract dirt and cause wear. High-quality hubs like those from Trifox come pre-lubricated, but periodic maintenance will extend their lifespan.
Inspection
Periodically inspect your hub for signs of wear or damage. Check for any play in the bearings, unusual noises, or rough rotation. If you notice any issues, address them promptly to prevent further damage.
Bearing Replacement
Over time, bearings may wear out and need replacement. Follow the manufacturer’s guidelines for replacing bearings. Trifox hubs are designed for easy servicing, making bearing replacement straightforward.
Torque Settings
Ensure bolts and axle nuts are torqued to the manufacturer’s specifications. Over-tightening can damage components, while under-tightening can lead to instability.
In conclusion, selecting and maintaining the right road hub involves understanding key components, considering compatibility, and performing regular maintenance. By choosing high-quality hubs like those from Trifox and following these maintenance tips, you’ll enjoy optimal performance and a smoother, more reliable ride. Invest in the right road hub today and experience the difference it makes in your cycling journey.

Maintaining and upgrading your Trifox freehub is essential for ensuring smooth, reliable performance on the trails and roads. Proper maintenance can extend the life of your components, while timely upgrades can enhance your riding experience.
Importance of Regular Maintenance
Regular maintenance of your freehub is crucial for several reasons:
Performance: A well-maintained freehub ensures smooth and efficient power transfer from your pedals to the wheels;Durability: Routine care prevents premature wear and tear, extending the lifespan of your freehub;Safety: Properly functioning components reduce the risk of accidents caused by sudden mechanical failures.
Steps to Clean and Lubricate Your Freehub
Remove the Freehub: Start by removing the rear wheel from your bike. Use a wrench to carefully unscrew the freehub from the hub body;Clean Thoroughly: Wipe down the freehub with a clean cloth to remove dirt and grime. Use a degreaser to clean the internal parts, ensuring all old lubricant and debris are eliminated;Inspect for Wear: Check the pawls and ratchets for signs of wear or damage. Look for any cracks or chips in the freehub body;Lubricate: Apply a light layer of freehub-specific lubricant to the pawls and ratchets. Avoid over-lubricating, as excess grease can attract dirt and cause buildup;Reassemble: Carefully reassemble the freehub and reinstall it onto the rear wheel. Ensure all parts are securely tightened.
Signs of Wear and When to Upgrade
Even with regular maintenance, freehubs can wear out over time. Here are some signs that it might be time to upgrade:
Noise: Unusual clicking or grinding noises indicate worn out or damaged pawls and springs;Slippage: If your pedals slip under pressure, the freehub's engagement mechanism may be failing;Difficulty Shifting: Hard-to-shift gears can signal internal issues within the freehub body.
Benefits of Upgrading
Upgrading to a higher-quality Trifox freehub offers several benefits:
Improved Performance: Enhanced engagement mechanisms provide quicker and more precise power transfer;Increased Durability: High-quality materials and construction mean longer-lasting components;Better Riding Experience: Smoother operation and reduced noise contribute to a more enjoyable ride.

Conclusion
Maintaining and upgrading your Trifox freehub is a vital part of bike upkeep. By regularly cleaning and lubricating your freehub, inspecting for signs of wear, and upgrading when necessary, you ensure optimal performance and longevity. For a wide range of high-quality bike components, including freehubs, visit TrifoxBike. Keep your bike running smoothly and enjoy every ride to the fullest!


