


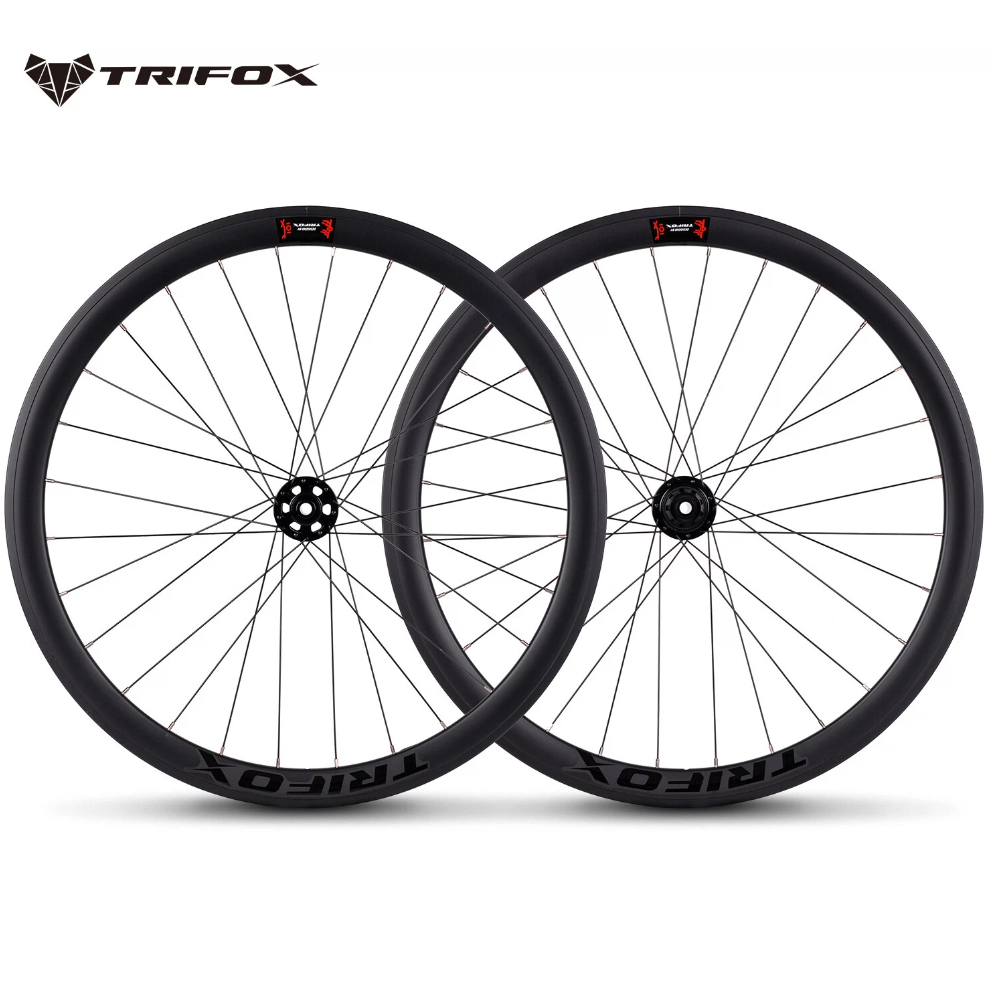
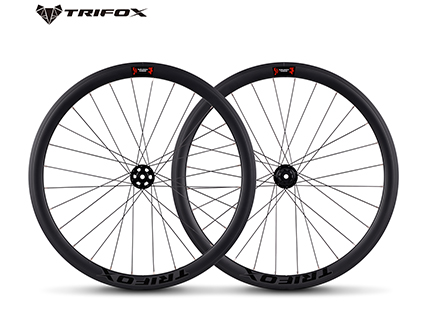
Finding a single wheelset that can tackle steep mountain passes, withstand the rigors of daily commuting, and deliver a lively feel on a classic weekend club run is a tall order. Many wheels are specialized for one task but compromise on others. The Trifox AWT7 alloy disc brake wheelset defies this trend. With its thoughtfully chosen 30mm rim depth, durable alloy construction, and smooth-rolling hubs, it proves to be a versatile performer, equally at home on climbs, commutes, and classic road adventures.
On Climbs: Lightweight and Responsive
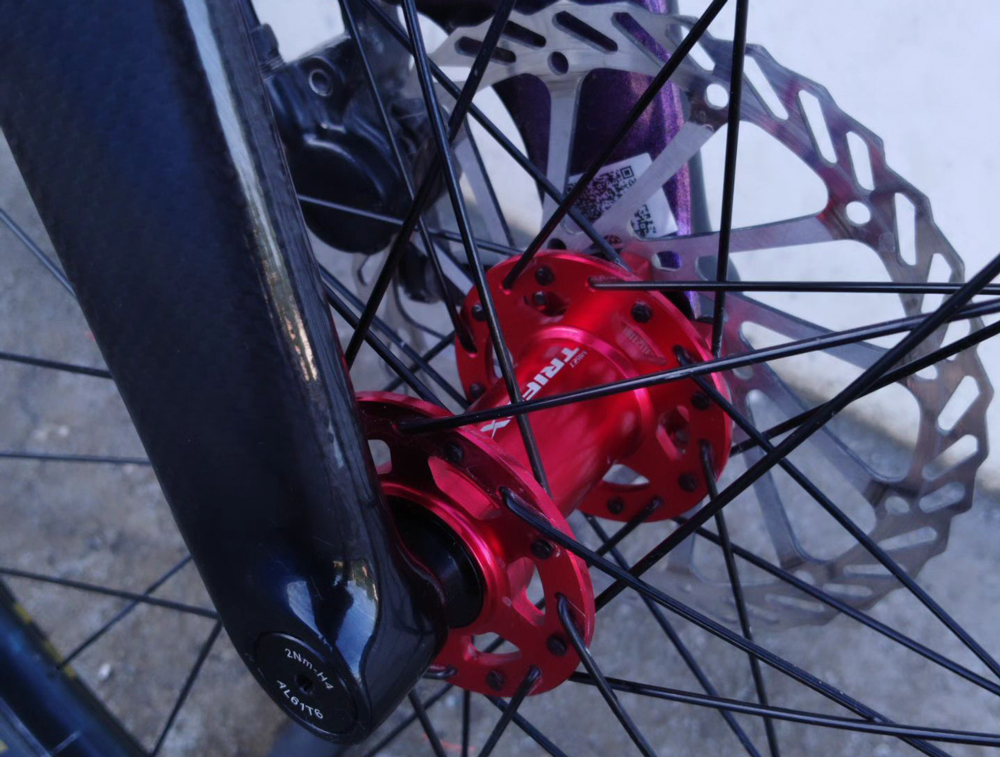
When the road tilts upward, every gram counts. The AWT7 wheelset strikes an excellent balance, with a pair weight of approximately 1956g (front: 920g, rear: 1036g). This is notably light for a durable alloy wheelset with disc brake compatibility. The low rotational mass means less effort is required to accelerate the wheels out of a corner or up a steep pitch. The stiffness of the alloy rims, laced with 28 Pillar stainless steel spokes front and rear, ensures that when you stand on the pedals, your power translates directly into forward momentum with minimal flex. The 6-pawl, 120-point engagement hubs deliver that immediate, crisp pickup when you need to power over a crest or accelerate out of a hairpin.
For Commutes: Durable and Reliable
Daily riding puts a unique strain on equipment. Potholes, curb hops, and unpredictable weather demand durability and reliability. The AWT7's welded aluminum rim construction and robust 28-spoke count provide the strength needed to withstand the daily grind without sacrificing weight. The 14mm inner rim width is optimized for the popular 25-28mm tire sizes, offering a stable tire profile that enhances comfort and grip on less-than-perfect pavement. The sealed cartridge bearings (with ceramic options on the rear) resist the elements, ensuring smooth rolling in rain or shine. The 12mm thru-axle compatibility guarantees a secure, rattle-free connection to modern frames and forks, essential for safe braking and handling in traffic.
In the Classics: Agile and Stable
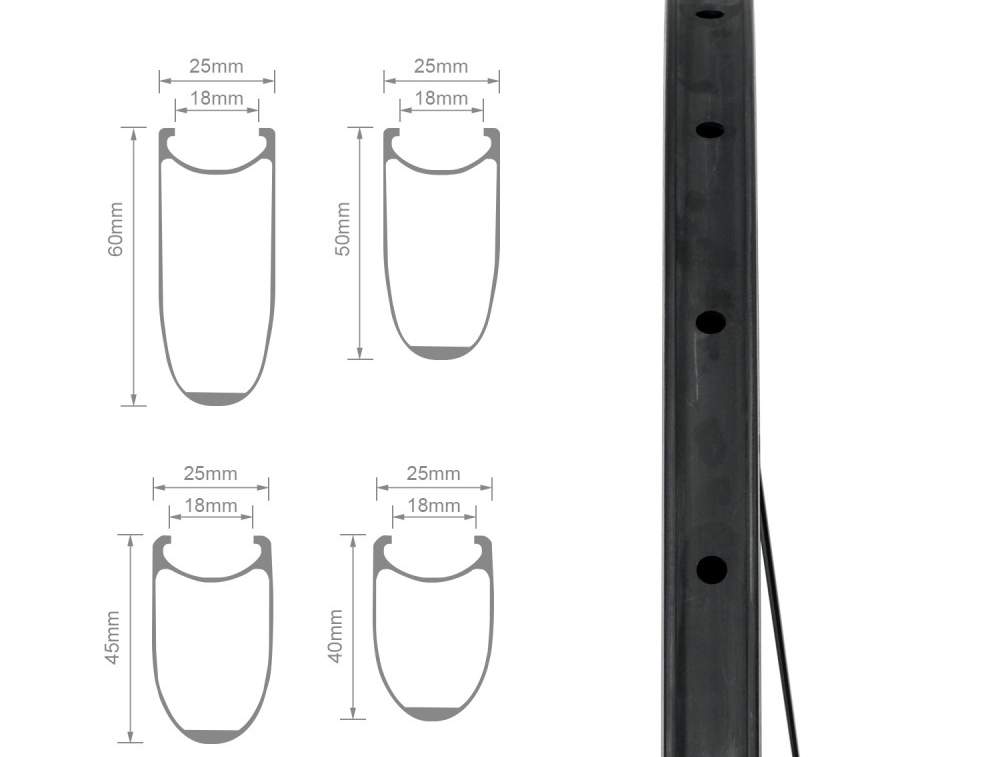
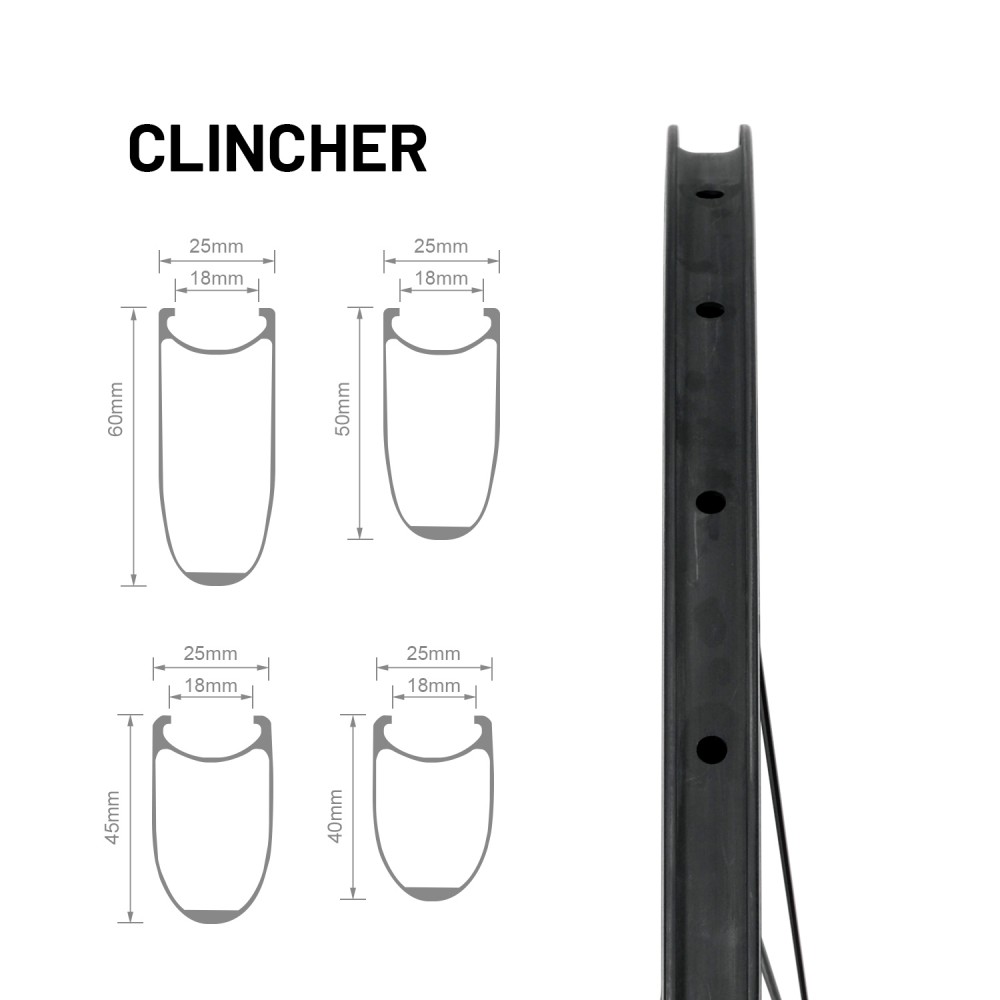
Classic road riding—whether a spirited fondo or a fast group ride—demands wheels that feel lively yet predictable. The AWT7's 30mm rim depth hits a sweet spot. It's deep enough to offer an aerodynamic benefit and improve crosswind stability compared to deeper sections, yet shallow enough to keep the wheel light and responsive. The wheels accelerate eagerly and hold speed well on rolling terrain. The disc brake interface provides consistent, powerful stopping power in all conditions, giving you confidence on long, fast descents. Whether you're attacking a short, steep climb or cruising in the peloton, the AWT7 feels connected and engaging.
Versatility Without Compromise
The Trifox AWT7 doesn't try to be the lightest pure climbing wheel or the deepest aero section. Instead, it masterfully combines the best attributes of an alloy wheelset into a single, versatile package. Its strength makes it a perfect choice for year-round training and commuting. Its weight and responsiveness make it a joy on climbs and spirited rides. And its reliability makes it a trusted companion for any road adventure. For riders seeking one set of road bicycle wheels that can truly do it all, the Trifox 700c road bike wheels AWT7 represents an outstanding blend of performance, durability, and value.
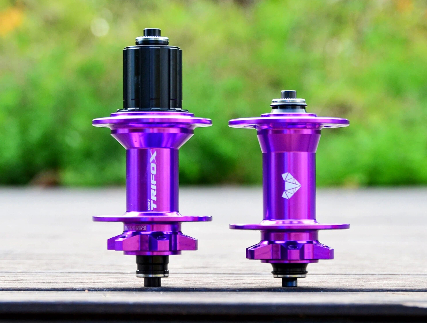
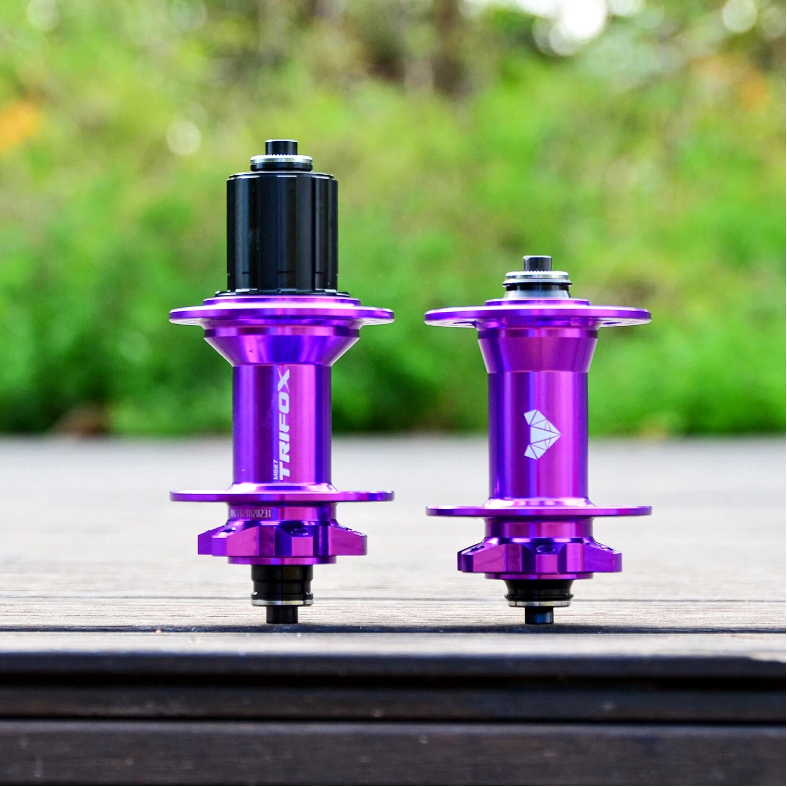
At the heart of every great wheelset lies the hub—a component often overlooked until performance falls short. The Trifox M827 mountain bike hub is designed to be noticed, not for its sleek aesthetics alone, but for the sophisticated engineering within. Its 6-pawl, 72-point engagement system promises rapid power transfer and reliable performance, but the technical story goes even deeper, offering a level of versatility that makes it a standout choice for any builder.
The Engagement System: Instant Response
The core of the M827's performance is its driver mechanism. Inside the hub shell, six precision-engineered pawls engage simultaneously with a 72-tooth ratchet ring. This configuration is key. With 72 points of engagement, the hub requires only a 5-degree rotation of the crank before the pawls lock into place. In practical terms, this means when you stomp on the pedals out of a corner or over a technical obstacle, power is delivered almost instantly. There's no lag or "dead spot" where the pedals spin freely before catching—just immediate, decisive forward momentum. This rapid engagement is a game-changer for technical climbing and aggressive trail riding where every pedal stroke counts.
Convertible Axle System: One Hub, Two Standards
Modern mountain biking is in a state of transition, with Quick Release (QR) and Thru-Axle (TA) standards both prevalent. The M827 solves this compatibility puzzle elegantly. The hub is sold with standard QR end caps (front 9x100mm, rear 10x135mm). However, its design allows you to purchase and install optional end caps to convert it to modern Thru-Axle standards (front 15x100mm TA, rear 12x142mm TA). This means you can confidently build a wheelset for your current QR frame, and if you upgrade to a newer TA frame later, you don't need new wheels—just swap the end caps on your M827 hubs. It's a future-proofing feature that adds immense long-term value.
Universal Freehub Compatibility
Versatility extends to the drivetrain as well. The M827 comes standard with a Shimano/SRAM HG-compatible freehub body, supporting 8 to 12-speed cassettes. But recognizing the diversity of modern drivetrains, Trifox offers optional freehub bodies for SRAM XD (11/12s) and Shimano Micro Spline (12s). This simple swap capability ensures the same bicycle rim hub can be adapted to virtually any high-performance groupset on the market, making it an incredibly flexible foundation for custom wheel builds.
Built to Last: Materials and Bearings
All this sophisticated engagement and adaptability is housed in a durable shell. The hub bodies are machined from 6061 aluminum alloy, while the axles and freehub bodies use stronger 7075 aluminum. The rear hub spins on four sealed cartridge bearings (two in the front) for smooth, long-lasting performance with minimal maintenance. Weighing in at a competitive 165g front and 314g rear, it offers a superb balance of strength and low weight.
In summary, the Trifox M827 is far more than a simple mtb hub. It's a meticulously engineered component that delivers instant power through its 6-pawl, 72-point system, while its convertible end caps and freehub bodies make it one of the most adaptable hubs on the market. For the discerning wheel builder seeking a hub that combines rapid engagement with genuine long-term versatility, the Trifox mtb hub M827 represents a compelling, high-performance choice.
The Unsung Role of the Hub in Road Bike Handling
We obsess over frame materials, gear ratios, and tire choice, often overlooking a component that fundamentally shapes how a bike feels: the humble hub. Tucked away at the center of your wheels, it's far more than a simple spinning part. The hub is the critical anchor point of a complex tension structure—your wheel. Understanding its geometry is the key to unlocking a ride that feels direct, stable, and supremely efficient.
Think of a bicycle wheel as a sophisticated bridge in constant motion. The bicycle rim hub is the central pier, and the spokes are the tensioned cables holding everything together. The hub's design, specifically its flange geometry, dictates how effectively these "cables" can transfer force and maintain the wheel's shape under load.
Flange Diameter: The Lever for Power. The distance from the hub's center to where the spokes attach is like the length of a wrench. A larger flange diameter provides a longer, more effective lever arm for the spokes. This creates a straighter, more direct line of force from the rim to the axle. The result is enhanced lateral stiffness for confident cornering and superior drive stiffness, meaning more of your pedal power goes into acceleration with less wasted in wheel flex. It's the difference between a firm handshake and a weak one.
Flange Spacing: The Foundation for Stability. This is the distance between the left and right spoke flanges. A wider spacing creates a broader, more stable base of support for the entire wheel, similar to standing with your feet apart versus together. This geometry dramatically increases lateral rigidity, ensuring the wheel resists side-to-side deformation when you lean into a turn or battle crosswinds. A wheel built on a hub with optimized flange spacing tracks predictably and inspires confidence.
These abstract principles translate directly into your riding experience. When you carve through a high-speed corner, a wheel with high lateral stiffness from a well-designed hub deforms less, holding your chosen line with tenacity. When you jump out of the saddle to sprint or climb, the immediate, crisp response you feel is the high drive stiffness at work—no spongy delay, just pure power transfer. Ultimately, an efficient hub system minimizes energy lost to microscopic wheel distortions, converting more of your effort into speed.
This philosophy guides the design of hubs like the Trifox T11. By prioritizing robust flange geometry and employing quality materials like 6061 aluminum alloy with a 7075 axle, the focus is on creating a reliable, responsive foundation. Its wide compatibility, including a SRAM XDR freehub body for modern 12-speed groupsets, ensures it serves as a versatile core for performance wheels. The goal is singular: to build a hub that disappears into the background of a perfect ride—one where every input is met with precision, every corner feels planted, and every watt is accounted for.
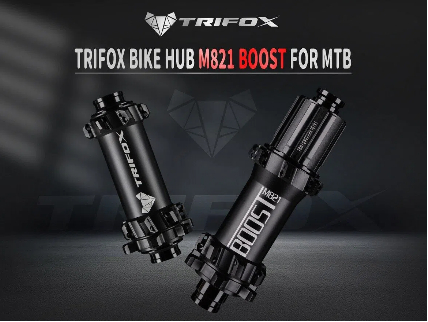
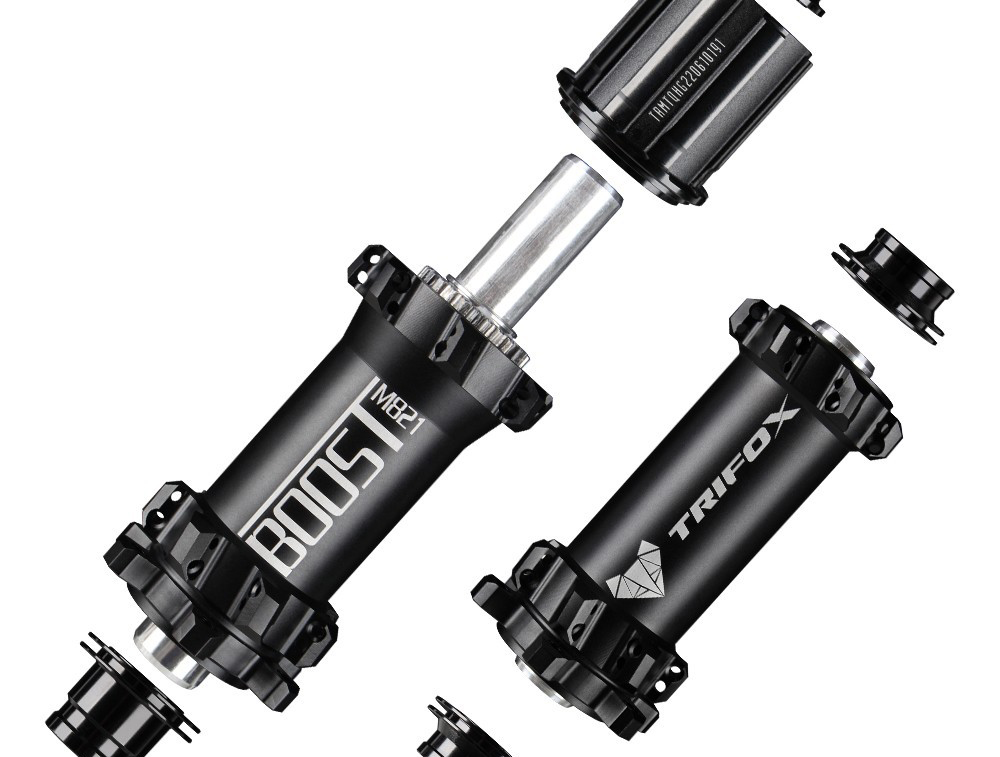
The distinctive click of a coasting mountain bike is the sound of engineering at work—a precise mechanical conversation between your pedaling input and the trail. At the heart of this interaction lies the rear hub's engagement mechanism, a critical component that dictates responsiveness, reliability, and ride feel. For riders looking to upgrade their mountain bike hubs, understanding the differences between ratchet, pawl, and star ratchet systems is key. Let's demystify these mechanisms and see how hubs like the Trifox M821 Boost implement this technology.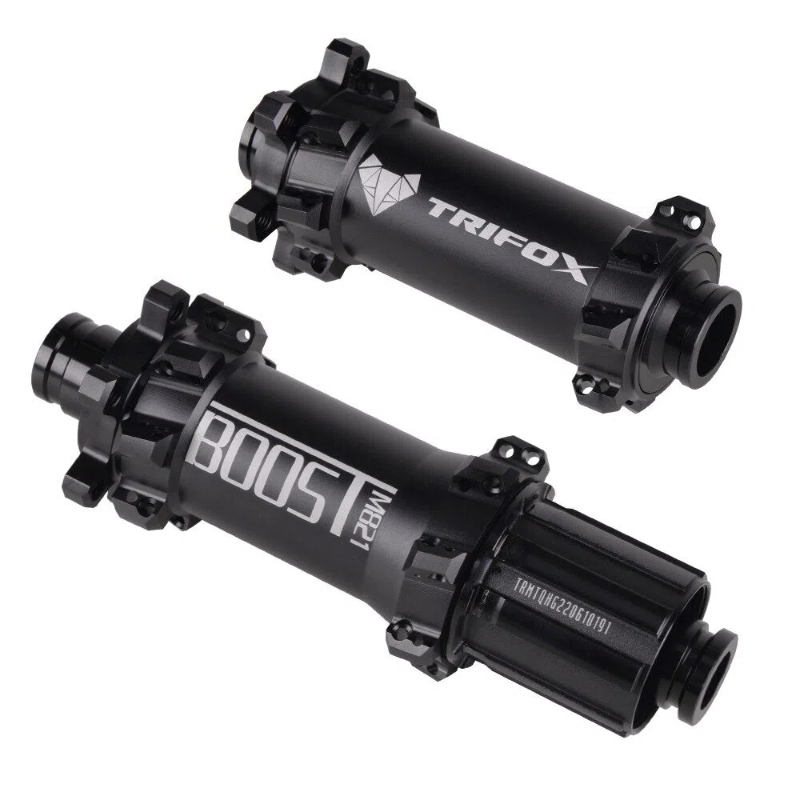
The Fundamentals: Engagement Points and the Pursuit of Zero Lag
The core function of any freehub mechanism is to allow the wheel to spin freely when coasting while instantly transferring power when you pedal. The measure of this instantaneity is called Points of Engagement (POE). A hub with more engagement points has a smaller “dead zone” or free rotation angle before power transfers. For example, a 36-tooth hub engages every 10 degrees, while a 60-tooth hub engages every 6 degrees, offering noticeably quicker pickup. This is the first critical spec to examine in a bicycle wheel hub.
The Mechanism Showdown: Pawls vs. Star Ratchet
1. The Traditional Pawl System
This common design uses small, spring-loaded tabs (pawls) that click outward to engage with a notched ring inside the hub. It can offer very high POE and a classic loud sound, but the small contact area of individual pawls can be a stress point under high torque.
2. The Star Ratchet System
This system, pioneered by brands like DT Swiss, uses two solid, star-shaped ratchet rings pressed together by a spring. It boasts a massive contact area for incredible durability and is typically much quieter. While traditionally offering lower POE, modern versions have significantly increased engagement points.
The Trifox M821 Boost Approach: Precision Pawls, Engineered for Strength
The Trifox M821 Boost Hub employs a high-performance, multi-pawl system that intelligently balances instant engagement with trail-ready durability. Here's why its design stands out:
• High-POE Foundation & Option: The hub comes standard with a 36-tooth ratchet for reliable 10-degree engagement. For riders craving the fastest pickup, an optional 60-tooth upgrade slashes the engagement angle to just 6 degrees.
• Durability First: Instead of using fragile components for high POE, Trifox focuses on robustness. The precision-machined ratchet teeth and strong pawl springs ensure the mechanism withstands repeated trail shocks.
• Premium Construction: The entire hub is crafted from AL7075 aluminum and machined on a 5-axis CNC for perfect tolerances, creating a stiff, reliable platform. Sealed bearings keep everything running smoothly.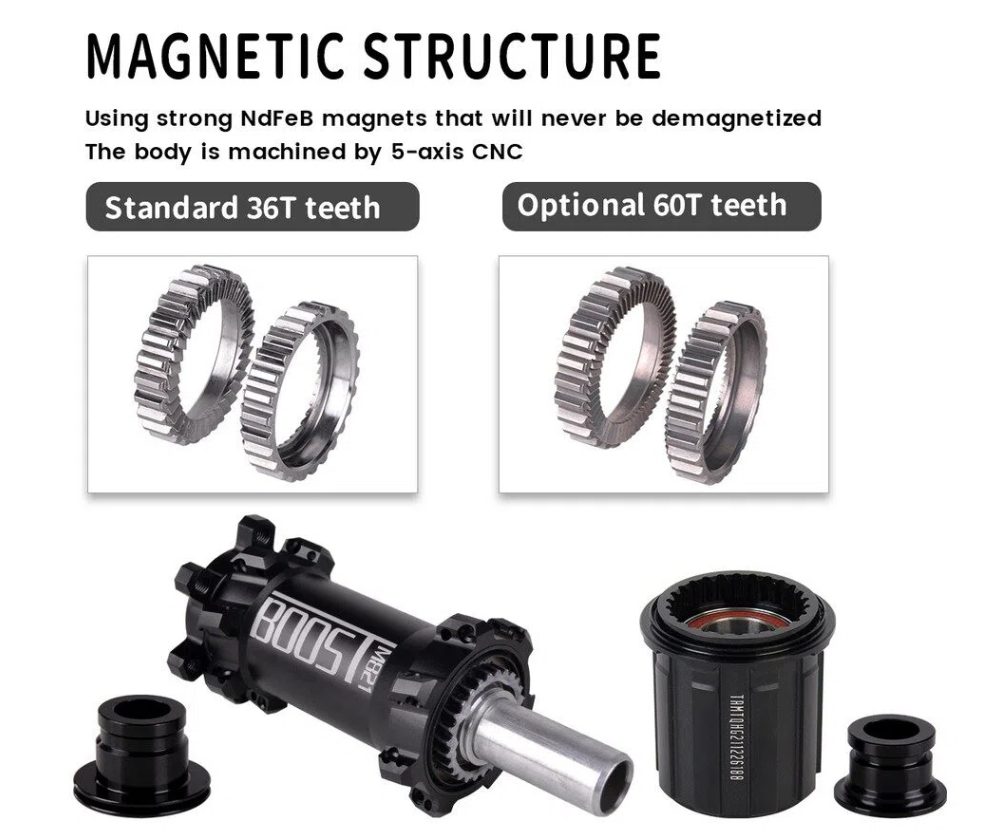
Choosing Your Mechanism: A Rider's Guide
The best hub mechanism for you depends on your riding style:
• Cross-Country & Trail Riders (Prioritizing Responsiveness): Benefit most from higher POE (54T+). The immediate engagement helps with technical climbs and quick power bursts. A quality multi-pawl system like the Trifox M821 with its 60T option is ideal.
• Aggressive Trail & Enduro Riders (Prioritizing Durability): Your priority is a mechanism that survives brutal descents and high torque. A star ratchet system is the gold standard, but a robust, well-made pawl system with a moderate POE (like the 36T standard on the M821) is also an excellent, often more affordable, choice.
• Long-Distance & Bikepacking (Prioritizing Reliability & Maintenance): For remote adventures, simplicity and ease of service are key. A star ratchet system is famously easy to service. A simple, proven 2- or 3-pawl system with sealed bearings also offers great reliability.
Conclusion: The Heart of the Wheel
Your bicycle wheel hub is a precision power-transfer device. Whether you choose the lightning-fast click of a high-POE pawl system or the silent force of a star ratchet, understanding the mechanism inside empowers your choice. The Trifox M821 Boost Hub offers a smart balance: the choice between durable 36-tooth engagement and an ultra-responsive 60-tooth option, all housed in a well-made, lightweight package. It proves you don't need to sacrifice strength for speed, making it a versatile and high-value cornerstone for any serious mountain bike wheelset.
When it comes to mountain bike performance, the hub is one of the most critical yet often overlooked components. While riders frequently focus on upgrading frames or suspension, the humble hub plays a vital role in how your bike accelerates, maintains speed, and handles technical terrain. If you're experiencing any of these five issues, it might be time to consider the Trifox M827 Mountain Bike Hub for your next upgrade.
1. Poor Engagement and Power Loss
Modern mountain bike hubs feature high engagement points for instant power transfer. If you're experiencing noticeable delay between pedaling and drive response, or feeling like your power isn't translating immediately to forward motion, your hub's internal mechanism may be worn out. The Trifox M827 hub with its precise 54-tooth engagement system ensures immediate power transfer, making it ideal for technical climbs and sudden acceleration.
2. Unusual Noises During Riding
While some hub noise is normal, new or increasingly loud sounds often indicate problems. Grinding, crunching, or irregular clicking noises suggest that bearings may be contaminated or internal mechanisms are failing. The M827 MTB hub features sealed bearings and precision machining to provide smooth, quiet operation in all riding conditions.
3. Visible Play or Wobble in the Wheel
If you can feel or see side-to-side movement in your wheel when it's securely mounted, this indicates hub bearing wear. This play affects riding stability and can lead to unsafe handling. The Trifox bike hub is engineered with superior bearing seals and precise tolerances to eliminate play while maintaining smooth rotation.
4. Rough Rotation and Increased Drag
A properly functioning hub should allow the wheel to spin freely with minimal resistance. If your wheel stops spinning quickly or feels rough when rotating, the bearings may be damaged. This friction creates drag that slows you down. The M827 mountain bike hub features low-friction seals and high-quality bearings to maintain smooth spinning and reduce rotational drag.
5. Frequent Maintenance Requirements
High-quality hubs are designed to require minimal maintenance. If you find yourself constantly adjusting or repairing your current hub, it's likely reaching the end of its service life. The Trifox M827 is built for durability with minimal maintenance requirements, saving you time and frustration while providing reliable performance ride after ride.
Why Choose Trifox M827 Hub?
The Trifox M827 Mountain Bike Hub represents the perfect balance of performance, reliability, and value. With its 54-tooth rapid engagement mechanism, sealed bearing system, and lightweight construction, it delivers professional-level performance for serious riders. Whether you're tackling technical cross-country trails or aggressive all-mountain routes, this hub provides the instant engagement and reliable performance you need.
Compatible with most modern mountain bike standards and available in multiple axle configurations, the M827 makes an excellent upgrade for riders looking to improve their bike's performance without breaking the bank. The hub's durable construction ensures it can handle the demands of aggressive trail riding while maintaining smooth operation.
Don't let an aging hub limit your riding potential. Recognizing these five signs early will help you maintain optimal performance and get the most from your mountain bike. Upgrading to the Trifox M827 Mountain Bike Hub is one of the most cost-effective ways to transform your bike's responsiveness and reliability. Experience the difference that quality engineering makes in your next ride.

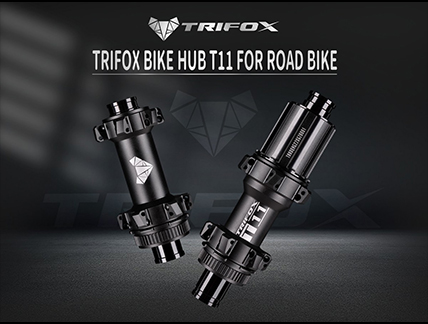
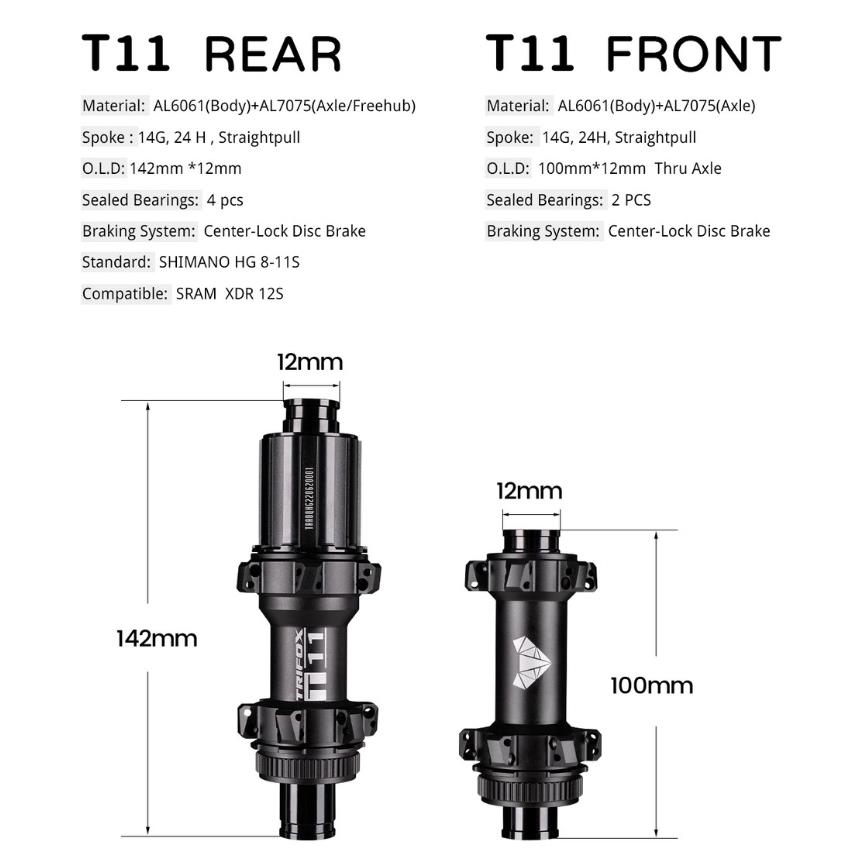
Your disc brake wheelset's hub is the critical link between your drivetrain and your stopping power. Choose wrong, and you'll face compatibility headaches or costly fixes. Here's how to match your hub to your drivetrain flawlessly, using the Trifox T11 Centerlock Road Hub as an example.
1. Axle Standard First:
- What it is: How the hub attaches to your frame (fork/rear triangle). Common standards:
Road: Quick Release (QR), 12x100mm (front), 12x142mm (rear) thru-axle.
Gravel: Often 12x100mm front, 12x142mm rear, but sometimes Boost (110/148mm) for wider tires.
- Why it matters: Your frame dictates this. The Trifox T11 Hub typically offers 12x100mm front and 12x142mm rear thru-axle options – the current road standard. Check your frame specs!
2. Brake Interface:
- Centerlock (CL): Uses a lockring to secure the rotor (like a cassette). Requires specific CL rotors. Lighter, simpler installation.
- 6-Bolt (ISO): Uses 6 bolts to attach the rotor. Compatible with almost all rotors.
- The Trifox T11 is Centerlock, meaning you need CL rotors (Shimano, SRAM, TRP, etc., offer them). Choose CL for its clean look and ease.
3. Drivetrain Compatibility: The FREEHUB BODY:This is crucial! The freehub body determines which cassette fits.
- Shimano/SRAM Road 8/9/10/11-speed: Uses the HG (Hyperglide) freehub body. This is the most common. The Trifox T11 uses a standard HG freehub, compatible with Shimano Tiagra, 105, Ultegra, Dura-Ace (11s & below), SRAM Apex, Rival, Force (11s & below).
- Shimano 12-speed Road (Dura-Ace R9200, Ultegra R8100): Requires the new Micro Spline freehub body. Not compatible with HG.
- SRAM XDR: Used for SRAM's 12-speed road cassettes (especially the 10-28t, 10-30t). Requires an XDR freehub body.
- Campagnolo: Requires a specific Campagnolo freehub body. Not compatible with HG.
Why the Trifox T11 HG Hub is a Smart Choice:
For riders using Shimano 11-speed or below (like Tiagra 4700, 105 R7000, Ultegra R8000) or SRAM 11-speed road groups, the HG freehub is perfect. It's the universal standard for this tier, ensuring easy cassette compatibility and future wheel upgrades. Combined with its durable Centerlock interface and standard road thru-axles, it's a reliable, high-value foundation for a performance road wheelset.
The Takeaway:
Don't overlook the hub! Match these three elements:
1. Axle Standard (Match your frame: e.g., 12x100/142mm)
2. Brake Interface (Choose CL or 6-Bolt; T11 uses CL)
3. Freehub Body (Match your cassette: T11 uses HG for Shimano/SRAM 11s & below)
Choosing correctly ensures smooth shifting, secure braking, and a hassle-free ride. The Trifox T11 exemplifies a well-specified, versatile hub for mainstream road drivetrains. Double-check your specs before you buy!
Bike hubs are the unsung heroes of your wheelset, influencing performance, durability, and ride quality. Whether you’re upgrading or building a bike, understanding the three primary hub types ensures you pick the right one for your needs.
1. Freewheel Hubs
Common on older or budget bikes, freewheel hubs feature a threaded mechanism where the gear cluster (freewheel) screws directly onto the hub. Pros: Simple design, affordable. Cons: Less durable under heavy load; replacing gears requires removing the entire freewheel. Ideal for casual riders or vintage builds but less common in modern cycling.
2. Freehub (Cassette Hubs)
The modern standard for most road, gravel, and mountain bikes. Freehubs have a splined body where the cassette slides on, with bearings housed within the hub. Pros: Stronger, easier maintenance, and compatible with a wide range of cassettes. Cons: Slightly pricier. This design dominates high-performance bikes due to its reliability and ease of upgrades.
3. Fixed Gear Hubs
Used in track bikes or “fixies,” these hubs lack a freewheel mechanism, meaning the pedals move whenever the bike is in motion. Pros: Direct power transfer, lightweight, and low maintenance. Cons: No coasting—requires constant pedaling. Popular among urban riders and velodrome racers seeking simplicity and control.
Choosing Your Hub
Your riding style dictates the best fit:
- Freewheel: Budget-friendly, low-maintenance commuting.
- Freehub: Versatile performance for most disciplines.
- Fixed Gear: Minimalist urban or track use.
Upgrade your ride with precision-engineered hubs from Trifox Bike, offering durability and smooth engagement across all types. Whether chasing speed or mastering city streets, the right hub transforms your bike's potential.
Upgrading from traditional V-brakes to disc brakes is a common question among cyclists seeking better stopping power and control. The answer? Yes, but it depends on your bike’s compatibility and budget. Let’s break down the process, costs, and whether it’s worth the effort.
Key Considerations
1. Frame & Fork Compatibility: Disc brakes require mounts (IS or Post Mount) on your frame and fork. If your bike lacks these, conversion isn’t feasible without costly adapters or replacements.
2. Wheel Compatibility: Disc brakes need hubs with rotor mounts. Your current wheels may not support this, necessitating a new wheelset.
3. Brake Levers: V-brakes use long-pull levers, while mechanical disc brakes (cable-actuated) are compatible. Hydraulic discs require dedicated levers, often meaning a new groupset.
4. Cost: Expect to spend 200
200–500+ for quality disc brakes, rotors, wheels, and labor if DIY isn’t an option.
Steps to Convert
1. Check Compatibility: Inspect your frame, fork, and wheels for disc mounts. No mounts? Consider a new fork/wheelset or stick with V-brakes.
2. Choose Brake Type:
Mechanical Discs: Affordable, easier to install, and compatible with existing levers.
Hydraulic Discs: Superior performance but require new levers and bleeding tools.
3. Upgrade Wheels: Invest in disc-ready hubs. Trifox’s lightweight carbon wheels, for example, offer durability and compatibility for smooth upgrades.
4. Install Brakes & Rotors: Attach calipers, secure rotors, and adjust pad alignment. Test thoroughly before hitting trails!
When Is It Worth It?
- Performance Needs: Disc brakes excel in wet/muddy conditions and on steep descents. If your rides demand reliability, upgrade.
- Future-Proofing: Converting lets you use modern components if you plan to keep the bike long-term.
- Frame Quality: High-end frames justify the cost; cheaper bikes may not.
Alternatives
- Hybrid Systems: Semi-hydraulic (e.g., TRP HY/RD) combines cable levers with hydraulic calipers for a middle-ground solution.
- Optimize V-Brakes: High-quality pads (e.g., Kool-Stop) and compressionless housing can improve existing V-brake performance.
Swapping V-brakes to discs is possible but not always practical. If your frame supports it and you crave all-weather reliability, the upgrade is transformative. For casual riders or incompatible bikes, stick with tuned V-brakes or consider a new disc-equipped bike. Either way, prioritize safety and compatibility—because confident braking is the foundation of every great ride.
If you're eyeing a wheelset or frame upgrade, you’ve likely heard about “Boost” hubs. But is this wider hub standard (110x15mm front, 148x12mm rear) worth the investment?
What is Hub Boost?
Boost spacing increases hub width, allowing for stiffer wheels and better tire clearance. Developed for mountain biking, it enhances control on technical terrain by improving spoke bracing angles and reducing flex.
Benefits of Boost Hubs
Stiffer Wheels: Better power transfer and handling, especially during aggressive cornering or descents.
Wider Tires: Accommodates modern, plus-sized tires (2.6”+), improving traction and comfort.
Future-Proofing: Most new MTB frames and forks prioritize Boost compatibility.
When Do You Need It?
Aggressive Trail/Enduro Riding: If you’re tackling rocky descents or high-speed singletrack, Boost’s stiffness is a game-changer.
Upgrading Your Frame/Fork: Newer models often require Boost hubs. Check compatibility before purchasing.
Running Wide Tires: Boost spacing prevents chainstay rub on larger tires.
Considerations
Cost: Upgrading may require new hubs, wheels, or even a frame. The Trifox M821 offers a durable, lightweight option at a competitive price.
Compatibility: Non-Boost frames won’t fit Boost hubs without adapters (which add weight and complexity).
Riding Style: Casual riders on smooth trails may not notice a difference.
If you're into technical riding or planning a frame upgrade, Boost hubs are worth it. The stiffness and tire clearance benefits shine on rough terrain. For others, it’s a “nice-to-have” but not essential.
Ready to boost your ride? Explore the Trifox M821 Boost Hub—engineered for durability and performance without breaking the bank.


