


On a bicycle, the bottom bracket (BB) may be hidden inside the frame, but it is a critical component that transmits pedalling power.
Many riders upgrade wheelsets, groupsets, or frames, yet overlook the importance of the bottom bracket. When you hear unusual noises, feel rough pedalling, or notice crank play, it is likely time to inspect or replace your BB.
So, how do you know if your bottom bracket needs replacing?
What problems with the bottom bracket indicate replacement is needed?
1. Unusual noises when pedalling
If you hear clicking, creaking, or grinding sounds – especially under heavy pedalling – the BB bearings may be worn.
Of course, noises can also come from pedals, cranks, or the chain, but the bottom bracket is one of the first components to check.
2. Crank rotation feels rough
Normally, the cranks should spin smoothly and freely.
If you notice:
- Resistance when turning
- Gritty or catching sensation in the bearings
- Loss of pedalling smoothness
it suggests the internal bearings may be damaged and replacement should be considered.
3. Crank wobble or play
When you push the cranks sideways and feel noticeable movement, besides loose crank bolts, it could be due to excessive clearance in the BB.
Riding with a worn bottom bracket not only degrades the ride experience but also reduces pedalling efficiency.
Understanding the Bicycle bottom bracket shell is important
Before choosing a new bottom bracket, you need to know your frame's Bicycle bottom bracket shell specification.
Different frames use different BB standards, such as:
- BB68
- BSA threaded
- Press Fit
- BB30
- PF30
Each frame requires a matching bottom bracket; otherwise, installation will not be possible.
Therefore, before purchasing a new BB, confirming your frame's BB specification is essential.
What are the differences between Bottom bracket types?
Currently, Bottom bracket types fall into two main categories.
One is threaded bottom brackets, such as the BSA system – simple to install, easy to maintain, and ideal for long‑term use.
The other is press‑fit bottom brackets, which are lighter and commonly found on high‑performance carbon frames.
Each type has its advantages. The choice depends on your frame design and riding needs.
Is the TRIFOX BB68 Aluminum Bottom Bracket worth choosing?
If your bike uses a BB68‑spec bottom bracket, the TRIFOX BB68 Aluminum Bottom Bracket TRBB68 is a reliable upgrade choice.
The TRBB68 features a high‑quality aluminium alloy shell, combining light weight, durability, and stability – suitable for daily training, long‑distance rides, and performance upgrades.
Key features include:
- BB68 standard design
- High‑strength aluminium alloy shell
- Smooth and durable bearing system
- Improved pedalling efficiency
- Easy installation and maintenance
- Compatible with many road and mountain bike upgrades
A quality bottom bracket reduces energy loss, making every pedal stroke more direct and effective.
How often does a bottom bracket need replacing?
BB lifespan depends on riding conditions and frequency.
If you frequently ride:
- In wet weather
- In muddy conditions
- During high‑intensity training
- On off‑road terrain
the BB will wear faster.
Regular inspection can prevent small issues from developing into major failures.
Conclusion
The bottom bracket may not be the most visible part of a bicycle, but it directly affects pedalling efficiency, ride comfort, and overall performance.
When you hear abnormal noises, feel rough rotation, or notice crank play, it is time to check your BB.
Choosing the correct BB for your frame specification is crucial. For bikes with a BB68 shell, the TRIFOX BB68 Aluminum Bottom Bracket TRBB68 offers a solid structure, durable design, and excellent value – making it an ideal upgrade for enhancing your riding experience.
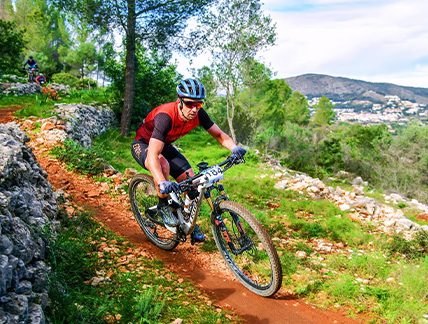
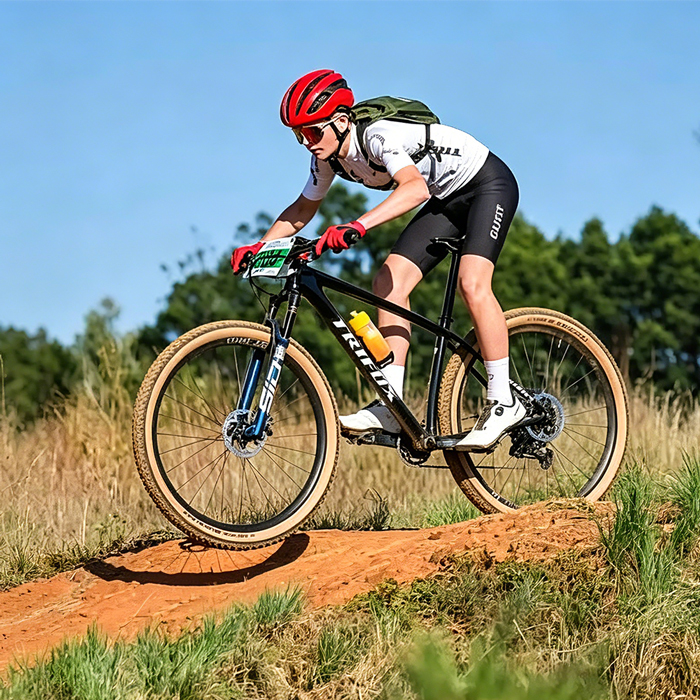
On the trails, you will notice that most mountain bikers maintain a slightly forward-leaning posture. Many beginners may wonder: why can't they sit upright like on a city bike? Is this forward lean really necessary?
In fact, the forward-leaning position in mountain biking is not just for looking "pro" – it is an efficient posture developed through years of riding experience and evolving frame geometry.
Why does mountain biking require a forward lean?
The main purpose of leaning forward is to optimise the rider's centre of gravity.
When climbing, a forward position shifts more weight onto the front wheel, increasing front‑tyre traction and preventing the wheel from lifting as the gradient steepens.
On fast descents or rough terrain, a proper forward lean also helps the rider maintain control, allowing the body to act as part of the suspension system.
This posture brings:
- Better front‑wheel control
- More stable steering response
- More efficient pedalling output
- Improved handling on technical sections
Is the forward-leaning position suitable for all mountain biking?
Although a forward lean has many advantages, it does not mean "the lower, the better".
If the handlebar is too low, it may cause:
- Increased wrist pressure
- Shoulder and back fatigue
- Reduced comfort on long rides
That is why modern mountain bikes place increasing emphasis on ergonomics – using appropriate bar width, rise, and frame geometry to strike a balance between speed and comfort.
The upgrade experience brought by a carbon MTB handlebar
Besides riding posture, the handlebar itself is a critical component that affects handling.
Compared with traditional aluminium bars, carbon handlebars offer better vibration damping, filtering out high‑frequency buzz from gravel and trail chatter, which improves comfort over long distances.
Many XC and trail riders opt for lightweight wide bars, such as 800mm carbon mtb bars, because a wider bar provides greater leverage and control, especially during high‑speed cornering and on rough terrain.
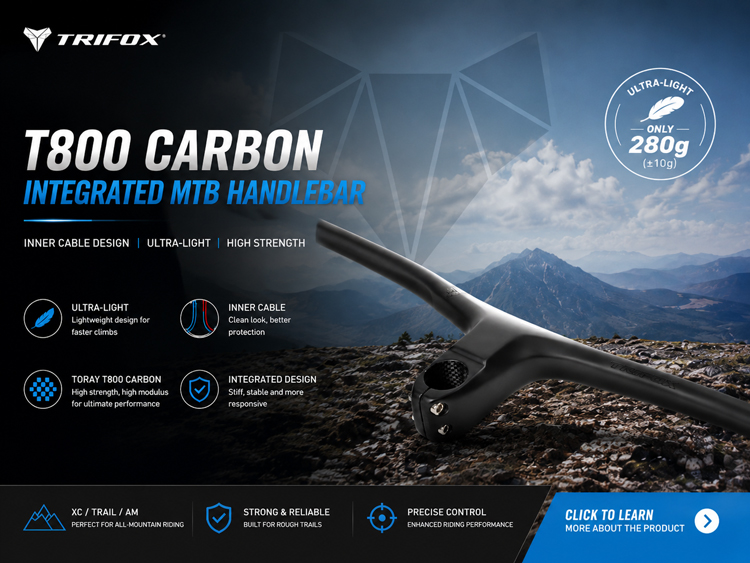
TRIFOX RHB600: Lightweight integrated carbon MTB handlebar
If you are upgrading your mountain bike's cockpit, take a look at the TRIFOX Ultra Light Integrated Full Inner Mountain Bike Handlebar RHB600.
The RHB600 features a carbon fibre integrated design that combines the handlebar and stem into one piece, reducing weight while improving overall stiffness and steering response.
Key features include:
- Ultra‑light carbon construction
- Integrated one‑piece design
- Full internal cable routing for a clean, sleek look
- Wide profile for enhanced handling stability
- Excellent vibration damping for greater ride comfort
For riders chasing lightweight XC builds or high‑performance Trail setups, this handlebar delivers a noticeable upgrade in feel and performance.
Are carbon bars worth it MTB?
Many riders ask: are carbon bars worth it for mountain biking?
The answer depends on your riding needs.
If you only ride occasionally for leisure, aluminium bars are perfectly adequate.
But if you frequently ride XC, Trail, or long‑distance off‑road, the weight savings, vibration damping, and improved handling that carbon bars offer often make them a worthwhile investment.
Conclusion
The forward‑leaning position in mountain biking is not a habit – it is an optimised riding posture. It helps riders improve pedalling efficiency, enhance bike control, and adapt to challenging terrain.
At the same time, choosing the right handlebar is equally important. A lightweight carbon model like the TRIFOX RHB600 Carbon MTB Handlebar further elevates handling feel and ride comfort.
Whether you are a speed‑focused XC rider or a trail enthusiast who loves technical singletrack, a proper riding posture combined with high‑performance components will make every ride more stable and efficient.
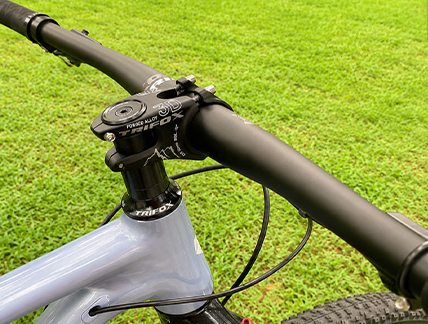
For mountain bikes, the stem may be a small component, but it directly affects riding posture, steering speed, and overall handling. Many riders wonder when upgrading: short stem or long stem – which one suits me better?
There is no absolute answer; it depends on your riding style and frame geometry.
Why does MTB stem length matter?
mtb bike stem length changes the distance between the handlebar and the frame, thus influencing your centre of gravity and handling characteristics.
Generally, a short stem (35–50mm) offers more responsive steering and more direct handling, making it ideal for Trail, Enduro, and technical terrain.
A long stem (70–100mm) increases forward reach, allowing a more stretched pedalling posture, which suits XC riding and long‑distance cruising.
With the evolution of modern mountain bike geometry, more and more brands are adopting shorter stems to achieve more stable and agile handling.
How to choose the right stem for you?
If you enjoy trail riding, jumps, or technical sections, a short stem is recommended – it sharpens steering response and makes the bike easier to control on challenging terrain.
If your riding is mainly XC, endurance, or long‑distance training, a slightly longer stem can provide better pedalling efficiency and riding comfort.
Additionally, pairing with a higher mtb riser stem or a riser handlebar can further improve riding posture, reducing pressure on your back, shoulders, and wrists, making long rides more comfortable.
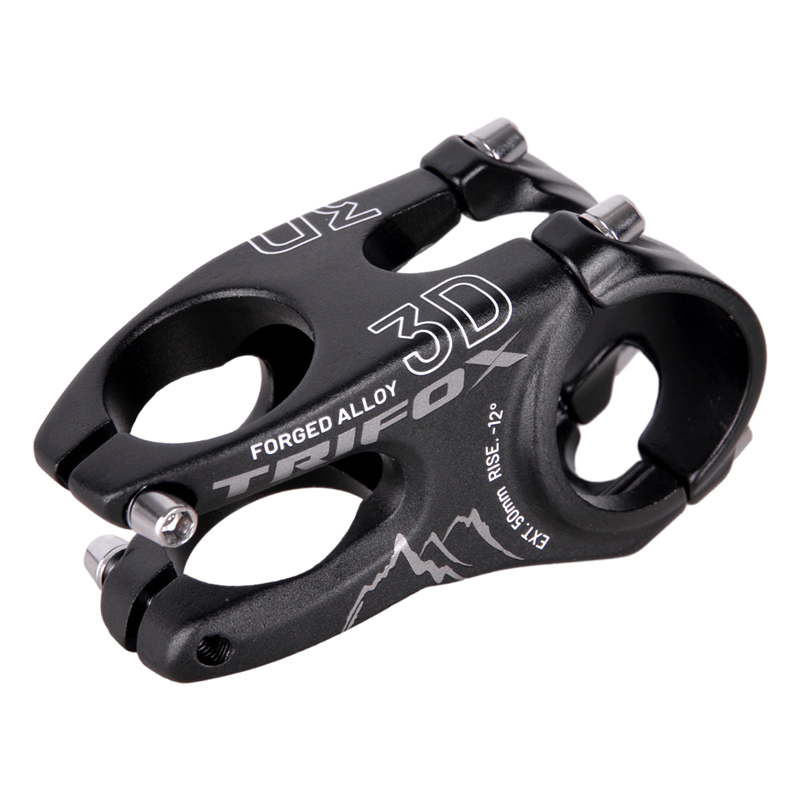
TRIFOX ABS200: A lightweight alloy mountain stem
If you are planning to upgrade your MTB stem, check out the TRIFOX ABS200 Lightweight Alloy Mountain Stem.
The ABS200 is CNC‑machined from high‑strength aluminium alloy, offering excellent rigidity while keeping weight low – ideal for XC, Trail, and everyday off‑road riding.
Key features include:
- Lightweight alloy construction to enhance bike performance.
- Multiple length options to suit different mtb bike stem length needs.
- High‑stiffness design for precise steering.
- Clean aesthetics compatible with most modern mountain bikes.
- Easy installation, perfect for upgrades or custom builds.
Conclusion
There is no absolute winner between short and long stems – each serves different riding needs.
If you prioritise agile handling and technical riding, a short stem is the better choice. If you value pedalling efficiency and long‑distance comfort, a longer stem still holds advantages.
Whatever length you choose, a high‑quality stem can noticeably improve your riding experience. The TRIFOX ABS200 Lightweight Alloy Mountain Stem, with its lightweight design, excellent stiffness, and wide size range, is an ideal upgrade component. It also pairs easily with modern mtb riser stem setups, delivering sharper and more stable handling on every ride.
When upgrading a mountain bike, many riders focus on forks, wheelsets, or frames, but often overlook another component that significantly affects ride quality – the seatpost.
In particular, the 0 Offset MTB Seatpost (straight seatpost) has become increasingly common on XC, Trail, and Downcountry bikes in recent years. So, what makes it special? And who is it best for? Let's dive in.
What is a 0 Offset seatpost?
Seatpost offset refers to the rearward distance from the seatpost centreline to the clamp centre at the top.
Traditional seatposts usually have 15mm, 20mm, or 25mm of setback, while a 0 Offset seatpost has no rearward offset – the saddle sits directly above the centreline, hence the name "straight seatpost".
This design places the rider's centre of gravity further forward, promoting a more efficient pedalling posture and complementing the increasingly steep seat tube angles found on modern XC mountain bikes.
Why are straight seatposts becoming more popular on mountain bikes?
On modern mountain bikes, especially XC and trail models, frame geometry continues to evolve. Paired with a 0 Offset seatpost, riders can achieve a more natural and efficient riding position.
Key benefits include:
- Improved pedalling efficiency
- Better forward weight distribution when climbing
- Increased front‑wheel traction and stability
- More direct acceleration
- Reduced fatigue on long rides
Particularly on technical climbs, a straight seatpost helps prevent the front wheel from lifting, enhancing overall handling – which is why it has become a favourite among XC riders.
What additional advantages does a carbon straight seatpost offer?
Beyond geometry, carbon fibre also enhances the riding experience.
Compared with aluminium seatposts, carbon offers superior vibration damping, absorbing small bumps from trails and gravel for a smoother ride.
At the same time, a lightest carbon seatpost helps reduce overall bike weight, making acceleration, climbing, and long‑distance rides easier – a worthwhile upgrade for any weight‑conscious rider.
TRIFOX Carbon MTB Seatpost: A lightweight upgrade that sheds real grams
If you are looking for a seatpost that balances light weight, comfort, and strength, the TRIFOX Lightweight Straight Carbon MTB Seatpost SLS21 is well worth considering.
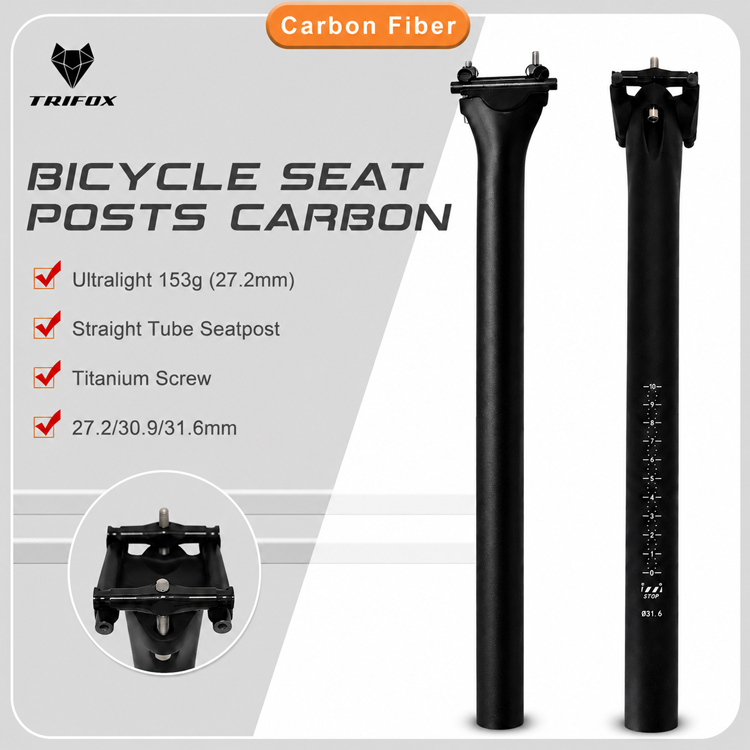
The SLS21 is crafted from high‑quality T800 carbon fibre and features titanium alloy fixing bolts, delivering high strength and durability while significantly reducing weight – making it an ideal upgrade for lightweight XC and Trail builds.
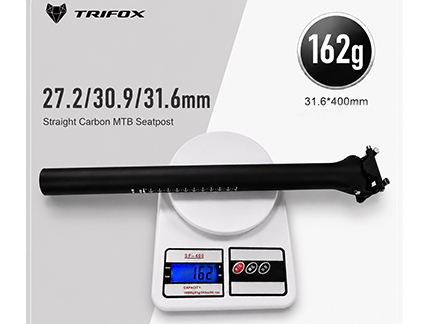
To suit various frame specifications, the TRIFOX SLS21 is available in multiple sizes. Among them, the 27.2×400mm version weighs only about 153g, the 30.8×400mm version about 164g, and the 31.6×400mm version about 162g. Compared with typical aluminium seatposts weighing 250g to 350g, this saves nearly 100g, giving your bike a noticeable weight advantage.
Beyond weight savings, the SLS21 also offers:
- 0 Offset straight design, optimised for modern XC riding posture.
- T800 carbon construction, balancing stiffness and comfort.
- 400mm length to fit a wide range of frames.
- UD matte carbon finish for a clean, classic look.
- Available in 27.2mm, 30.8mm, 30.9mm, and 31.6mm diameters to suit most mountain bike frames on the market.
For riders aiming for the lightest carbon seatpost setup or searching for the best carbon mtb seatpost, the TRIFOX SLS21 delivers outstanding light weight along with comfort, reliability, and great value – an ideal upgrade to boost your bike's overall performance.
Who should choose a 0 Offset seatpost?
0 Offset isn't just for professional racers.
Consider upgrading if you:
- Enjoy XC or Trail riding.
- Frequently tackle climbing routes.
- Want to improve your pedalling posture.
- Aim to reduce overall bike weight.
- Are building or upgrading a carbon mountain bike.
Of course, whether a straight seatpost is right for you also depends on your leg length, flexibility, frame geometry, and bike fit – all of which contribute to getting the best results.
Conclusion
A good seatpost may seem like a small part, but it can significantly affect riding posture, pedalling efficiency, and overall comfort.
For modern XC mountain bikes, the 0 Offset MTB Seatpost has become an increasingly popular choice. Combined with lightweight carbon, it not only improves riding position but also saves weight and boosts comfort, making every pedal stroke more efficient.
If you are looking for a best carbon mtb seatpost that offers light weight, comfort, and reliability, the TRIFOX Lightweight Straight Carbon MTB Seatpost SLS21 deserves a place on your upgrade list. Its ultra‑light weight, multiple size options, and quality carbon construction will help you build a lighter, faster, and more comfortable mountain bike.
A lot of riders get this idea when they want to upgrade their bike: can I put a mountain bike wheelset on my fixie frame?
At first glance, it seems like as long as the wheel size matches, it should work. But actually, compatibility involves a lot more—frame design, hub specs, brake systems, and tire clearance. If you're thinking about swapping wheels, this article will walk you through the fit between fixie frames and MTB wheelsets, and also introduce a solid option: the TRIFOX Alloy MTB Wheelset.
Can It Be Done in Theory?
The short answer is: in most cases, it's not recommended.
While some fixies and mountain bikes both use 29‑inch (700C) wheels, their designs are totally different.
Fixie frames are built for city riding, with:
- Narrow tires
- Single speed drivetrain
- Rim brakes or caliper brakes (no disc mounts)
- Narrow rear fork spacing
MTB wheelsets, on the other hand, need:
- Wider rims
- Wider tires
- Disc brake mounts
- Boost or standard MTB hub spacing
So even if the wheel diameter is close, true compatibility is rare.
Where Do Compatibility Issues Happen Most?
1. Hub Width Differences
This is the most common problem.
Fixie frames usually have 120mm or 130mm rear dropout spacing, while modern MTB wheels use 135mm, 142mm, or even Boost 148mm. If the width doesn't match, the wheel simply won't fit.
2. Brake System Mismatch
Most modern 29er mtb disc wheelset models are designed for disc brakes and need disc brake mounts on the frame. Traditional fixie frames often don't have those mounts, so even if the wheel fits, you won't be able to brake safely.
3. Tire Clearance
MTB wheelsets usually come with tires 2.1–2.4 inches wide or more. Fixie frames can only handle 25C–35C road tires at most. Even if you manage to mount the wheel, the tire will likely rub against the frame.
Is Upgrading to 29‑Inch Wheels Worth It for a Real MTB?
For an actual mountain bike, swapping to a quality wheelset is one of the best ways to improve your ride. A great 29er wheelset mtb can give you:
- Faster acceleration
- Better rollover ability
- More stable handling
- Higher wheel stiffness
- Smoother off‑road riding
Especially for XC, trail, or everyday forest riding, a good wheelset makes a big difference.
Should You Consider the TRIFOX Alloy MTB Wheelset?
If you're looking for a wheelset that balances performance and budget, check out the TRIFOX 29er Alloy MTB Wheelset.
This wheelset is built for modern mountain bikes, suitable for daily training, trail riding, and longer backcountry trips.
Key features:
- 29‑inch wheel size
- High‑strength aluminium rims
- Disc brake compatible
- Good stiffness and durability
- Stable on rough terrain
- Great value and low maintenance cost
For riders on a budget who still want a real performance boost, it's a very practical choice.
Why Are More Riders Choosing Aluminium MTB Wheelsets?
Even though carbon wheels are getting more popular, high‑quality aluminium wheelsets still have a strong following. Compared to carbon, they offer:
- Lower price
- Better impact resistance
- Easier daily maintenance
- Great for training and trail riding
- Cheaper to repair if damaged
That's why many riders see a good aluminium set as the best alloy wheelset mtb for their needs—especially if you're just upgrading your first MTB or want the most bang for your buck.
Final Thoughts
Back to the original question: can you put MTB wheels on a fixie frame?
Technically, because of hub width, brake mounts, frame clearance, and tire size, it's usually not a good idea. Not only is installation difficult, but it can also be unsafe.
If your goal is to boost your mountain bike's performance, getting a proper 29er wheelset mtb is the smarter move. A product like the TRIFOX Alloy MTB Wheelset offers durability, stability, and value—whether you're riding every day or tackling rough trails, it can really improve your bike's performance.
Your handlebar is your primary connection to the trail. It dictates your posture, influences steering precision, and affects how fatigued your hands and arms feel after a long ride. But not all handlebars are created equal. The differences between a cross-country (XC) handlebar and a downhill (DH) handlebar go far beyond aesthetics—they reflect fundamentally different riding styles, terrain, and priorities. Here's what sets them apart and how to choose the right one for your bike.

Rise and Drop: Posture Matters
The most obvious difference between XC and downhill handlebars is the rise. XC handlebars typically have a low or flat rise (0–10mm), placing the rider in a low, aerodynamic position that prioritizes climbing efficiency and pedaling power. A lower front end shifts your weight forward, improving traction on steep climbs and reducing frontal drag.
Downhill handlebars, by contrast, feature a significant rise—often 20–40mm or more. This raises the front end, shifting the rider's weight rearward for better control on steep descents. A higher bar also makes it easier to lift the front wheel over obstacles and provides a more upright, relaxed posture that reduces fatigue on long, rough runs. The RHB200's integrated design offers a -17° stem rise, which is aggressive and race-oriented—perfect for XC and trail riding where efficiency and a forward-leaning position are key.
Width: Stability vs. Maneuverability
Width directly affects leverage and control. XC handlebars are typically narrower, ranging from 680mm to 740mm. A narrower bar reduces frontal area for better aerodynamics and allows for quicker steering inputs—ideal for tight, twisty singletrack where agility matters more than raw stability.
Downhill handlebars are significantly wider, often 760mm to 800mm or more. The extra width provides greater leverage for steering, making it easier to muscle the bike through rock gardens and maintain control at high speeds. It also opens up the chest for better breathing during intense efforts. The RHB200 comes with a maximum length of 800mm, making it versatile enough for both XC and more aggressive trail riding—you can cut it down to suit your preferred width and riding style.
Backsweep and Upsweep: Wrist Comfort and Control
Backsweep (the angle of the bar relative to the stem) affects wrist position and steering feel. XC handlebars often have a moderate backsweep of 6–9 degrees, which keeps the wrists in a neutral, comfortable position for long hours in the saddle. The RHB200 features a 9° backsweep, striking a balance between comfort and control that works well for both XC and trail riding.
Downhill handlebars sometimes have a more pronounced backsweep (9–12 degrees) to accommodate a more aggressive, attack position. Some also include upsweep (a slight upward bend at the ends) to further reduce wrist strain during steep descents. These small angular differences can significantly affect how natural the bar feels under your hands.
Stiffness and Material: Where Carbon Excels
Both XC and downhill riders benefit from carbon fiber's exceptional stiffness-to-weight ratio. However, the demands differ. XC riders prioritize lightweight construction for climbing and acceleration, while downhill riders need maximum stiffness for precise steering under heavy loads. The RHB200 is constructed from T800 carbon fiber, offering a rare combination: it's light enough for XC racing (just 280g for the complete bar and stem assembly) yet stiff enough to handle the demands of aggressive trail riding. The integrated, one-piece design eliminates the bar-stem interface, further increasing front-end stiffness and steering precision.
Integrated Design: The Best of Both Worlds
The Trifox RHB200 is an integrated carbon handlebar that blurs the line between XC and downhill categories. Its -17° stem rise and 9° backsweep make it ideal for riders who want a race-oriented position without sacrificing comfort. Available in stem lengths from 80mm to 110mm and an 800mm width that can be cut down, it offers the adjustability to suit a wide range of riding styles and body types. Whether you're a cross-country racer chasing podiums or a trail rider seeking better control on descents, the RHB200 delivers the stiffness, weight savings, and precision that modern mountain bikers demand.
Which One Is Right for You?
The choice between an XC and downhill handlebar comes down to your riding style and terrain. Choose an XC-oriented bar like the RHB200 (with its low rise and moderate width) if you prioritize climbing efficiency, quick steering, and lightweight performance. Choose a downhill bar if you spend most of your time on steep, technical descents and need maximum stability and control. For the majority of trail riders, a versatile carbon XC handlebar like the RHB200 offers the best of both worlds—light enough to climb, stiff enough to descend, and adjustable enough to fit your unique position. If you're a gravity-focused rider, you might lean toward a wider, higher-rise downhill MTB handlebar to match your aggressive style. Ultimately, the right handlebar is the one that keeps you comfortable, confident, and in control on the trails you love.
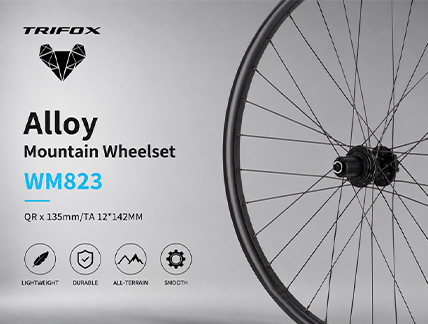
Whether you’re building a new mountain bike from the frame up or simply replacing a worn‑out set of hoops, wheel compatibility is rarely as straightforward as “it’s a 29er.” A modern MTB wheelset must align with your frame’s rear dropout spacing, match your brake rotor mounting standard, and support a tire width that suits your terrain. Overlook any of these three parameters and you risk anything from a subtle rotor rub to a wheelset that simply won’t fit. In this technical deep dive we break down the three pillars of MTB wheel compatibility: the Boost 148 rear hub, the 6‑bolt disc interface, and the 25mm internal rim width. We use the Trifox WM823 bicycle wheel as our reference example because it combines all three modern standards in one durable alloy package.
Hub Spacing: Why Boost 148 Has Become the Norm
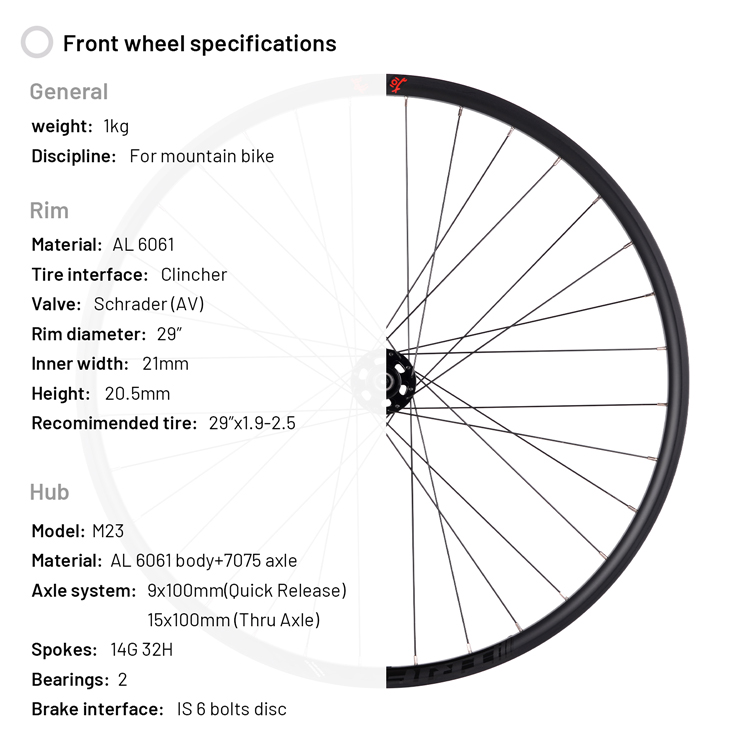
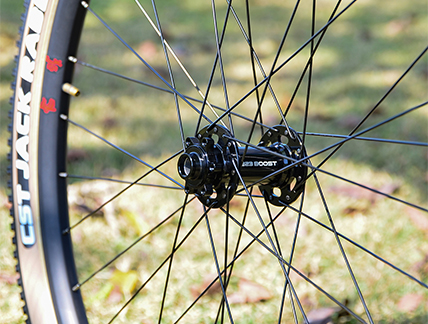
The first and most critical compatibility check is the rear hub’s spacing, today measured by its “Over Locknut Distance“ (OLD). While older mountain bikes used 135mm quick‑release (QR) or 142mm thru‑axle spacing, almost every contemporary trail, enduro and cross‑country frame now requires **Boost 148mm** rear spacing. As the name implies, Boost adds 6mm to the overall hub width—3mm on each side—compared to the older 142mm standard. That seemingly small increase has a big mechanical benefit: it pushes the hub flanges farther apart, which allows the spokes to form a wider bracing angle. The result is a significantly stiffer, stronger rear wheel without adding extra material weight. According to early industry data, a 29˝ wheel built around a 148mm Boost hub achieves the same lateral stiffness as a smaller 27.5˝ wheel with a 142mm hub. Stiffer wheels track more accurately, resist flex under hard cornering and improve pedaling efficiency—exactly what you want on aggressive singletrack. The WM823 hub is built specifically for the **Boost 148x12mm** rear standard (front: 15x110mm), making it a perfect match for any modern hardtail or full‑suspension frame. The WM823’s rear axle attachment is a **thru‑axle**, which further increases stiffness by threading directly into the frame dropout rather than relying on a QR skewer. And if you are currently riding an older QR frame, the WM823 includes optional end caps that convert it to a 9x100mm (front) and 10x141mm (rear) QR, a versatile feature not found on many competing wheelsets.
Rotor Mount: 6‑Bolt Remains the Trail‑Ready Choice
The second major interface is the disc rotor mount. Two standards dominate the MTB world: the traditional **6‑bolt (ISO)** pattern and Shimano’s proprietary **Center Lock** system. While both work perfectly well, each has trade‑offs that affect the mountain bike rider. Center Lock rotors are secured by a single lockring, which makes wheel installation and removal marginally faster, especially on the side of the trail. However, 6‑bolt rotors are far more common (especially at replacement time), generally slightly lighter, and easier to repair on the trail because no special tool is needed to remove a stuck lockring. The WM823 uses a **6‑bolt disc interface**, a choice that aligns perfectly with the demands of cross‑country and all‑mountain riding. The six bolts distribute clamping force evenly around the rotor, and repair is simple: you only need a 5‑mm hex key and an appropriately sized rotor—both can be found at almost any bike shop. The WM823’s braking system also accepts both Shimano and SRAM rotors (and most other brands), so you are never locked into a single component ecosystem.
Rim Width & Tire Compatibility: Matching Tire Profile to Trail
The third compatibility dimension is rim width, which determines how a tire sits once inflated. Too narrow a rim for a given tire will “lightbulb” the tire, rounding the tread contact patch and reducing grip. Too wide a rim can make the tire feel overly square, risking burping on low‑pressure setups. The industry standard for a **29er MTB wheelset** riding 2.2–2.4 inch tires is an internal rim width in the 25–30mm range. The WM823 hits right in the sweet spot with a **25mm internal width** and a **30mm external width**. This profile is engineered to support tires from 1.9 inches (for fast‑rolling XC rubber) up to 2.5 inches (for aggressive trail tread). The low 25mm rim depth further helps you run lower pressures without the risk of rim dings because the tire has a stable, broad platform to rest on. Lower pressure means more traction, better small‑bump compliance, and a much more forgiving ride over roots and rocks—all without adding appreciable weight. The WM823’s alloy rims are tubeless‑ready clinchers, making the switch to tubeless sealant simple and reliable.
Putting It All Together: Building a Compatible MTB Wheelset
Choosing a wheelset that aligns on all three dimensions—Boost spacing, 6‑bolt rotor mount and a modern internal rim width—eliminates most compatibility headaches before they arise. The Trifox WM823 mtb wheelset 29 was conceived as a turn‑key solution for today’s frames: a 148x12mm rear hub, a 15x110mm front hub, a 6‑bolt rotor interface, and a durable 25mm internal rim. The wheelset includes stainless steel Pillar spokes, 32 holes per wheel, and ceramic bearings. Each wheelset is backed by a two‑year warranty and supports rider weights up to 125 kg (275 lb). Ultimately, when you check the three compatibility boxes properly, you stop worrying about spec sheets and start enjoying a ride that is stiffer, more responsive and more capable wherever the trail leads.
When you invest in a new frame, you’re not just buying today’s ride feel. You’re buying into a platform that should remain relevant, serviceable, and upgradeable for years to come. The Trifox SDY20 carbon hardtail frame is built around three key industry standards that together deliver a compelling long-term value proposition: Boost 148mm rear spacing, the Universal Derailleur Hanger (UDH), and a threaded BSA 73mm bottom bracket. Here’s why this combination makes the SDY20 one of the smartest best budget mountain bike frame investments you can make.
Boost 148mm: The Modern Stiffness Standard
The SDY20 is a true boost frame mtb, featuring Boost 148x12mm rear spacing. This wider hub standard (148mm vs. the older 142mm) was introduced to address the specific demands of 29-inch wheels. By widening the hub flanges, Boost allows for a stiffer, stronger rear wheel through improved spoke bracing angles. On the trail, this translates directly to more precise handling, better tracking through corners, and less wheel flex under hard pedaling or braking. Crucially, Boost has become the overwhelming standard for modern mountain bikes. Choosing a Boost frame means your wheelset choices are virtually unlimited, and you’re aligned with the direction the entire industry has taken, ensuring compatibility for years to come.
UDH: The Gateway to Future Drivetrains
One of the most forward-thinking features of the SDY20 is its Universal Derailleur Hanger (UDH). This isn’t just a hanger; it’s a platform. The UDH is the mandatory interface for SRAM’s revolutionary T-Type Eagle Transmission drivetrains, which mount directly to the frame without a traditional hanger for unmatched durability and shift performance. By owning a UDH frame, you’ve already removed the single biggest barrier to upgrading to this next-generation drivetrain technology. However, the beauty of UDH is that it’s also fully backwards compatible. It works perfectly with all standard derailleurs from SRAM, Shimano, and other brands, making it the most universally compatible hanger on the market. This future-proofing ensures your frame won’t be left behind as drivetrain technology evolves.
BSA 73mm: The Paragon of Reliability
While the industry has experimented with various press-fit bottom bracket standards, the SDY20 stays true to the tried-and-true threaded BSA 73mm bottom bracket. This decision is a direct benefit to the long-term owner. A threaded BSA bottom bracket is famously creak-free, easy to service with simple tools, and provides a rock-solid, reliable interface for your crankset. Unlike press-fit shells, which can develop annoying creaks over time due to frame tolerances, a BSA shell is a simple, robust system that any home mechanic can maintain. This long-term reliability is a cornerstone of a smart investment.
Synergy: A Platform Built for the Long Haul
The true genius of the SDY20 lies in how these three standards work together. The Boost spacing allows for a stiff, responsive rear end. The UDH future-proofs your drivetrain compatibility. The BSA bottom bracket ensures your bike’s core will remain quiet and reliable. All of this is wrapped in an ultra-light T1000 carbon fiber frame that is designed to be a long-term companion for your riding journey. Whether you are a cross-country racer, a trail enthusiast, or a rider looking for the best budget mountain bike frame, the SDY20 delivers a performance and value proposition that is designed to last. It’s an investment in a modern platform that will grow with you, not one you’ll outgrow.
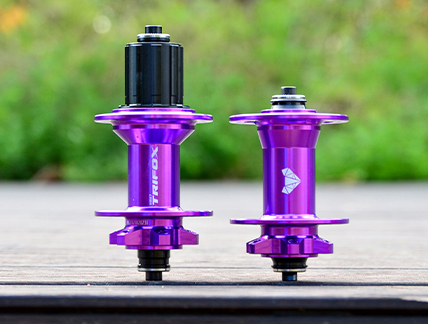
In the world of cycling, the pursuit of lightness has become an obsession. We weigh every component, chase gram savings, and celebrate the lightest frames, wheels, and parts. But when it comes to mountain biking—especially components like hubs that endure tremendous forces—the mantra “lighter is better” can lead you astray. A hub that sacrifices durability, engagement speed, or reliability for a few grams is not an upgrade; it’s a liability. Here’s why a robust, well-engineered hub like the Trifox M827 is often a smarter choice than the lightest option on the market.
The Hidden Cost of Ultra-Light Hubs
To achieve extremely low weights, some hub manufacturers use thinner flanges, smaller bearings, or less material in the freehub body. While these hubs may look impressive on a scale, they often compromise on durability. Thin flanges can crack under the stress of hard landings or repeated impacts. Undersized bearings wear out faster and are more prone to developing play. And a lightweight freehub body can suffer from cassette bite (where the cassette digs into the soft aluminum) or even strip under high torque.
The Trifox M827 durable bike hub takes a different approach. It’s constructed from machined 6061 aluminum alloy bodies and 7075 aluminum axles and freehub bodies—materials chosen for their excellent strength-to-weight ratio, not just low weight. The result is a hub that is still impressively light (front: 165g, rear: 314g) but built to withstand the rigors of trail, all-mountain, and even enduro riding.

Engagement Speed Matters More Than a Few Grams
When you’re powering over a rocky climb or sprinting out of a corner, instant power transfer is far more valuable than saving 20 grams. The M827 features a 6-pawl, 72-point engagement system with just 5 degrees of rotation between engagement points. This means the hub responds almost instantly when you put down power. An ultra-light hub with a slow-engaging mechanism (e.g., 10-15 degrees of rotation) will feel vague and unresponsive, no matter how light it is. For mountain biking, reliable and fast engagement is a performance feature that outweighs minor weight savings.
Durability Is the Ultimate Weight Saving
A hub that fails on the trail can end your ride, damage your frame, or even cause injury. A durable hub that you install and forget about is, in the long run, the lightest hub of all—because you never have to carry spare parts or walk out of the woods. The M827’s four sealed cartridge bearings in the rear (two in the front) provide smooth rolling and long service life. The robust pawl design and heat-treated freehub body resist wear and tear. This isn’t a hub that needs constant maintenance or early replacement.
The Real-World Trade-Off
Yes, you can find hubs that are 50-100 grams lighter than the M827. But those hubs often come with trade-offs: lower rider weight limits, shorter bearing life, or less reliable engagement. For most riders—from XC racers to aggressive trail riders—the M827 offers the perfect balance. It’s light enough to build a responsive wheelset, but it’s engineered to take abuse and keep rolling. The peace of mind that comes from a durable, high-engagement hub is worth far more than a few grams saved on a spec sheet.
The Verdict
When shopping for a mountain bike hub, don’t be seduced by the lowest number on a scale. Consider engagement speed, bearing quality, material strength, and overall reliability. The Trifox M827 delivers on all fronts: fast 6-pawl/72-point engagement, durable 6061/7075 aluminum construction, sealed bearings, and convertible axle options for future‑proofing. It’s a hub that proves “lighter” isn’t always “better”—what’s better is a component that performs when you need it most, season after season.


