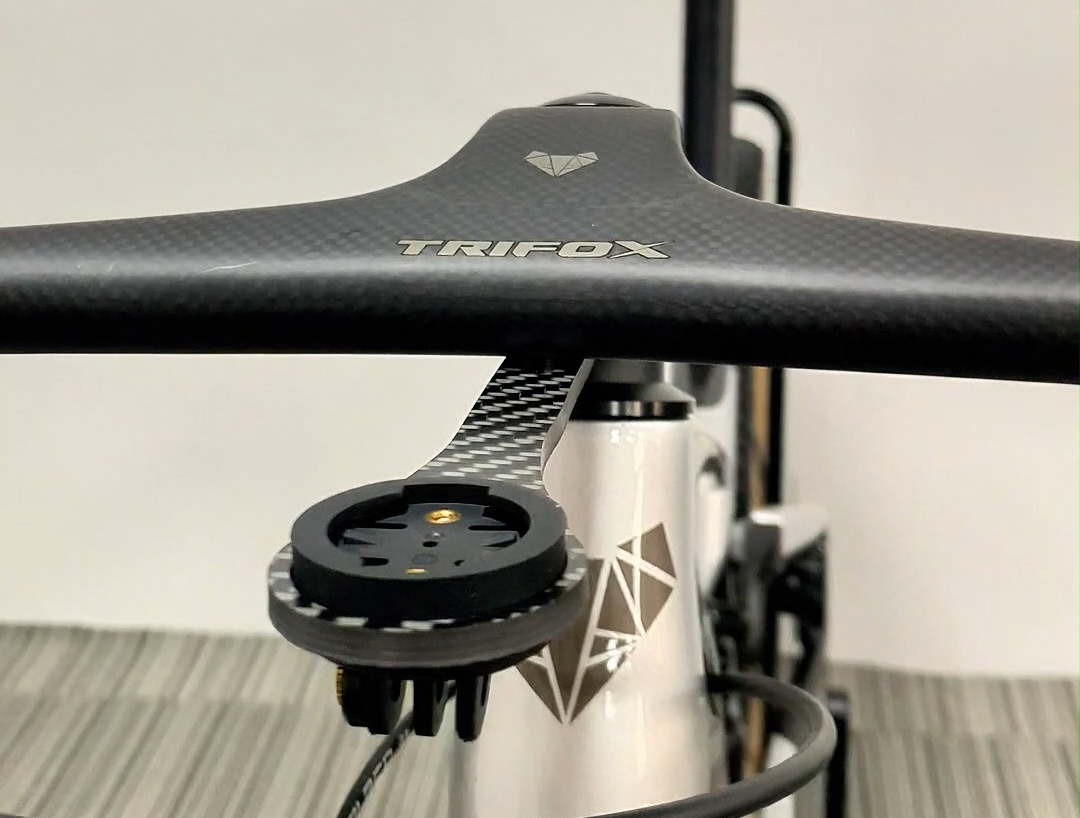
As technology continues to evolve, cyclists are finding new ways to integrate smart devices into their rides. Whether you're a casual rider, a competitive racer, or a weekend adventurer, smart tech has revolutionized the way we track performance, navigate routes, and stay connected while on the bike. However, the more devices we use, the more cluttered and cumbersome our handlebars can become. Bulky mounts, messy cables, and additional weight can detract from the sleek, aerodynamic design of your bike and even interfere with your riding comfort. That's where the Integrated Handlebar Computer Mount comes into play, offering a streamlined solution that merges cutting-edge technology with minimalist design. The Trifox Carbon Bike Computer Mount SBH100 is a prime example of this innovative approach. This high-quality mount combines a durable carbon fiber construction with a sleek, aerodynamic design that integrates directly into your handlebars. Instead of relying on traditional mounts that sit awkwardly atop the handlebars or protrude outward, the SBH100 provides a seamless solution by placing your computer at the center of your handlebars, reducing drag and keeping your setup looking clean and professional. Benefits of the Integrated Handlebar Computer Mount 1. Sleek Design & Reduced Clutter The primary benefit of an integrated mount is its ability to eliminate clutter. With the Trifox SBH100, your bike’s handlebars will no longer be weighed down by bulky, unsightly attachments. The mount sits flush with your handlebars, offering a clean, minimalist look that complements the overall design of your bike. By eliminating excess parts, you’ll have more space on your handlebars for gloves, lights, and other accessories without the worry of interference. 2. Improved Aerodynamics Aerodynamics is key for performance cyclists and racers looking to shave off every second. A traditional bike computer mount can cause unwanted drag, slowing you down and affecting your overall speed. The Trifox carbon fiber design ensures that the mount does not disrupt airflow, making it an ideal solution for those who prioritize speed and efficiency. By integrating the mount directly into your handlebars, the setup offers better airflow, reducing wind resistance and helping you achieve your best performance. 3. Stability & Security Nothing is more frustrating than having your bike computer wobble or shift during a ride, especially on bumpy roads or off-road trails. The Trifox SBH100 mount is designed to hold your computer securely in place, no matter the terrain. Its robust carbon fiber construction ensures that your device stays stable even through rough conditions. This is particularly important for cyclists who rely on their computer for tracking speed, heart rate, navigation, and other critical data points. 4. Better Visibility & Ergonomics The position of your bike computer can make a big difference in terms of visibility and comfort. With the Trifox SBH100, your device is placed directly at the center of your handlebars, offering better visibility without having to take your eyes off the road. This ergonomic positioning reduces strain on your neck and eyes, allowing you to focus on your ride without unnecessary distractions. Whether you’re navigating tight corners or keeping an eye on your performance metrics, the integrated mount ensures your device is right where you need it. 5. Universal Compatibility The Trifox SBH100 is designed with versatility in mind. It is compatible with a wide range of bike computers, including popular models from Garmin, Wahoo, and others. Whether you’re using a GPS navigation device or a fitness tracker, this mount can accommodate a variety of cycling computers, providing flexibility as you upgrade or switch devices over time. This universal fit ensures that you don’t need to worry about compatibility issues when investing in the mount. Why Choose Carbon Fiber? The choice of material for the SBH100 mount is a key factor in its performance and durability. Carbon fiber is known for its strength, lightness, and resistance to wear and tear, making it an ideal choice for high-performance cycling components. Carbon fiber is also highly durable, meaning the mount can withstand the harsh conditions of long-distance rides, off-road biking, and intense racing. Plus, its lightweight properties ensure that it won’t add unnecessary weight to your bike, helping you maintain optimal performance. A Smarter Ride Starts with Smart Tech The integration of smart technology into cycling gear has brought about a host of benefits, from enhanced performance tracking to better navigation. The Trifox SBH100 Integrated Handlebar Computer Mount is designed to complement this tech, offering a seamless, efficient, and aerodynamic solution for mounting your bike computer. Whether you’re training for a race, exploring new trails, or simply tracking your ride for fun, the mount ensures that you stay connected to your device without compromising on style or performance. By choosing the Trifox SBH100, you're not just investing in a mount – you're upgrading your entire cycling experience. Streamline your setup, reduce clutter, and improve your performance with this sleek, high-tech accessory that brings smart cycling into the future. Ready to make your ride smarter? The Trifox Carbon Bike Computer Mount SBH100 is the perfect solution for anyone looking to streamline their bike setup and enhance their performance with the latest in cycling technology. Check it out today and experience the difference it can make on your next ride.
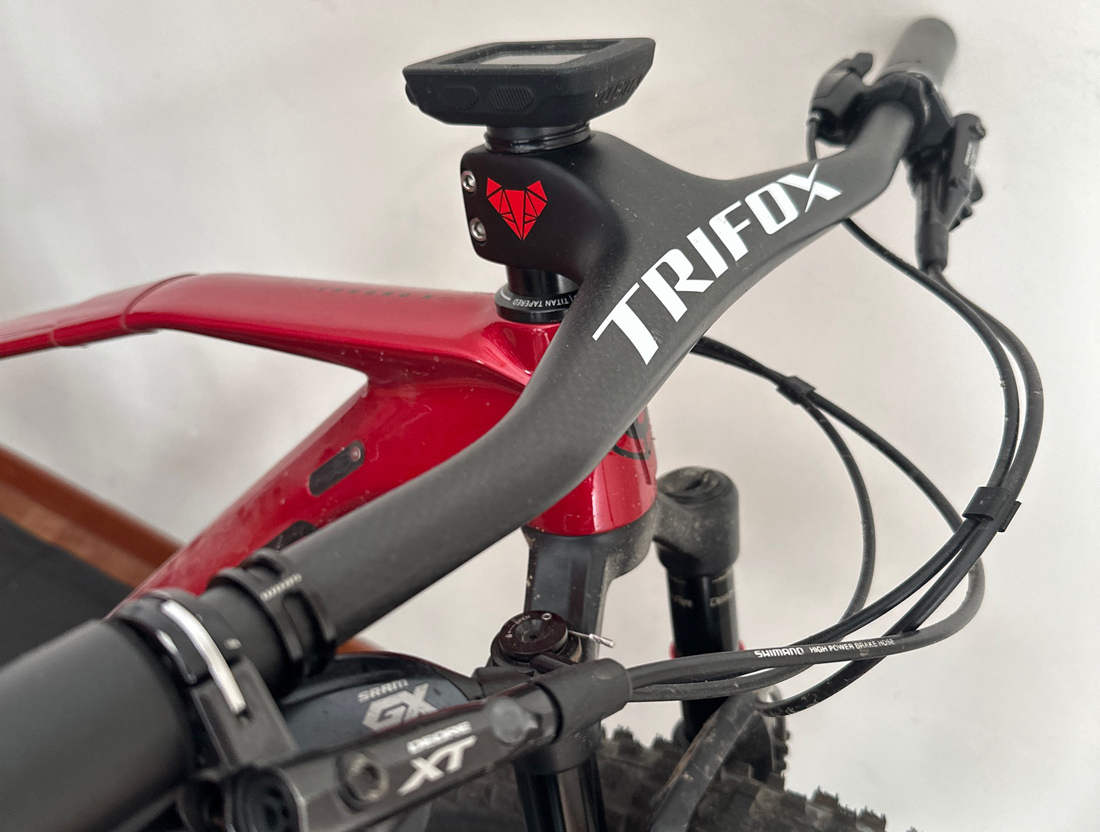
When it comes to enhancing your cycling performance, the handlebar is one of the most important components to consider. Not only does it affect your riding posture and comfort, but it also plays a crucial role in the overall handling and control of your bike. For athletes and enthusiasts looking to fine-tune their ride, choosing the right sports bike handlebar is essential. Trifox’s range of carbon bike handlebars provides the perfect balance of performance, comfort, and durability, making it easier to find a handlebar that suits your riding style. Understanding Handlebar Types There isn't a one-size-fits-all handlebar for sports bikes. The right choice depends on factors like your riding discipline, body type, and personal preferences. Here are the key types of handlebars to consider: 1. Flat Bars: Ideal for mountain biking or urban riding, flat bars provide excellent control and stability on rough terrain. These handlebars are typically lightweight and offer a neutral riding position that helps reduce strain on the back and wrists. 2. Riser Bars: Offering a higher position than flat bars, riser handlebars are great for those looking to improve control on technical trails. They provide better handling and can reduce stress on the rider’s arms and shoulders, making them ideal for aggressive riders or those tackling more challenging trails. 3. Drop Bars: Common on road bikes, drop bars allow for multiple hand positions, providing comfort and aerodynamic advantages during long-distance rides. These handlebars are perfect for riders who want to improve their speed and efficiency while maintaining control. 4. Aero Bars: Designed for triathlons and time trials, aero handlebars offer an aggressive, aerodynamic position to maximize speed and minimize drag. The Trifox Carbon Advantage When it comes to materials, carbon fiber handlebars are a top choice for serious riders. Carbon handlebars are known for their lightweight properties and exceptional strength-to-weight ratio, making them ideal for performance-driven cyclists. Trifox carbon handlebars are engineered with precision, providing stiffness where it’s needed most and absorbing road vibrations for a smoother ride. Trifox's carbon handlebars are designed to reduce fatigue, allowing you to ride longer with less discomfort. The ergonomic design ensures that your wrists, shoulders, and elbows stay comfortable, even on longer rides or rough terrain. These handlebars are not only light but also incredibly durable, able to withstand the rigors of competitive cycling. Comfort and Performance Combined Ultimately, the perfect sports bike handlebar is one that aligns with your riding style and ensures both comfort and performance. Whether you’re looking for better control on mountain trails or aiming for speed on the open road, the right handlebar can make a significant difference. Trifox’s carbon bike handlebars provide superior performance while reducing fatigue and increasing comfort, making them an excellent choice for riders seeking to elevate their cycling experience. Choosing the right handlebar doesn’t have to be complicated. With Trifox’s expertise and range of handlebars tailored for different cycling disciplines, finding the perfect fit has never been easier. Ready to upgrade your bike? The right handlebar could be the game-changer you’ve been looking for.
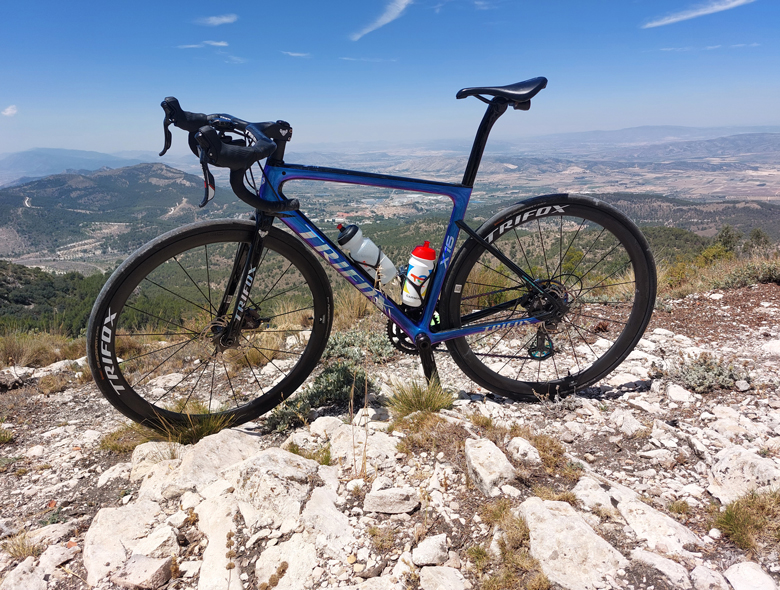
When it comes to mountain biking, having the right wheels can make all the difference. While high-end wheels often come with a hefty price tag, you don't have to break the bank to get a set that delivers excellent performance on the trails. The Trifox MTB Wheels offer a great balance of affordability, durability, and performance, making them the perfect choice for riders on a budget who still demand quality. Why Wheel Quality Matters Wheels are one of the most crucial components of any mountain bike. They determine how well your bike handles different terrains, how quickly you accelerate, and how smoothly you glide over rough ground. Lightweight and strong wheels are essential for optimal performance, especially when navigating rocky trails or steep descents. But finding a quality set that won’t drain your wallet is often a challenge. Budget-Friendly Without Compromise Trifox has made it their mission to offer budget MTB wheels that don’t skimp on quality. Designed with riders in mind, these wheels offer durability, lightness, and responsiveness at an affordable price. Whether you’re just starting out or looking to upgrade your current setup without spending a fortune, Trifox has several options that won’t disappoint. The Trifox T22 MTB Wheels are an excellent choice for those who want a reliable and versatile wheelset that performs well across various terrains. Made with aluminum rims and designed to be strong yet lightweight, they offer great stiffness and control, allowing you to tackle everything from technical trails to downhill sections. The tubeless-ready design helps reduce weight and improve traction, providing a smoother and faster ride while keeping punctures at bay. These wheels are a solid option for riders who prioritize durability but want to keep costs down. For those who want a more performance-oriented wheelset without splurging on high-end carbon options, the Trifox T24 Carbon MTB Wheels offer the perfect compromise. The carbon fiber rims provide the strength and stiffness necessary for aggressive riding, while their lightweight design enhances acceleration and climbing ability. These wheels are also tubeless-ready, ensuring better traction and reduced rolling resistance. The T24 wheels offer incredible value for riders who want the benefits of carbon at a budget-friendly price. If you're on a tight budget but still want wheels that can handle rough terrain, the Trifox T26 MTB Wheels are an excellent choice. These wheels come with strong aluminum rims that offer excellent durability without sacrificing too much weight. The double-wall construction ensures added strength and protection against impact, making them perfect for trail riders who often find themselves riding over rocks, roots, and other obstacles. They also feature sealed hubs, which reduce maintenance and provide smooth, reliable performance in various conditions. What to Look for in Budget MTB Wheels When choosing budget-friendly MTB wheels, there are a few important factors to keep in mind to ensure you're getting the best value for your money: Durability: Budget wheels need to be able to withstand the wear and tear of rough trails. Look for wheels with reinforced rims, solid spokes, and sealed hubs. Weight: Lighter wheels improve acceleration and reduce fatigue, but they need to be durable as well. Aim for a balance of lightness and strength. Tubeless Compatibility: Tubeless-ready wheels offer numerous benefits, including reduced rolling resistance, better grip, and fewer flats. Look for wheels that are compatible with tubeless tires for added performance. Hub Quality: The hub is the heart of your wheelset, so it’s important to choose wheels with reliable, smooth-rolling hubs. Sealed hubs are a good option, as they require less maintenance and offer better protection from dirt and moisture. Final Thoughts You don't have to spend a fortune to upgrade your mountain bike wheels. Trifox offers several excellent budget-friendly MTB wheelsets that deliver impressive performance on the trails. Whether you’re a beginner looking to improve your bike’s handling or an experienced rider seeking a cost-effective upgrade, Trifox MTB wheels are a great option. With the right combination of durability, performance, and value, you can ride confidently without breaking the bank. Ready to hit the trails with new wheels? Trifox has you covered.
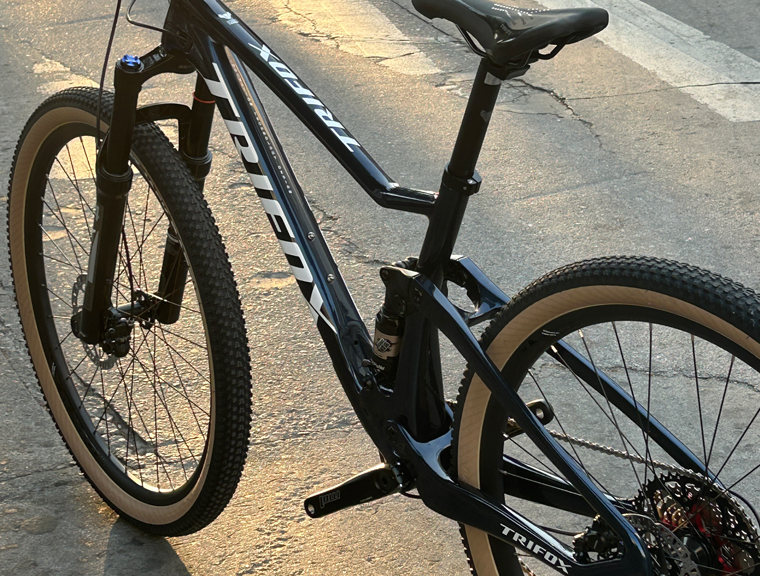
Finding the perfect bike that suits every type of ride is no easy feat, but the Trifox Complete Bike strikes the ideal balance between versatility, performance, and comfort. Designed for riders who need a bike that can handle a variety of conditions, the Trifox Complete Bike offers a seamless transition from city roads to rugged trails and everything in between. Whether you're an avid commuter, weekend trail rider, or someone who enjoys the occasional adventure, this bike has you covered. One of the key features of the Trifox Complete Bike is its versatility. Built with a flexible geometry that accommodates various riding styles, it allows you to easily switch between road biking, mountain biking, or even light touring. The durable aluminum or carbon frame is lightweight yet strong, providing excellent responsiveness and durability. The bike's design ensures that you can tackle everything from urban streets to bumpy trails with confidence, making it ideal for riders who crave diversity in their cycling experiences. When it comes to performance, the Trifox Complete Bike is equipped with high-quality components that ensure smooth, precise shifts, whether you're climbing steep hills or cruising downhill. With responsive braking systems and a reliable drivetrain, you’ll experience an uninterrupted ride, no matter the terrain. Its adaptable tires, available in multiple sizes, provide enhanced grip and stability, giving you the confidence to ride on a variety of surfaces. But it's not just about performance—it's also about comfort. The Trifox Complete Bike is designed with ergonomics in mind, offering features such as a comfortable saddle, adjustable handlebars, and shock-absorbing forks for a smoother ride over uneven surfaces. This ensures that long rides are as enjoyable as short ones, reducing fatigue and allowing you to focus on the experience rather than discomfort. Whether you're looking to explore new trails, commute efficiently, or simply enjoy a weekend ride, the Trifox Complete Bike offers the ideal combination of versatility, performance, and comfort. Ready to ride anywhere? The all-round bike from Trifox is your perfect companion.
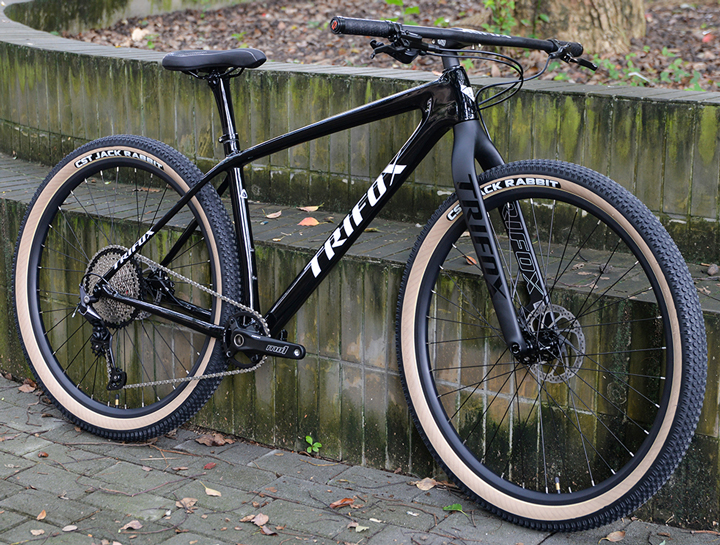
When it comes to cycling, weight matters. The lighter your bike, the faster, more agile, and efficient your ride. Enter the Trifox SDY20, a superlight bike designed for riders who crave speed, precision, and peak performance. Crafted with cutting-edge technology and materials, this bike offers the ultimate combination of lightweight design and top-tier performance features. The SDY20 is built with a carbon fiber frame, reducing weight without compromising on strength or durability. This design ensures maximum power transfer with minimal effort, so you can conquer steep climbs and reach top speeds on the flat. Whether you're sprinting down a winding road or tackling a challenging trail, the SDY20's responsiveness gives you complete control. Its aero design further enhances speed by reducing drag, while the advanced suspension system guarantees comfort and stability across various terrains. Additionally, the SDY20 comes equipped with high-quality components that ensure smooth shifting, precise braking, and long-lasting reliability. If you're a cyclist looking to push your limits and experience the thrill of unmatched agility and performance, the Trifox SDY20 is your perfect ride. It's not just a superlight bike – it's the future of cycling.
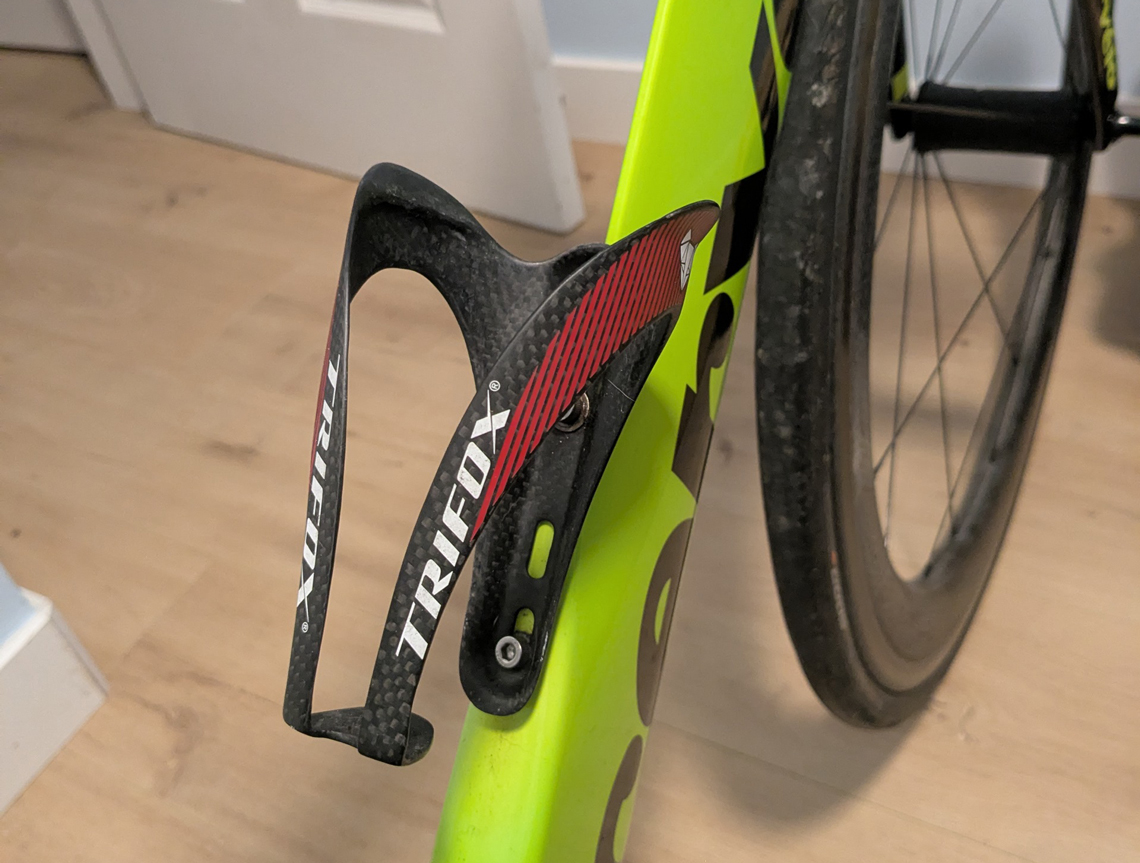
When it comes to building the perfect bike, every detail matters—especially when it comes to reducing weight and enhancing durability. One often-overlooked component in this equation is the water bottle cage. While it may seem like a minor accessory, the material and design of your water bottle cage can significantly impact your bike’s overall performance. That’s where carbon water bottle cages come into play. 1. Unmatched Weight Reduction When it comes to competitive cycling, weight reduction is crucial, whether you're a professional racer or a recreational rider seeking peak performance. Every gram counts, especially on long climbs or when you're sprinting for the finish line. Carbon fiber is known for its strength-to-weight ratio, meaning it is extremely light without sacrificing structural integrity. A carbon water bottle cage is typically much lighter than traditional aluminum or plastic cages. For example, the Trifox carbon bike water bottle cage weighs significantly less than its aluminum counterparts, providing a noticeable weight reduction on your bike. This reduction in weight translates directly to a more responsive, faster ride. Even small components like the water bottle cage can make a significant impact when you're aiming to shave off grams. By choosing a carbon cage, you're optimizing your bike’s performance without compromising on strength or utility. 2. Superior Durability and Strength While reducing weight is important, durability and strength are equally crucial, especially for cyclists who ride in rough conditions. Carbon fiber offers incredible durability, making it perfect for cycling accessories that need to withstand the elements. Carbon water bottle cages are highly resistant to impacts, UV rays, and environmental wear. Unlike plastic cages, which can crack or break easily, carbon cages retain their shape and function even in harsh conditions. Whether you're navigating rocky terrain, enduring rough weather, or encountering accidents on the trail, a carbon cage will stand the test of time without failing. Additionally, carbon water bottle cages are known for maintaining their integrity over long periods, unlike plastic or metal cages, which can weaken with extended exposure to sunlight or repeated use. The carbon material’s durability ensures that your bottle cage performs as well on day 100 of use as it did on day one. 3. Sleek, Aesthetic Appeal Carbon fiber isn't just about performance—it also provides a sleek, modern look that appeals to many cyclists. Its unique texture and finish make it an ideal aesthetic match for high-performance bikes, especially for those who care about both functionality and style. The Trifox carbon water bottle cage, for example, combines performance with elegance. The lightweight carbon frame gives the bike a sleek, sophisticated look that complements your high-end setup. Carbon’s glossy or matte finish is a perfect match for high-end carbon frames, creating a seamless, professional appearance. Beyond looks, the design of carbon water bottle cages is typically aerodynamically optimized, further contributing to the overall efficiency of your bike. This aerodynamic advantage is a subtle yet valuable feature, reducing drag while you ride at higher speeds. 4. Tighter Fit and Easier Access Another advantage of carbon water bottle cages is the ability to design a more precise and snug fit for your water bottle. Since carbon is a highly moldable material, manufacturers can design water bottle cages that perfectly contour to the shape of the bottle, ensuring it stays securely in place while riding. This feature can be especially beneficial for mountain bikers or cyclists riding on rough terrain where bumps could otherwise dislodge a poorly fitted bottle. In addition to securing the bottle, carbon cages often offer easier access. The lightweight, stiff nature of carbon allows for a design that doesn’t impede quick bottle removal or insertion, which is essential for competitive cyclists or anyone who needs to hydrate quickly during a ride. 5. Enhanced Vibration Damping One less-discussed advantage of carbon fiber is its ability to absorb vibrations. While this feature is typically associated with carbon frames and handlebars, it also applies to carbon water bottle cages. The natural vibration damping properties of carbon help reduce the road or trail noise that passes through the bike, making for a more comfortable ride overall. This is particularly useful on rougher terrain, where vibrations from the ground can be harsh, and cyclists often experience hand fatigue or discomfort. By absorbing some of these vibrations, a carbon water bottle cage can contribute to a smoother, more enjoyable ride, especially on long-distance rides or technical trails. While it may not be as significant as the vibration dampening provided by a full carbon frame, it’s a nice added benefit to your overall biking experience. 6. Eco-Friendly and Long-Lasting In today's environmentally-conscious world, sustainability plays an important role in product selection. Carbon fiber, although not as easily recyclable as aluminum or plastic, is extremely durable and long-lasting, reducing the frequency of replacements and contributing to less waste in the long run. When you invest in a carbon water bottle cage, you're investing in a product that can last for many years, reducing the need for frequent replacements that would otherwise end up in a landfill. Conclusion The carbon water bottle cage is the ideal choice for cyclists who want to achieve a balance between weight reduction, durability, and performance. With its incredibly low weight, strength, sleek design, and added comfort, it's the perfect accessory for any serious rider looking to maximize their bike's potential. Whether you're a competitive racer, a weekend warrior, or someone who values high-quality gear, the Trifox carbon bike water bottle cage offers the durability, lightness, and style you need for the ultimate cycling experience. So, make the switch to carbon, and let your bike perform at its absolute best while staying hydrated on those long rides.
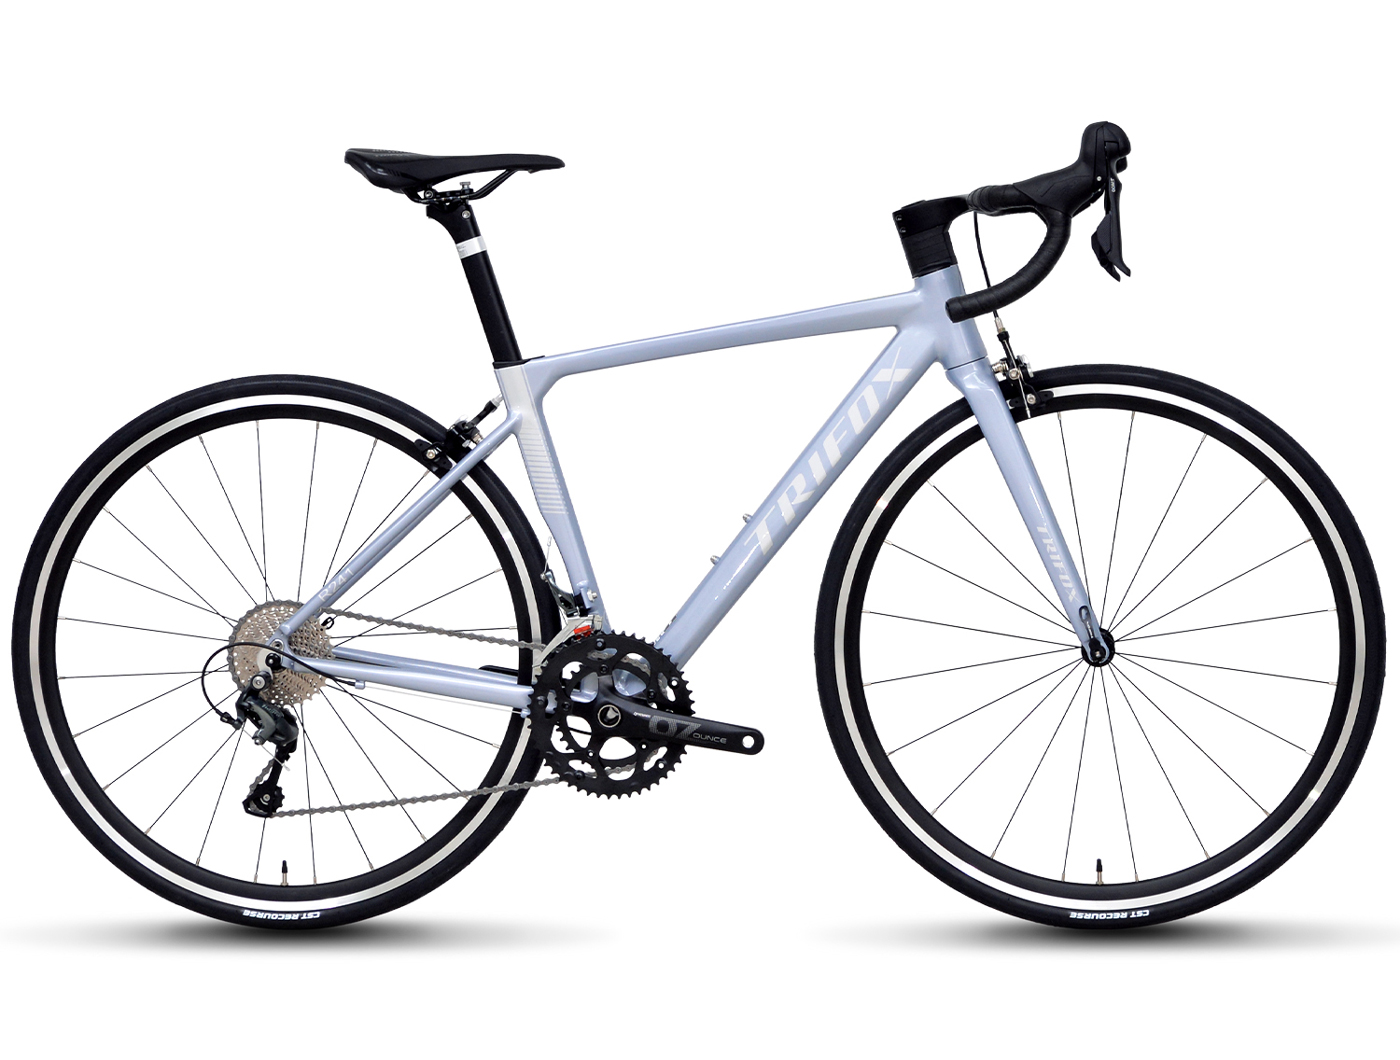
When it comes to cycling, the right bike can make a world of difference. Whether you're a seasoned cyclist or just getting started, choosing the right materials and design can elevate your performance and enjoyment on the road. One such bike option gaining traction among enthusiasts is the aluminium aero road bike. If you're in the market for a high-performance bike that offers a balance of speed, durability, and affordability, this could be the perfect choice for your next cycling adventure. But what exactly makes aluminium aero road bikes such a great option? Let’s break it down. 1. Aerodynamic Efficiency Aerodynamics play a pivotal role in road cycling, especially if you’re looking to boost your speed and reduce fatigue over long distances. The “aero” design of these bikes is not just a cosmetic feature – it’s all about reducing wind resistance. Aluminium aero road bikes are built with sleek, aerodynamic frames that cut through the air more efficiently, allowing you to maintain higher speeds with less effort. The shape of the frame, handlebars, and even the wheels are all designed to minimize drag, giving you a noticeable advantage when racing or pushing your limits. If you're cycling on long stretches of road or tackling challenging climbs, the aerodynamic benefits of an aluminium aero road bike can make your ride smoother and faster, helping you get the most out of your energy. 2. Lightweight Yet Strong Aluminium is widely recognized for its excellent strength-to-weight ratio. When compared to other materials like steel or titanium, aluminium offers the perfect balance between durability and lightweight construction. A lighter bike allows for faster acceleration and better maneuverability, which can be particularly important in competitive settings or on more challenging terrains. Unlike heavier steel frames that can feel cumbersome, an aluminium frame provides the rigidity and strength needed for a responsive and stable ride while keeping the overall weight down. This makes the aluminium aero road bike a top choice for cyclists who want to shave off seconds during a race or simply enjoy an effortless ride on hilly or winding roads. 3. Affordability and Durability While high-end carbon fiber bikes can cost a small fortune, aluminium aero road bikes offer exceptional value without compromising on performance. For cyclists on a budget or those who are new to the sport, aluminium bikes provide a more affordable entry point without sacrificing key features like speed and durability. Moreover, aluminium is incredibly durable and resistant to corrosion. While it may not have the same level of shock absorption as carbon fiber, it provides a solid and sturdy feel on the road, offering long-lasting reliability. This makes aluminium aero bikes an excellent choice for cyclists who want a bike that will stand up to regular use over the years, regardless of weather conditions or road surface types. 4. Versatility for Various Terrains One of the unique advantages of the aluminium aero road bike is its versatility. Many models, like the [Trifox 700c Aluminum Alloy Aero Gravel Road Bike], are designed to handle not just smooth paved roads but also gravel and more rugged terrain. This means you can take your bike on a variety of cycling adventures – whether you're racing down a smooth highway or exploring off-road trails. The ability to take your bike off-road adds a layer of flexibility to your cycling experience, allowing you to explore new routes without worrying about your bike’s capability to handle different types of surfaces. 5. Modern Design and Technology Aluminium aero road bikes come with modern design elements that enhance comfort, performance, and overall ride quality. Innovations in frame geometry and componentry ensure that you’ll have a bike that handles well and is equipped with advanced technology to suit your cycling needs. Whether it's through internal cable routing for a clean look or disc brakes for enhanced stopping power in all conditions, these bikes come ready to meet the demands of both casual riders and competitive athletes alike. Final Thoughts An aluminium aero road bike offers the perfect blend of aerodynamic efficiency, lightweight design, affordability, and durability. With the ability to tackle both road and gravel paths, and a host of modern features that cater to different cycling needs, it’s no wonder that this type of bike is becoming a go-to choice for cycling enthusiasts. Whether you're preparing for your next big cycling adventure or just looking to upgrade your current setup, the aluminium aero road bike is a worthy investment that promises performance, versatility, and value.
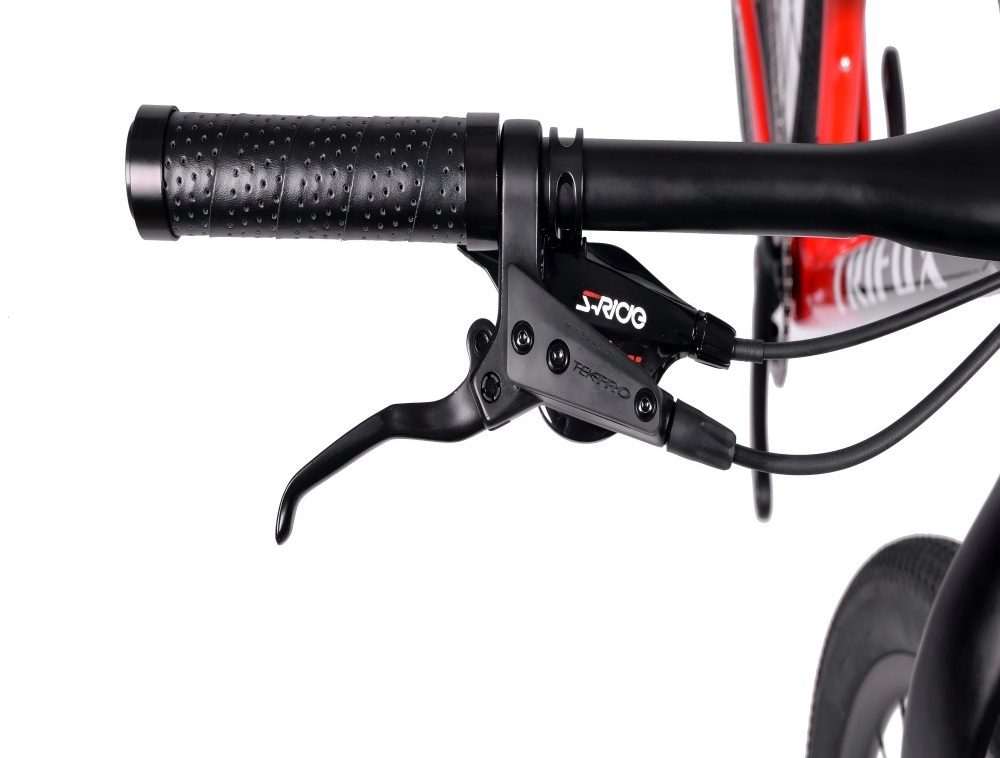
When tackling rough, rugged terrain on your mountain bike (MTB), control and comfort are paramount. The key to maintaining both lies in the often-overlooked component of your bike: the MTB grips. While they may seem like a small detail, the right grips can significantly enhance your riding experience, particularly when navigating challenging trails, rocky paths, and steep inclines. 1. Improved Grip and Stability One of the primary functions of MTB grips is to offer a secure hold on the handlebars, especially in rough conditions. When you're riding on uneven trails, your hands can easily slip if your grips aren't designed to provide enough traction. This can be dangerous, particularly when riding downhill or over obstacles, as a lack of control can lead to accidents. The Trifox MTB Handlebar Grip (MBT100), for example, is specifically designed to provide a non-slip surface that allows you to maintain a firm grip in all weather conditions, whether it’s wet, dry, or muddy. The textured surface and ergonomic design of these grips reduce the chances of your hands sliding, helping you stay in control even during the most aggressive rides. 2. Enhanced Comfort for Long Rides Riding on rough terrain can be physically demanding, and if your grips are too thin or hard, they can cause hand fatigue and discomfort. Over time, the constant vibrations from bumps, rocks, and roots can lead to numbness or soreness in your hands and wrists. This is where the right MTB grips come in—designed with padding or vibration-damping materials, they can absorb much of the shock, making long rides much more comfortable. Grips like the Trifox MTB Grips feature soft rubber compounds and ergonomic shapes that distribute pressure evenly across your palms and fingers. This cushioning effect reduces the vibrations that travel up your arms, minimizing hand fatigue and discomfort, and allowing you to ride longer without feeling the effects of rough terrain. With proper MTB grips, you can enjoy greater comfort and focus on your ride, not on the pain in your hands. 3. Increased Control Over Technical Sections On technical trails, where sharp turns, drops, and obstacles are common, the ability to control your bike is crucial. Grips with a solid, ergonomic design give you greater leverage and precision when navigating tight corners, steep descents, and obstacles like rocks and roots. When your hands are comfortable and securely positioned, you can apply better force to the handlebars, improving your control over the bike. The Trifox MTB Grips (MBT100) are designed with a dual-density grip pattern, ensuring a high level of traction without being overly aggressive, which allows for smooth handling of technical sections while maintaining comfort. This enhanced control is particularly valuable when riding in areas with loose gravel or mud, where stability is essential for safe, efficient riding. 4. Reduced Hand Fatigue with Ergonomic Features In addition to cushioning and vibration dampening, many MTB grips incorporate ergonomic features that target specific areas of the hand, such as the palm and the thumb. By contoured designs or soft ridges that fit the natural shape of your hand, these grips reduce pressure on key areas, leading to less fatigue over long rides. This is especially important when riding on rough terrain, where you need to maintain a strong grip without tiring quickly. The Trifox MTB Grips are ergonomically shaped to fit the contours of your hands, ensuring that even on the most technical trails, you can maintain a comfortable grip. Their thoughtful design also allows for natural hand movements, so you won’t have to overexert yourself to keep a steady hold on the bars. 5. Better Shock Absorption for Rough Terrain As you navigate rough terrain, the shocks from bumps and jumps can reverberate through your bike’s frame, sending vibrations directly into your hands and arms. MTB grips designed with shock-absorbing materials can mitigate these impacts, ensuring a smoother ride. Foam or gel inserts, for example, can cushion these shocks and reduce the vibrations that could otherwise lead to discomfort or long-term injury. With the Trifox MTB Grips, the high-quality material composition and shock-absorbing properties help reduce the impact of trail obstacles on your hands and wrists, providing additional comfort and control. This feature is particularly helpful on longer rides, where continuous vibrations could otherwise wear you down. 6. Customization for a Personalized Ride MTB grips come in a variety of shapes, sizes, and materials, which means you can find a pair that suits your personal riding style and comfort needs. Whether you prefer thicker grips for more cushioning or thinner ones for better feedback, customizing your grips allows you to tailor your bike setup to your preferences. Additionally, grips come in different colors and designs, so you can choose a set that matches your bike’s aesthetics. The Trifox MTB Grips offer several options for riders to personalize their setup, allowing for maximum comfort and a performance-oriented design that fits your needs on the trail. With a wide range of designs and materials to choose from, you can find the perfect grips to complement your mountain biking style. When riding on rough terrain, MTB grips play a crucial role in ensuring that you maintain control, comfort, and performance. With the right grips, you can improve your handling, reduce hand fatigue, and ride longer and harder without sacrificing comfort. The Trifox MTB Handlebar Grip (MBT100) is a perfect example of how quality grips can enhance your experience on technical trails, providing excellent traction, shock absorption, and ergonomic comfort. If you're looking to take your mountain biking to the next level, investing in high-quality MTB grips is a smart choice. They might seem like a small detail, but the difference they can make to your control, comfort, and overall performance is anything but insignificant. Choose the right grips, and you’ll be ready to conquer any trail that comes your way.
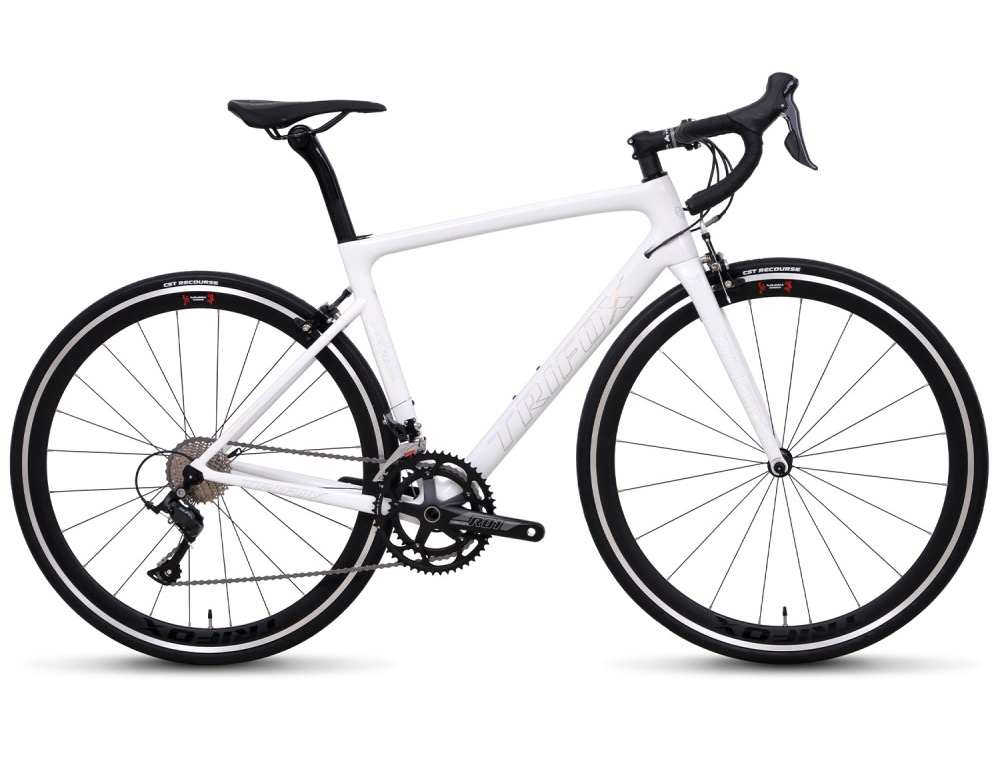
In the world of competitive cycling, performance is everything. Every gram matters, every fraction of a second counts, and the equipment you ride on can make all the difference between winning and losing. For competitive cyclists, a carbon ultra-light road bike is often the ultimate choice. But why is carbon so highly regarded in the cycling community, and why do so many elite riders choose it for their races and training? 1. Lightweight Design for Faster Speeds One of the biggest advantages of a carbon ultra-light road bike is its incredibly low weight. Weight is a critical factor in competitive cycling, especially when it comes to climbing hills, accelerating, and maintaining high speeds over long distances. Carbon fiber, being one of the lightest yet strongest materials, allows bike manufacturers to create frames that are significantly lighter than those made from traditional materials like aluminum or steel. The Trifox Carbon Fiber Ultra Light Road Bicycle is an excellent example of this, as it boasts a super-lightweight carbon frame that ensures minimal drag while maximizing performance. A lighter bike means you expend less energy to propel it forward, allowing you to ride faster for longer periods. Whether you're attacking a steep incline or sprinting for the finish line, every gram saved can make a noticeable difference. 2. Increased Stiffness and Power Transfer While lightness is important, stiffness is equally crucial for competitive cyclists. Carbon fiber frames are known for their superior stiffness compared to aluminum or steel frames. This stiffness translates into better power transfer from the rider’s legs to the bike, meaning more of your energy goes into propelling the bike forward instead of being absorbed by the frame. This is especially beneficial for sprinters or time-trialists, where every ounce of power matters. With the Trifox 700c Carbon Fiber Ultra Light Road Bicycle, the frame’s design ensures optimal stiffness while still maintaining some degree of flexibility for comfort. This balance results in a responsive ride that maximizes energy output without sacrificing rider comfort, allowing competitive cyclists to push harder without feeling fatigued. 3. Superior Vibration Damping for Comfort Another reason competitive cyclists choose carbon fiber bikes is the material’s ability to dampen vibrations. The carbon frame naturally absorbs road vibrations, providing a smoother ride compared to other materials. This feature is especially beneficial for long-distance races or rides where fatigue can set in due to the constant pounding from uneven roads or rough terrain. The Trifox Carbon Fiber Ultra Light Road Bicycle incorporates carbon’s vibration-damping properties, helping reduce the impact of road imperfections on the rider's body. By minimizing the vibrations transmitted through the frame, carbon bikes reduce muscle fatigue and discomfort, allowing cyclists to maintain better performance throughout long events like marathons or multi-stage races. 4. Aerodynamic Efficiency In competitive cycling, aerodynamics plays a key role in determining overall performance, particularly when riding at high speeds or in time trials. Carbon fiber frames are designed to optimize aerodynamics, as the material can be molded into aerodynamic shapes that reduce drag and improve efficiency. The Trifox 700c Carbon Fiber Ultra Light Road Bicycle has been engineered with an aerodynamic frame that helps minimize wind resistance, allowing the cyclist to conserve energy while riding at top speeds. The frame’s sleek design helps you cut through the air with less effort, which is crucial during high-speed sprints or when riding into headwinds. 5. Durability and Performance Over Time Despite being light and stiff, carbon fiber is also incredibly durable. Competitive cyclists demand bikes that can withstand the rigors of racing and training without sacrificing performance. Carbon frames are resistant to corrosion and can handle the stresses of high-speed rides, whether on smooth tarmac or rough mountain roads. The Trifox Carbon Fiber Ultra Light Road Bicycle is built to endure the demands of competitive cycling, ensuring that riders don’t have to worry about their bike losing performance or structural integrity over time. With proper care and maintenance, a carbon bike can last for many years, making it a wise long-term investment for serious cyclists. 6. Cutting-Edge Technology and Innovation Carbon fiber is also the material of choice for bike manufacturers looking to push the boundaries of technology and innovation. Over the years, advancements in carbon construction have allowed manufacturers to create lighter, stronger, and more aerodynamic frames, offering cyclists an edge in races and competitions. These advancements often result in bikes that are not only faster but also more comfortable, efficient, and responsive than ever before. The Trifox 700c Carbon Fiber Ultra Light Road Bicycle exemplifies this innovation. Its frame incorporates the latest carbon technologies, ensuring that cyclists get the most advanced features available, giving them a significant advantage over the competition. For competitive cyclists, every detail counts. The carbon ultra-light road bike is the ultimate choice because it combines lightness, rigidity, comfort, and aerodynamics to offer a competitive edge. Bikes like the Trifox 700c Carbon Fiber Ultra Light Road Bicycle allow cyclists to ride faster, climb more efficiently, and maintain peak performance over long distances. Whether you’re racing in a time trial, attacking a hill, or sprinting to the finish line, a carbon ultra-light road bike provides the speed, comfort, and performance needed to succeed. If you're serious about your cycling performance and looking for an upgrade, a carbon ultra-light road bike is the way to go. With its proven advantages, it’s no wonder that carbon bikes are the preferred choice for elite riders worldwide.


